GameBrief · General
Gambonanza Tips: Crumble Mode, Reserve, and Gambits

Reviewing
Gambonanza
Blukulélé
Run 3 is when gambonanza tips actually become useful. Runs 1 and 2, you're learning that the win condition isn't chess: capturing the king doesn't end anything, every piece on the board matters, and losing your best piece early costs you the run. By run 3, you're asking why you keep stalling out and what the counter in the top corner actually does.
These gambonanza tips cover what the game almost never explains directly: the Crumble Mode counter, the reserve as a positioning system, and which Gambits are safe to pick versus which ones require a specific plan to pay off.
TL;DR: Gambonanza is a chess roguelike where the win condition isn't chess: capturing the king ends nothing, every piece matters, and losing your best piece early can sink the run. The counter in the top corner is Crumble Mode, so learn what triggers it before you stall out around run 3. Treat the reserve as a positioning tool, time deployments deliberately, and lean on Economic gambits, which pay off in almost every run.
Key takeaways
- Win by capturing all enemy pieces: king capture alone does nothing
- Crumble Mode's 3/3 counter forces a capture every 3 moves or the board starts shrinking from the edges
- The reserve holds pieces off-board so you can deploy them at the exact moment a position opens
- Economic Gambits (gold-on-capture) are reliable for any run; reserve-interaction Gambits need a deployment plan
- Max Piece expansion ($25) is the most important shop purchase once your build direction is clear
Gambonanza tips overview
These gambonanza tips target runs 3-15: players past the tutorial wall who keep hitting Stage 3 or Stage 4 and want to understand the decision structure underneath the board.
Gambonanza launched May 1, 2026 from Blukulélé, published by Sidekick Publishing and Stray Fawn Publishing. The current review score is Mostly Positive (~75% positive across 1,100+ reviews). The board starts at 5×5 in early stages (smaller than standard chess), scales across 5 stages, and ends each stage with a boss. There are 150+ Gambits in the pool, a reserve column on each side of the board for off-board piece storage, and a shop between stages where you spend coin on upgrades and tile effects.
GODEEPER: For the full breakdown of Gambonanza's score system, boss encounters, and Gambit categories, the review covers all of it. Gambonanza Review →
Understanding Crumble Mode: the 3/3 counter
The small counter in the corner that reads something like "0/3" is the Crumble Mode indicator. Here's exactly what it does:
Every move you make that doesn't result in capturing an enemy piece increments the counter by one. When it hits 3/3, the board degrades: outer tiles crumble away from the edges, shrinking the play area and cutting off coverage you needed. Any capture resets the counter to 0/3.
In practical terms: you have three moves to make a capture before the board turns hostile.
At 0/3 and 1/3, maneuver freely. At 2/3, a capture needs to happen on the next move, or you need a clear path to one on the move after. At 3/3 reached without a capture, you're not dead yet: but the shrinking board eliminates captures you needed further into the position.
The mistake players make early is reading this as a death timer. It isn't. You won't lose immediately from the board crumbling. You lose because the reduced play space eliminates the capture lines you relied on two moves later. The real damage is positional, not immediate.
When you're at 2/3 with no clean capture visible, find any capture. A pawn taken suboptimally is better than hitting 3/3 in a position where you needed that square's coverage. The Crumble Mode counter rewards aggression even when the board isn't set up for the move you actually want.
 Caption: Crumble Mode at 2/3: the suboptimal bishop capture resets the counter before the board degrades, buying time to set up the real fork.
Reserve system: when to hold pieces off-board
The reserve columns run on the left and right sides of the board. Pieces stored in reserve are off the board: the enemy can't capture them, they don't take turns, and they don't contribute to captures until you deploy them.
The reserve is not defensive storage: it's a positioning tool you use before a position exists.
Standard chess has all pieces always in play. In Gambonanza, holding a piece in reserve costs nothing per turn: but it also means that piece isn't making captures, which feeds into Crumble Mode. The trade-off is time vs position: a piece in reserve is waiting for the exact right moment to land where it needs to be.
The canonical example: hold a knight off-board and wait for an enemy to step into a fork position. The instant that square opens, deploy the knight from reserve directly into the fork. If the knight was on the board in a different position, you'd spend two or three turns repositioning: and every move costs Crumble Mode counter ticks. From reserve, you skip the repositioning entirely.
Bishops waiting for diagonal lanes to clear and rooks waiting for file openings follow the same logic. The reserve removes the cost of being in the wrong place.
What doesn't work: holding most of your pieces in reserve because you're unsure where to put them. A board with few active pieces generates few captures per turn, which means the Crumble Mode counter climbs faster. The reserve creates targeted waiting, not general hesitation.
Step-by-step: building through a Gambonanza run
Step-by-step: applying these in your run
In Stages 1 and 2, the Gambits you pick define the run's architecture. An Economic Gambit (pawns generating gold on capture) commits you to a shop-sustain path: fewer urgent capture lines, more coin flowing into upgrades. A movement Gambit extending queen range commits you to queen-forward play. Taking Gambits that pull in opposite directions during the first two stages usually means neither path develops cleanly.
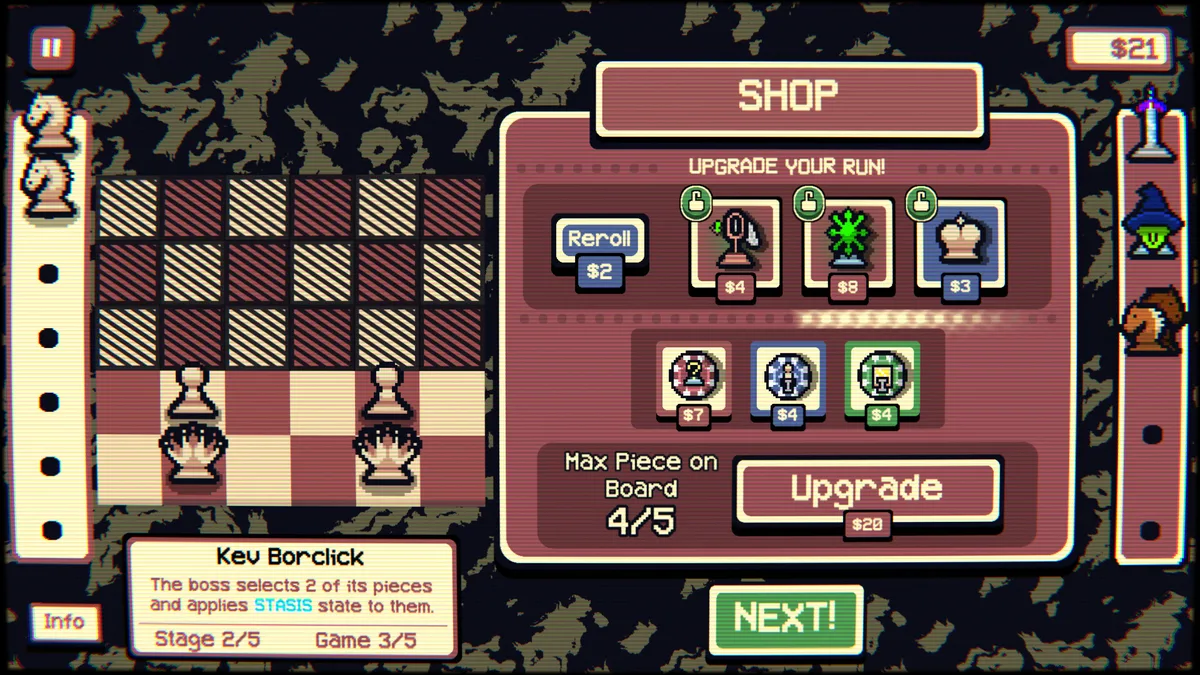
Before you spend coin in any shop, look at the boss preview. Kev Borclick at Stage 2 applies STASIS to two of his own pieces per turn, which modifies their movement. If you're building toward rook-based capture lanes and the boss freezes his rooks, the lanes you paid for won't generate captures. The boss ability is shown before you spend. Read it first.
By Stage 3, your unlocked items (roughly 60-90 of 200 at this point) will show a cluster. Three of your Gambits are reserve-interaction types? That's a signal: lean into it. Make deployment decisions based on the combination you've built rather than falling back on default chess instincts.
When a run is going badly: a $2 reroll in the shop before taking a Gambit that doesn't fit your direction is almost always worth it. Two misaligned Gambits taken out of desperation are harder to recover from than a missed opportunity.
Economy and shop priorities
The coin budget in Gambonanza runs tight through most of a run. The spend order that consistently works: Max Piece expansion ($25) first, piece upgrades ($3-5) second, rerolls last.
The Max Piece expansion is worth $25 because more pieces on the board means more capture options per turn: and more captures means less Crumble Mode pressure. Buy it as soon as your build direction is clear, before spending on piece upgrades. A highly upgraded piece on a thin board still starves you of captures.
For piece upgrades, spend on pieces central to your build. Queen upgrades are the safe default. Queens are the strongest baseline piece type: Gambit builds centered on other pieces can outperform a queen-forward run in specific combinations, but when your Gambit sequence hasn't clarified anything, queen upgrades don't waste coin.
Rerolls at $2 are for when the current offerings actively conflict with what you're building. One reroll to check the next pool is correct. Chaining rerolls hunting for a specific Gambit is usually too expensive and usually fails anyway.
Ghost tiles, gold tiles, and blessing tiles are powerful in builds that interact with them. In anything else, skip them: they're coin you needed for something else.
GODEEPER: For a different take on how short-session roguelikes handle economy and build direction, the Die in the Dungeon Tips guide covers the dice-builder version of the same decision: when to invest now vs. hold currency for later rounds.
Gambits that change how you play
Not all 150+ Gambits are created equal at the beginning of a run. Three categories are worth knowing before you start making selections:
Economic Gambits convert specific pieces (typically pawns) into gold-generating units on capture. These are the beginner-safe picks because they work in any run: you're not committing to a positioning strategy, just adding coin-on-capture. Take one in the first Gambit selection if you're not sure which direction the run should go. The coin sustain makes future shop visits less punishing.
Clone Gambits duplicate pieces on specific tile types. These interact heavily with the reserve system: you can clone pieces you deploy from reserve, doubling coverage on critical capture turns. The ceiling is high in Stage 4 and Stage 5 when boards are larger and capture chains become possible that would be absurd on a 5×5 board. These require planning. Don't take a Clone Gambit in Stage 1 if you haven't built a deployment plan.
Reserve-Interaction Gambits modify how pieces behave on the turn they're deployed from reserve: sometimes adding a first-capture bonus, sometimes changing movement on deployment turn. High ceiling, narrow use case. These are for runs where the reserve deployment rhythm is already working. Taking one early when you're still learning the reserve timing is putting the tool before the skill.
 Caption: Gambit selection mid-run: the Economic option is reliable for any build direction; the movement modifiers are worthwhile only if the current run is already queen-forward.
Gambonanza tips for extended runs
The Collection screen is worth checking between runs: not just to see what you've unlocked, but to see what you haven't. The 200-item collection across six categories (Gambits, Pieces, Tiles, Enemy Modifiers, Bosses, Strains) shows locked slots as chained black squares. That pattern tells you which Gambit directions you've never run. Deliberately trying paths you've avoided is how the collection fills past 100 items. Running the same queen-forward approach every time hits a wall around hour ten regardless of skill level.
Boss abilities also change the optimal shop spend in ways the game expects you to notice. Every boss has a documented ability visible in the shop before Stage entry: Kev Borclick's STASIS at Stage 2 is the first example you'll hit. Build your spend around the ability's implication. A boss that freezes pieces makes mobile builds less effective. One that multiplies pieces on death makes capture-chain builds more valuable. Reading the boss before spending is a habit worth forming early.
One thing that's annoying: community reports document roughly 7-second gacha animations and 15-second boss introduction cutscenes, neither currently skippable. At ten or more runs per session, these add up. It's on Blukulélé's patch radar. For now, shorter sessions are less frustrating than marathons.
For players coming from Murim Survival (a cross-run mastery system) or the dice-building loop in Die in the Dungeon: Gambonanza's decision texture is spatial, not cumulative. You're not selecting from options and building a hand: you're solving a board position under a time constraint the Crumble Mode counter imposes. The gambonanza tips above get you to the point where that spatial reasoning feels deliberate rather than reactive.
Frequently Asked Questions
How does Crumble Mode work in Gambonanza? Crumble Mode runs a 3/3 counter. Three consecutive moves without a capture and the board starts degrading from the edges, shrinking the play area. Any capture resets the counter to 0/3. The game uses it to prevent indefinite maneuvering: you have to commit to an attack, not position forever.
When should I deploy pieces from the reserve in Gambonanza? Deploy from reserve when you have a specific capture or fork lined up that requires that piece's position. The reserve is a positioning tool, not emergency storage. A knight held off-board can be dropped into fork range the instant an enemy steps into position: impossible if the knight was already somewhere else on the board. Don't deploy to fill space.
What Gambits should new Gambonanza players prioritize? Economic Gambits are safe for any run. They fund shop upgrades without demanding a specific positioning strategy. Reserve-interaction Gambits are high ceiling but require a planned deployment approach: avoid stacking them early before you know your build direction.
Does capturing the king end a run in Gambonanza? No. Win by capturing every enemy piece on the board, not just the king. This changes sacrifice tactics entirely: any piece you lose is gone permanently for that run, so trading a pawn to open the king doesn't end anything because the king isn't the win condition.
What should I spend coins on in the Gambonanza shop? Max Piece expansion ($25) once your build direction is clear, then piece upgrades ($3-5) on your core pieces, then rerolls ($2) when the current options conflict with your Gambit direction. Skip tile effects unless they interact directly with your build.
What is Kev Borclick's STASIS ability in Gambonanza? Kev Borclick is the Stage 2 boss. Each turn it applies STASIS to two of its own pieces, modifying their movement. Check the boss preview in the shop before spending coin: builds that rely on specific capture lanes may find those lanes blocked by STASIS'd pieces.
Related Reading
- Gambonanza Complete Guide 2026: Hub for all Gambonanza guides: builds, tier lists, gambit pieces, tips, and vs-Balatro comparison.
- Gambonanza Best Builds: 3 Core Archetypes and Synergies
- Gambonanza Tier List: Best Gambits and Pieces
- Gambonanza Tier List: All 4 Gambit Types Ranked 2026: Gambonanza tier list for gambits: Economic S-tier every run, Clone needs Stage 3 board size, Reserve-Interaction fires once....
References
- Gambonanza on Steam: store page with release date, review score, feature list, system requirements
- Gambonanza Steam Community Discussions: community-reported mechanic details, Gambit breakdowns, animation timing data
Was this guide helpful?
About the author

Indie & JRPG Critic
Indie game evangelist and lifelong JRPG fan covering small studios since 2017. Mumbai-born, London-based. Writes the way she talks.
- 7 years indie games coverage
- JRPG and visual novel specialist
- Narrative design focus


Disclaimer
This article is published for informational and entertainment purposes. It does not constitute professional financial, legal, or technical advice. Game performance, online services, patch schedules, and store listings change. Verify critical details (pricing, system requirements, regional availability) with publishers and storefronts before you buy. Affiliate links, where present, help support our editorial work and are labelled in our affiliate disclosure.