Loading…
GameBrief · Guides
Die in the Dungeon Relic Tier List: Best Picks & Synergies
14 min readBy Marcus Vasquez

Reviewing
Die in the Dungeon
ATICO
This Die in the Dungeon relic tier list ranks all 142 relics in the pool. Most runs surface 30 to 40 of them across floor encounters and shop visits. The question isn't which relics are best in isolation: it's which die in the dungeon relics are best for your current dice composition.
The die in the dungeon relics system punishes players who optimize for a fixed tier list and rewards those who optimize for their current run's dice. After tracking relic selection across 60+ runs at varying difficulty levels, the evaluation framework below produces more consistent late-floor performance than any fixed ranking would.
TL;DR: Die in the Dungeon has 142 relics and no universal best list: the right relics are the ones that fire on your current dice composition. Attack-trigger relics are the most consistent across all four characters; narrow-condition relics only pay off once your dice clearly favor that face. The strongest late-floor builds pair two relics whose triggers fire on the same turn so their effects compound. Prioritize shop relics after Floor 5, since you can plan around them.
Die in the Dungeon relics: Key takeaways
- Die in the dungeon relics are evaluated against your current dice, not against a universal tier list
- Attack-trigger relics produce the most consistent value across all four characters
- Narrow-condition relics (needing 3+ of a specific face type) are only worth taking once your dice clearly favor that face
- The strongest late-floor builds pair two relics whose triggers fire on the same turn: compounding, not adding
- Skip relics whose trigger condition your current dice cannot meet in 70%+ of normal combat turns
- Shop relics mid-run are worth more than floor drops because you can plan around them: prioritize shops after floor 5
Overview
This guide covers relic selection and evaluation as of Die in the Dungeon's 1.0 release (May 1, 2026, developer ATICO). It covers how the relic trigger system works, how to evaluate any relic against your current dice, which trigger categories produce the strongest results by character type, and the synergy patterns that decide late-floor outcomes.
What it doesn't cover: how to replace or upgrade specific dice faces (that's a separate progression layer), the 36 potions (which are run-to-run consumables, not permanent), or the 31 dice types you unlock over multiple runs (covered separately).
Prerequisites before this guide matters: you should understand the four character starting loadouts and what face-type affinity means. If you don't, the Die in the Dungeon character guide maps each frog warrior to their dominant face type. The evaluation framework here builds directly on that.
Time investment: the relic system reveals itself across 5 to 8 runs. The framework below is designed to accelerate that process, not replace it: the first time a two-relic compound fires in a floor 8 boss fight and does 40+ damage in one turn, the logic becomes visceral.
How die in the dungeon relics work
Every relic has three components: a trigger condition, an effect, and (sometimes) a cooldown. The trigger is what causes the relic to activate. The effect is what it does. The cooldown determines how often you can get that effect per combat.
Trigger conditions fall into five categories. Face-type triggers activate when a specific face type (attack, parry, poison, reroll) lands (these are the most common in the pool. Count triggers activate when a specific number of that face type land in one roll; they're narrower but hit harder. Event triggers fire on combat start, on taking damage, on kill, or at turn end, with no face requirement at all. Combo triggers need two conditions met simultaneously) rare, but the highest-effect entries in the pool when they go off. And then there are flat bonuses, which aren't triggers at all, just passive stat additions to attack, defense, or max health.
Knowing which category a relic belongs to tells you how reliable its value is before you take it.
The five evaluation tiers
These tiers describe trigger reliability and effect ceiling, not a fixed ranking. The same relic can move between tiers depending on your dice composition.
Tier 1: Face-type triggers with attack or high-frequency faces
Relics that activate when attack faces land are the most consistently valuable in the pool. Attack faces appear in the starting dice of three of the four frog warriors, and in most replacement dice offered mid-run. A relic tied to attack face landings will fire multiple times per combat on almost any build.
Why this category is strong: consistency. A relic that fires twice per combat on average, every combat, across 12 floors produces more cumulative value than a relic that fires four times in one spectacular fight and then goes quiet.
On the attack-heavy character specifically, the turns that maximize attack output are the same turns that maximize relic activation. Both objectives align without any extra decisions required.
Attack-trigger relics are worth taking on any character with three or more attack faces in their current dice pool, not just the attack-heavy frog. Skip them when you're below two attack faces: on a heavily parry-modified or reroll-heavy build, the trigger fires rarely enough that the slot is better used by an event relic.
Tier 2: Event triggers with no face requirements
Relics that fire on combat start, on taking damage, or at turn end don't require any particular face to land. Their activation is guaranteed based on what happens in combat, not what your dice show.
"Combat start" relics provide their effect before you roll. "On taking damage" relics are particularly strong on the parry character, who actively manages incoming damage and can predict when hits will land. "Turn end" relics reward staying in longer fights: more turns, more trigger opportunities.
The downside is ceiling. Event-trigger relics can't compound with face-trigger relics on the same turn the way two face-triggers can. Steady, predictable contribution: not burst.
The parry character gets the most from on-damage triggers since they're actively managing when hits land. Combat-start relics are worth taking on any character. Reroll builds often pick up an event trigger as their second or third relic specifically because it doesn't compete for the face-type activations the reroll build depends on.
Tier 3: Count triggers (3+ face type in one roll)
These relics activate when your roll shows three or more of a specific face type simultaneously. The effect is typically stronger than a single-face trigger: but the activation condition means the relic contributes nothing until your dice composition can hit that count.
A "three attack faces in one roll" trigger fires sometimes on the attack-heavy starting loadout, occasionally on a modified parry build, and almost never on the reroll character before their dice are heavily replaced. The relic's value is therefore run-dependent in a way that face-type and event triggers are not.
Count triggers are the relics players most commonly take too early. The mistake is taking a high-effect count trigger before the dice composition can meet the threshold, resulting in a relic slot that doesn't contribute for the first 5 floors of the run.
The attack-heavy frog benefits most after dice modifications that push attack face count higher. The poison character can also make count triggers work if the trigger is for poison faces and there are already two or three poison relics compounding. Below four of the required face type in your current pool: pass. The trigger fires too infrequently to justify the slot.
Tier 4: Kill and combo triggers
Kill triggers activate when an enemy dies. Combo triggers need two conditions met simultaneously. Both have specific usage windows that make them strong in some runs and irrelevant in others.
Kill triggers underperform in boss-heavy floors where single enemies have high health pools. A kill trigger that fires once per five turns in a normal encounter fires zero times in a five-minute boss fight. Players running through floors 8 and beyond quickly discover that their kill-trigger relic hasn't contributed in three fights.
Combo triggers are the inverse: they don't fire often, but when they do, the effect is typically the strongest in the pool. A relic that requires both a specific face type and an on-damage event activating in the same turn will do something the other tiers cannot match. The challenge is that the turns where the combo fires aren't always the turns where you need a spike.
Kill triggers are floor-range dependent: good in lower ranges with multiple weak enemies per room, a dead slot in boss-heavy late floors. Combo triggers reward the reroll character specifically, since reroll faces give you additional attempts to hit the two simultaneous conditions the trigger requires.
Tier 5: Flat stat bonuses
Attack +2. Defense +1. Max health +4. These relics don't have trigger conditions: they apply permanently once taken. They're the safest pick if no other relic fits your build, and the weakest pick if your dice can support a trigger-based alternative.
The reason flat bonuses fall here isn't that the stats are useless. It's that trigger-based relics with consistent activation produce equivalent or greater stat contribution per floor, plus additional effects. An attack relic that activates twice per combat and adds 3 damage each time provides 6 damage per combat, which scales with the number of combats. A flat +3 attack bonus provides 3 extra damage per attack, which also scales: but provides no other effect.
Take flat bonuses when: your current dice can't reliably trigger any offered relic, you're on floor 1 or 2 without a clear synergy target, or the floor offers a health bonus and your build runs lean on survivability.
GODEEPER: The starting dice each character carries determines which of these relic tiers is accessible from floor 1. Die in the Dungeon Characters: Which to Pick First →
 The S-tier relics are conditional: they require specific die face setups to reach their ceiling.
Step-by-step: evaluating any relic you're offered
Step 1: Identify the trigger category
Read the relic's activation condition. Does it fire on a specific face type? On a count? On an event? This tells you the reliability tier before you assess the effect.
Step 2: Count your current face distribution
Before accepting or passing, count how many of the required face type your current dice have. If you have 6 dice with attack faces totaling 8 attack-face slots, an attack-trigger relic fires with high reliability. If you have 2 attack faces, it doesn't.
This step takes ten seconds and prevents the most common relic mistake: taking a high-effect relic whose trigger your dice can't meet.
Step 3: Check for compounding
Look at the other relics you're carrying. If you already have a relic that activates on attack faces, a second attack-trigger relic activates in the same turn. Both effects apply in the same roll where those faces land. This is the compounding that makes attack-trigger stacks strong in floors 6+.
The test: if both relics would activate in the same turn, consider them compound. If they activate in separate turns or on separate conditions, they add but don't compound. Compounding relics are worth taking at a lower individual effect level than non-compounding relics.
Step 4: Assess the effect size relative to floor
Effects that do 3 damage are strong on floor 2, marginal on floor 9. Effects that reduce incoming damage by 2 are moderate early and significant late when enemy damage scales. When evaluating a relic's effect, estimate what it contributes per floor, not per activation.
A relic that fires 4 times per combat on floor 5 produces twice the total contribution of a relic that fires 2 times, if both effects are equal. On floor 8 with harder enemies, the floor count drops but the per-activation value matters more.
Step 5: Accept or pass
Accept if: trigger fires reliably with your current dice AND the effect contributes meaningfully to your current floor range AND it compounds with an existing relic.
Pass if: trigger fires fewer than once every two turns on average with your current dice, even if the effect is high. A high-effect relic that rarely fires loses to a low-effect relic that fires constantly.
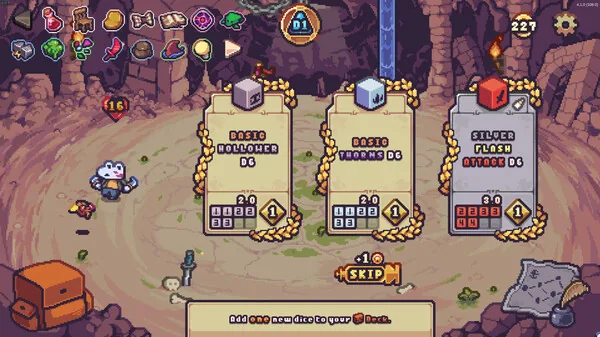
Three offered relics, one dice pool. The attack-trigger fires three times on this roll; the count trigger once. The flat bonus fires once, passively.
Building a two-relic core
The strongest late-floor build isn't one great relic: it's two die in the dungeon relics that activate in the same turn. The game has 142 relics because there are many ways to build this two-relic compound. The characters differ not in which compound is available, but in which compound is reachable from their starting dice.
The attack compound is two attack-trigger relics that both activate when attack faces land. Accessible from floor 1 on the attack-heavy character and the easiest of the four compounds to build without planning: just take both relics when offered.
The parry compound pairs a parry-trigger relic with an on-damage-taken event trigger. Both fire in the same turn when you take a hit and parry it. The game's boss encounters tend to have readable attack patterns, which makes this compound more reliable against bosses than the attack compound is.
The poison compound pairs a poison-face trigger with a DOT duration extender. One activates when poison faces land; the other extends how long that poison runs. A single poison face in turn 1 ends up contributing damage across four or more subsequent turns. Good in long fights; less effective when encounters end in two turns.
The reroll compound is a narrow-condition trigger (needs three of a specific face) paired with reroll-face effects. Reroll faces give you additional attempts to hit the narrow condition. When it lands, the narrow trigger fires and the reroll relic fires. Two relics activating off one set of faces: this is why the reroll character has the highest ceiling when the build clicks.
Tips
Prioritize shops from floor 5 onward. Floor drops offer a random subset of the relic pool. Shops offer selection: you can see 3 or 4 options and pick the one that matches your current dice. The reliability of shop relics makes them higher EV than floor drops even if the shop's offerings are lower-tier relics individually.
Track which relic fires least across two floors. After floors 5 and 6, mentally note which of your die in the dungeon relics activated the fewest times. If one has contributed less than half the activations of another, your dice composition doesn't support it. That's the relic you should replace if a better option appears.
Don't build toward a relic: build from your dice. The error pattern is seeing a strong relic in a shop and deciding to replace dice faces to trigger it. Replacing faces costs resources and often takes two to three floors to execute. The relic is strong now; your dice will catch up later. This reasoning works in theory and fails in practice because floors 5 through 8 punish weak builds, not floor 10.
Event triggers cover gaps in your dice composition. If the relics you're offered don't match your face type, take an event trigger that activates on combat start or on taking damage. These don't depend on which faces land, so they provide reliable contribution regardless of dice state.
Pair flat bonuses with the stat your build generates least. An attack-heavy build often sacrifices defense for offense. A flat +4 defense relic is worth more on that build than a +4 attack relic, because the attack-trigger relics are already scaling attack. The flat bonus fills the gap the build leaves open.
GODEEPER: The build mechanics that apply to all four characters, how dice faces interact with board positioning, are covered in the tips guide. Die in the Dungeon Tips, Dice, Board, and Build Basics →
Common mistakes
Taking relics before the dice can trigger them. A floor 3 relic shop offering a strong count-trigger relic is tempting. On a starting loadout with two of the required face type, that relic fires once every 8 turns. Players take it, see it contribute nothing for two floors, and conclude the relic is bad. The relic isn't bad: the timing was wrong. Count triggers belong in the middle and late floors, not the early ones.
Ignoring compounding. Two relics that fire in separate turns are additive. Two relics that fire in the same turn are multiplicative in their felt impact, even if the numeric values add rather than multiply. Players who evaluate relics individually and take the single strongest offered relic consistently build weaker than players who take the second-best relic that compounds with what they're carrying.
Holding relic slots for relics that never appear. Players who clear floor 3 waiting for a specific die in the dungeon relics entry they saw in a previous run often reach floor 5 with two flat-bonus relics and one they took reluctantly. The pool is 142: specific relics are not guaranteed per run. Evaluate what's offered against your dice, not the ideal relic you're hoping for.
Replacing relics too early. Some runs offer a relic replacement option at shops. Players see a higher-tier relic and replace a working attack-trigger relic on floor 4, breaking the compounding that was carrying their damage output. The upgrade felt correct: the individual relic was stronger. But the replaced relic was part of a compound. Replacing one leg of a compound for a solo relic is often a downgrade in practice.
Treating all kill triggers as equivalent. Kill triggers have wildly different values by floor range. On floor 2, you clear rooms of 4 to 6 weak enemies (the kill trigger fires 4 to 6 times per room. On floor 8, you fight bosses and elite encounters) the kill trigger may fire once or not at all. A kill trigger taken on floor 2 is not the same investment as a kill trigger taken on floor 7.
Related Reading
- Die in the Dungeon Complete Guide 2026: Hub for all Die in the Dungeon guides: builds, relics, dice tier lists, characters, and achievements.
- Die in the Dungeon Floor Guide: Floors 1 to 6 Breakdown: Die in the dungeon floor guide: what each floor demands, how floor 5 kills most.
- Die in the Dungeon Dice Tier List: Best Dice Ranked: Die in the Dungeon dice tier list: S to D ranking of all dice types,.
- Die in the Dungeon Relics: All Types, Triggers, and Effects: Die in the Dungeon relics guide: all 5 trigger categories, how each fires, which characters.
- Die in the Dungeon Best Build: Attack, Poison, and Reroll: Die in the dungeon best build: attack concentration, poison DoT, reroll chains.
References
- Die in the Dungeon on Steam: patch notes, review score (Very Positive, 1,572 reviews as of May 2026)
- ATICO Developer Page: official developer page with update announcements
- Die in the Dungeon Achievement Guide: all 59 achievements with which 31 unlock persistent dice
Frequently asked questions
Q: How many relics are in Die in the Dungeon? A: 142 unique relics in the pool at 1.0 launch. Not all appear in a single run: you see a subset based on floor progression.
Q: What are the best die in the dungeon relics? A: The best die in the dungeon relics in any run are the ones whose trigger conditions your current dice can meet reliably. Attack-trigger relics have the highest average reliability across all starting characters because attack faces appear widely. For any given run, a relic that fires 8 times in a floor outperforms one that fires twice, regardless of individual effect size.
Q: How do I unlock more relics? A: Relics aren't unlocked through a meta-progression system: the 142-relic pool is available from the first run. What changes across runs is which relics appear, based on RNG and floor biome. Running all four characters exposes you to different relic priorities, which surfaces portions of the pool you'd miss by staying with one character.
Q: Can you have duplicate relics? A: Yes. The game allows taking the same relic twice if offered. The effects stack. Two copies of a moderate attack-trigger relic produce stronger output than one copy of a high-effect relic in most run configurations, because both trigger in the same turn.
Q: Do relics carry over between runs? A: No. Die in the Dungeon is a roguelite: each run starts fresh with no relics. The 59 achievements and unlocked dice types persist, but the relic pool resets. This is why the evaluation framework matters more than memorizing which specific relics are best: the relics that appear shift, and the dice you're carrying determine which of them are worth taking. For which achievements unlock which dice, the Die in the Dungeon achievement guide covers all 59 with dice unlock notes.
Q: Are there hidden relics in Die in the Dungeon? A: The 142-relic pool is the full pool as of 1.0. No hidden relics require specific unlock conditions to appear in the pool. Some relics appear more frequently at higher floor ranges than lower, which creates the appearance of "hidden" entries in early runs: they're there, but the floor you need to reach before seeing them is simply higher.
Q: Which relic category is worst? A: Flat stat bonuses have the lowest ceiling in most builds, but they're not wrong to take: they're safest when your dice don't support any trigger-based option. Kill triggers are the most situationally weak: they lose value in boss-heavy late-floor configurations where most relics gain value. Avoid kill triggers after floor 6 unless your current build has no better option.
Was this guide helpful?
About the author

Senior Critic & Analyst
Former game data analyst turned critic with 11 years covering indie and mid-tier games. Based in Austin. Runs spreadsheets on games most people just play.
- 11 years games criticism
- Former game economy analyst
- Roguelike and strategy specialist


Disclaimer
This article is published for informational and entertainment purposes. It does not constitute professional financial, legal, or technical advice. Game performance, online services, patch schedules, and store listings change. Verify critical details (pricing, system requirements, regional availability) with publishers and storefronts before you buy. Affiliate links, where present, help support our editorial work and are labelled in our affiliate disclosure.