GameBrief · General
Legionbound Battle Mode Guide: Endurance Runs 2026

Reviewing
LegionBound
Spicy Garlic Games
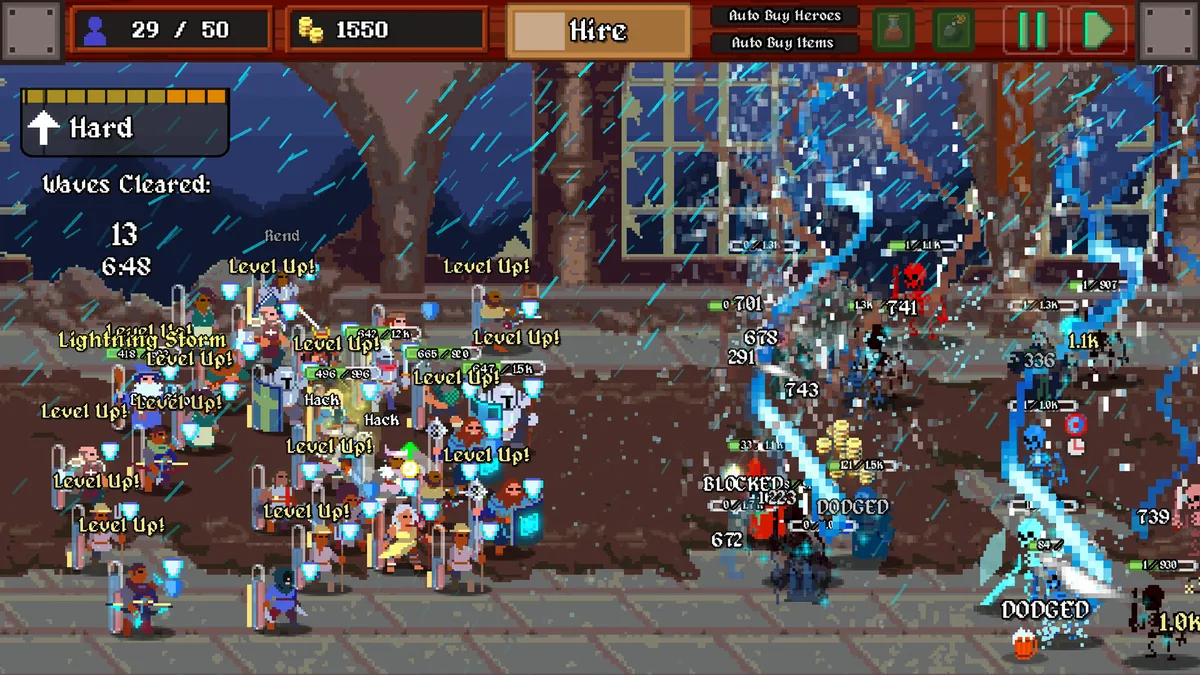
Legionbound Battle Mode strips the game down to its core question: how long can your hero roster hold before the enemy scaling overtakes you? No Endbringer bearing down on you, no routing decisions across maps, no building placement eating into wave prep time. Just your heroes, the waves, and however far you can push the wave count.
TL;DR: Legionbound Battle Mode is pure endurance: wave count is your score, no Endbringer, no map routing. Enemy scaling spikes at waves 10, 20, and 30. Tax Collector full loop (4 classes) handles up to wave 25. Warrior-group dual chain (Warrior,Sorcerer,Witch + Knight,Smith,Guardian) is what pushes past wave 30. Everything you learn here transfers directly to Adventure Mode.
That simplicity is why Battle Mode deserves attention on its own terms, not just as a warmup for Adventure Mode. It has its own optimal builds, its own scaling checkpoints, and its own leaderboard. Players who spend real time here learn things that Adventure Mode simply doesn't teach.
Key takeaways
- Battle Mode is pure endurance: wave count is your score, no Endbringer, no map routing
- Enemy scaling spikes at waves 10, 20, and 30; your build needs to be ready for each jump
- Tax Collector full loop (4 classes) is the easiest synergy build to complete in Battle Mode
- Warrior-group dual chains hold longer runs past wave 30 than any single-loop build
- Spell timing and row positioning matter as much here as class selection
- Everything you learn in Battle Mode transfers directly to Adventure Mode; the reverse isn't true
What Battle Mode is (and what it isn't)
The combat layer is identical in both modes: recruit heroes between waves, position them in rows, cast spells during combat, buy items from the shop. The difference is everything around it. In Adventure Mode, you're also routing between maps, placing structures, watching the Endbringer timer, and carrying decisions across multiple battle sequences. In Battle Mode, none of that exists. Every decision collapses into one question: which heroes am I putting on the field and in what order?
Because you're not managing buildings or routing anxiety, you can actually watch what's happening in the synergy chain and see how the enemy scaling reads against your current build. Most players who learn Ascension timing here (when to trigger a merge, and which class to merge first) carry that intuition cleanly into Adventure Mode. The reverse isn't reliable. Going straight to Adventure Mode and then trying to apply what you learned back to Battle Mode produces weaker results, because the two modes don't give you the same feedback loop.
Battle Mode also gives you more freedom in your recruiting sequence. Adventure Mode often forces your hand based on what's available at a given map node. Here the hero pool is freer, which makes this the better place to deliberately test a synergy chain you haven't built before. Want to run the full Tax Collector loop for the first time? Battle Mode lets you chase it without an Endbringer scaling against you while you're still figuring out the class trigger order.
How Battle Mode scaling works
Enemy scaling in Battle Mode doesn't climb evenly. There are identifiable spikes where the curve steepens fast, and if your build isn't ready for each one, the run usually ends within 2-3 waves of hitting it.
Wave 10 is the first real test. Enemy health roughly doubles from where it was in waves 1-4. Base-class heroes without synergy subclasses active can't absorb this. If you hit wave 10 with no Ascensions and no synergy pairs firing, you're probably done by wave 12 or 13. The minimum to clear this spike is one Ascension and at least one synergy pair.
Wave 20 is harder. Enemy attack values jump enough that whoever's in your front row is now dying in 2-3 hits instead of 5-6. Un-Ascended front-liners can't hold here. The builds that clear wave 20 are either running a completed Tax Collector loop with all four subclasses active, or they've built at least two adjacent Warrior-group synergy pairs with a first Ascension already resolved.
Wave 30 is where flat-stat builds stop working entirely. Past this point the scaling expects tier-2 Ascensions and synergy item bonuses. Leaderboard entries above wave 35 almost always reflect at least one tier-2 Ascension (a merged hero who's been merged a second time) with synergy item bonuses on top of that.
Treat each threshold as a deadline, not a checkpoint. Your first Ascension by wave 5 isn't optional: it's the timing that gets you past wave 10. Four synergy subclasses by wave 18 isn't ambitious; it's what the wave-20 spike actually demands.
GODEEPER: The full three-loop breakdown (which classes sit where in each circular synergy chain and what each synergy subclass does) is in the class reference guide. LegionBound Synergy Guide: All 30 Classes →
 Wave 20 is the first hard filter in Battle Mode: enemy attack values jump enough to eliminate un-Ascended front rows.
Legionbound Battle Mode: best builds for endurance runs
Tax Collector full loop: the reliable wave-25 build
The Tax Collector group has four classes: Tax Collector, Barbarian, Brawler, and Mercenary. None of the five starter classes belong to this group, so you're recruiting your way in from scratch. That's the only real cost: the payoff is that a complete Tax Collector loop activates all four synergy subclasses simultaneously: Strongarm, Berserker, Boxer, and Bounty Hunter.
Four subclasses across four heroes, all active at once, is something that takes significantly more party investment to achieve in either of the larger loops. In Battle Mode specifically, the Tax Collector loop is easier to chase because you're not also managing map routing. You can prioritize Tax Collector group recruits early and have a completed loop by wave 14-16 in most runs.
The ceiling is wave 25 without tier-2 Ascensions. Enemy scaling past that point hits harder than the base Tax Collector loop can absorb. If your goal is clearing waves 25-30, you need Ascensions progressing within the loop: and Barbarian into Berserker is the first Ascension to prioritize because Berserker's synergy form has the highest burst output of the four.
Warrior-group dual chain: the long-run build
Once you understand how subchains work inside the Warrior group's 14-class loop, Battle Mode's longer endurance runs open up. The advanced builds guide covers this in depth, but the short version for Battle Mode: run the damage chain (Warrior → Sorcerer → Witch) and the sustain chain (Knight → Smith → Guardian) simultaneously.
Seven party slots for seven active synergy subclasses: Spellblade, Warlock, Hexer on the damage side; Stalwart, Armorer, Bulwark on the sustain side. The front row runs your Knight chain absorbing damage while the Warrior chain's casters stack output behind them.
This build takes more waves to construct than the Tax Collector loop: none of the Knight chain classes are starters, so you're recruiting them mid-run. Expect to have the damage chain live by wave 8 and the tank chain completing around wave 14-16. The runs that push past wave 35 on the leaderboard usually reflect this dual structure with at least one tier-2 Ascension on the Sorcerer.
A practical note on sequencing: if you draw Warrior and Sorcerer in your first four waves and start building the damage chain, don't divert into Knight-chain recruiting until the Warrior,Sorcerer,Witch triplet is Ascended and synergy-active. The damage chain is your wave-1 through wave-12 engine. Knight chain goes in after that.
Anchor-plus-satellite: the efficient middle option
If neither full loop is clicking because of bad recruiting luck, the anchor-plus-satellite structure still gives you two active secondary synergy subclasses on top of your primary chain. Run 6-8 heroes deep in the Warrior group, then add 2 adjacent Tax Collector heroes (Barbarian + Tax Collector, for example) as satellites. Barbarian triggers Berserker with Tax Collector present. Two party slots, two subclasses, zero disruption to the main chain.
This isn't as clean as the dual chain, but it's more forgiving with bad draws. Battle Mode's recruiting pool gives you options: this structure lets you adapt without abandoning synergy discipline.
GODEEPER: Stat priority by Ascension tier, subchain values inside the loops, and exactly when to switch from HP items to damage multipliers: all covered in the late-game guide. LegionBound Advanced Builds: Late-Game Class Chains →
Row positioning in Battle Mode
 Front row is your damage sponge: if a caster ends up there after a death, replacing them is your next-wave priority.
Row positioning matters more in Battle Mode than its simplicity suggests. The basic rule from the tips guide (highest HP in front row) holds here, but Battle Mode's extended wave counts create situations where that rule needs updating mid-run.
When an Ascended hero has died and your front row suddenly has a caster that you placed there to fill the gap, replace them as fast as your next wave's recruiting allows. Front-row casters are a temporary measure, not a build state. Leaving a Witch or Sorcerer in front row past the wave-15 window usually costs you the run in Battle Mode because the wave-20 spike assumes your front line is genuinely tank-statted.
The swap protocol: if a front-row hero dies mid-wave, the row behind it absorbs that combat. After the wave resolves, immediately check who's in the front row and what their HP pool is. If the answer is "a class that belongs in the back row," recruiting a replacement takes priority over items that wave.
Step-by-step
1. Pick your anchor chain before wave 4. Decide whether you're building the Tax Collector full loop (4 classes, fastest synergy completion) or the Warrior-group dual chain (Warrior,Sorcerer,Witch for damage, Knight chain for sustain). Your first three recruits should all feed the chosen chain: no off-chain heroes in the first four waves.
2. Secure your first Ascension by wave 5. The wave-10 scaling spike requires at least one Ascended hero to absorb. Front-liners merge first: whoever holds your front row merges before casters do. An un-Ascended party entering wave 9 is already behind schedule.
3. Verify synergy subclasses are active before wave 10. Open the hero detail and confirm each class displays its subclass name (Spellblade, Berserker, Stalwart) rather than its base class name. If a hero still shows its base name, the synergy trigger is missing: find the gap and recruit into it immediately.
4. Fill all synergy positions by wave 18. The wave-20 spike demands full synergy coverage. For the Tax Collector loop: all four classes recruited, one Ascension complete. For the Warrior dual chain: damage triplet live, first Knight-chain hero in the roster, second Ascension queued. A missing synergy position at wave 18 means the wave-20 spike ends the run.
5. Check subclass status every five waves. A class reverting to its base name means synergy broke: a hero died, was repositioned incorrectly, or a trigger class left the party. Catching a broken synergy chain 5 waves in is recoverable. Catching it 15 waves later usually isn't.
What Battle Mode teaches that Adventure Mode doesn't
Players who skip Battle Mode and go straight to Adventure Mode tend to hit a specific wall: their synergy chains work fine in isolation but fall apart when map routing forces a non-ideal recruiting sequence. Having built chains in Battle Mode first means you've already internalized what the chain requires: so when Adventure Mode hands you a bad option, you can read the situation and adapt instead of just taking whoever's available.
Spell timing is the clearest example of a skill Battle Mode develops that Adventure Mode doesn't. With no routing overhead eating your attention, you can actually watch your spells relative to wave composition. Spending a group heal when two heroes are lightly damaged is a habit that quietly costs you. Holding it 3 seconds to catch four heroes below half HP extends runs meaningfully. Adventure Mode's cognitive load makes this easy to miss. Battle Mode gives you the space to actually see it.
Skill tree points accumulate at the same rate regardless of mode. A run that ends at wave 8 still earns points. If you're building up the tree before attempting a serious Adventure Mode run, Battle Mode sessions are just as efficient and significantly lower frustration per hour.
Legionbound Battle Mode leaderboard strategy
Battle Mode's leaderboard ranks by wave count. There's no additional scoring for party size, class diversity, or time: just how far you got.
Leaderboard play is about one thing: how long your build survives, not how cleanly it cleared the early waves. The Tax Collector loop gets you on the board. The Warrior-group dual chain with tier-2 Ascensions is what pushes you toward the top.
Two habits that separate the longer runs: check your synergy subclass status every five waves (a class displaying its base name instead of its subclass name means synergy broke somewhere: catching it early is recoverable, catching it fifteen waves later usually isn't), and hold AoE damage spells for enemy clustering rather than casting the moment they're off cooldown. An AoE that hits six enemies two seconds after it's ready beats the same spell hitting two enemies the instant it fires.
Frequently asked questions
What is Battle Mode in Legionbound? Battle Mode is Legionbound's endurance format: survive escalating enemy waves for as long as possible. No Endbringer, no map routing. Your score is your wave count.
How does difficulty scale in Battle Mode? There are notable spikes at waves 10, 20, and 30. Builds without any synergy subclasses usually end around wave 10-12. Completed Tax Collector loops typically hold past wave 20. Warrior-group dual chains with tier-2 Ascensions are what wave-30-plus runs require.
Which build survives longest in Battle Mode? The Warrior-group dual chain (Warrior,Sorcerer,Witch for damage plus Knight,Smith,Guardian for sustain) holds the longest endurance runs when combined with tier-2 Ascensions. The Tax Collector full loop is easier to construct and reliable to roughly wave 25.
Is Battle Mode good for beginners? Yes. It removes Adventure Mode's extra complexity (Endbringer, map routing, building placement) so you can focus on learning class synergies, Ascension timing, and row positioning: all of which transfer directly to Adventure Mode.
Does the skill tree advance in Battle Mode? Every run advances the skill tree, including Battle Mode runs that end early. Failed runs still count. This makes Battle Mode equally efficient for skill tree progression as Adventure Mode.
What's the first synergy build to try in Battle Mode? Tax Collector loop: Tax Collector, Barbarian, Brawler, Mercenary. None are starters, so you recruit into them. But four classes completing a full loop and activating all four synergy subclasses simultaneously is the cleanest introduction to what synergy-active party composition actually feels like.
What carries over to Adventure Mode? Synergy chain construction, Ascension timing, row positioning habits, and spell timing instincts: all of it. The mechanical knowledge maps directly. Adventure Mode adds map and building decisions on top, but the combat layer is the same system.
Related Reading
- LegionBound Adventure Mode Guide: the campaign format with map routing and the Endbringer, and how it builds on Battle Mode habits.
- LegionBound Synergy Guide: All 30 Classes & Groups: the full synergy loop system that decides how far your Battle Mode runs hold.
- LegionBound Advanced Builds: late-game class chains for pushing past the wave-30 endurance wall.
- LegionBound Tips for Beginners: the fastest way to learn Ascension timing and your first synergy chain.
- LegionBound Warrior Group: All 14 Classes & Synergies: LegionBound Warrior group: all 14 classes in the largest synergy loop, how the circular subclass chain works, and....
- LegionBound Barkeep Group: All 11 Classes & Synergies: LegionBound Barkeep group guide: all 11 classes in the mid-size synergy loop, the subclass chain, and the Rogue-Duelist-Gunslinger....
- LegionBound Tier List 2026: Ranking All 30 Classes: LegionBound tier list ranking all 30 classes from S to C: synergy chain value, Ascension.
- LegionBound Ascension Chain: Timing, Risk, Recovery 2026: LegionBound ascension chain guide.
- LegionBound Ascension Guide: How to Merge Heroes (2026): LegionBound Ascension explained: how to trigger your first merge by wave 5, stack Ascensions with.
- LegionBound Endbringer Guide: When to Fight and How to Win: LegionBound Endbringer guide: Adventure Mode's scaling final boss, when to confront it, the best counter-builds,.
References
- Legionbound on Steam: official store page, Very Positive reviews, $9.99 USD
- Spicy Garlic Games on Steam: developer page
- LegionBound Synergy Guide: All 30 Classes & Groups
- LegionBound Advanced Builds: Late-Game Class Chains
- LegionBound Tips: Best Builds & Synergies for Beginners
- LegionBound Launch Overview: April 2026
- LegionBound complete guide hub: all classes, synergies, ascension, and battle/adventure mode guides
Was this guide helpful?
About the author

Games Critic
Games writer and reluctant optimist who has reviewed over 400 titles across 9 years. Irish, currently in Berlin. Has strong opinions about tutorial design.
- 400+ games reviewed across 9 years
- Platformer and horror specialist
- Narrative design focus


Disclaimer
This article is published for informational and entertainment purposes. It does not constitute professional financial, legal, or technical advice. Game performance, online services, patch schedules, and store listings change. Verify critical details (pricing, system requirements, regional availability) with publishers and storefronts before you buy. Affiliate links, where present, help support our editorial work and are labelled in our affiliate disclosure.