Loading…
ARC Raiders · Guides
ARC Raiders Best Squad Loadouts: Roles, Builds & Tips
ARC Raiders best squad loadouts: how to build three-player teams around distinct roles, which weapons pair well across slots, and how to avoid redundancy.
10 min readBy Finn Calloway
ARC Raiders best squad loadouts solve a different problem than solo builds. Solo Raiders die at extraction. Squad Raiders die at loot. The failure mode shifts when you add two more players: three sets of inventory, three noise profiles, three Safe Pockets at stake. The loadout question isn't "what's the best weapon": it's "do these three players cover every scenario without stepping on each other."
This ARC Raiders best squad loadouts guide covers the three-role framework that works across zone tiers, with specific weapon and armor recommendations for each position. If anyone in your squad is joining ARC Raiders fresh, the ARC Raiders beginner guide has the zone and gear basics they'll need before the first squad run.
TL;DR: Build a three-role squad: a frontline player on Ferro battle rifle with medium armor, a scout on Bastinelli marksman rifle with binoculars, and a carrier on Canto SMG with high carry weight and light armor. Three different weapons cover every range and split ammo demand; at least two players stay in light armor so the squad keeps the option to avoid contact. Distribute high-value loot across Safe Pockets so one death doesn't wipe the run.
Key Takeaways
- Three roles: frontline (battle rifle, medium armor), scout (marksman rifle, light armor), carrier (SMG, high Conditioning)
- Distribute ammo types: Ferro uses Heavy ammo, Bastinelli uses Medium, Canto uses Medium: consider Light ammo coverage too
- Two Safe Pocket strategies: scout carries Hatch Key for silent extraction; frontline carries quest items; carrier carries rare materials
- Don't stack armor tiers: two heavy-armor players make the whole squad detectable and slow
- Carrier role pays off at Orange+: below Orange, carry weight isn't the bottleneck
Why Squad Loadouts Differ from Solo
Solo play optimizes around one constraint: survive without backup. Squad play introduces a different math. You have revive capacity if a player goes down before the run ends: no, actually you don't: ARC Raiders doesn't have field revives. Dead squad members are gone for that run.
What squads do have is distributed loot capacity. Three Safe Pockets. Three inventory loadouts that can absorb more material volume than one player. Three weapons covering three range profiles instead of one player juggling two.
The risk the ARC Raiders best solo loadouts guide is designed to minimize (dying without backup, fighting a siege without distraction plays) a squad absorbs. You can post one member on overwatch at extraction while two loot. You can send one player to a Raider Hatch while the other two prep a cargo elevator route as backup.
This changes how loadout design should work. Solo loadouts are defensive. Squad loadouts can afford to specialize.
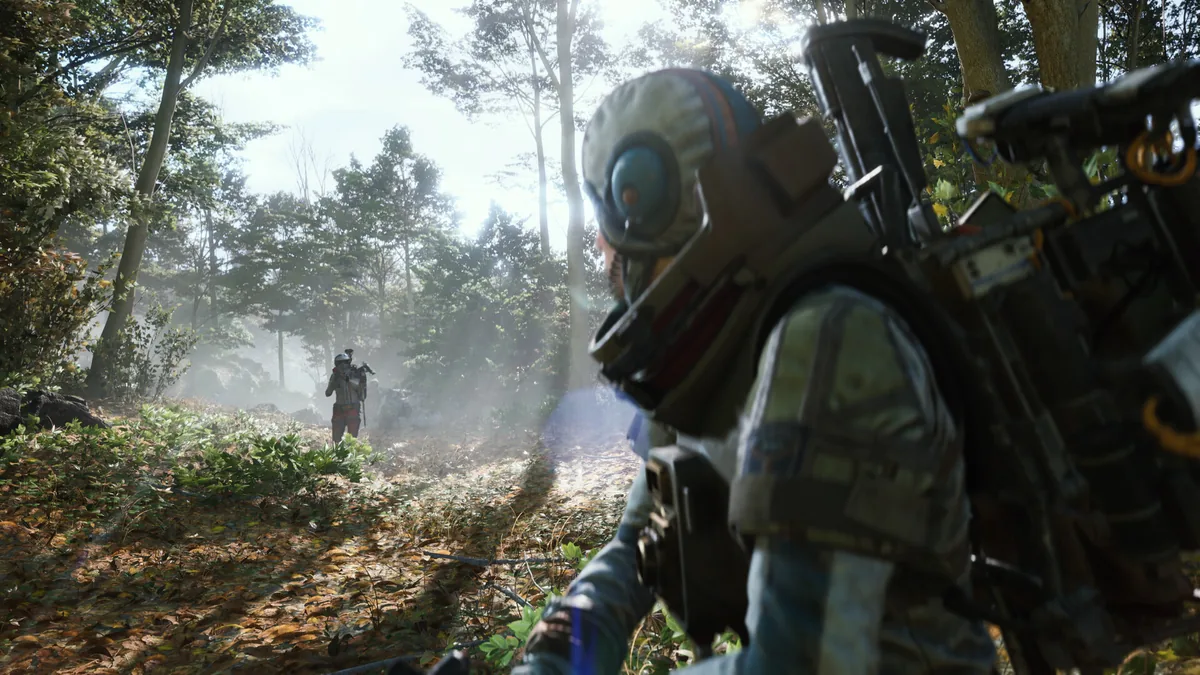 Caption: A two-player element moving through forest terrain. The spacing keeps both raiders' sightlines clear, the front player scouting while the rear covers the gear they're carrying.
The Three Squad Roles
Frontline
Weapon: Ferro battle rifle (Heavy ammo)
Secondary: Anvil hand cannon
Armor: Medium chest + medium head
Gadgets: Two EMP grenades, one frag grenade
Consumables: Two medkits, two stims
Safe Pocket: Quest items, one blueprint slot
The frontline player handles direct ARC contact. When Hornets close on the squad's position or Sentinels need to be cleared before the team crosses open ground, this is who leads. Medium armor trades some movement noise for the damage mitigation needed to stay in a fight long enough to close it.
The Ferro is non-negotiable here. Its armor penetration against ARC machine types (stripping Hornet armor in two to three shots versus five or more for comparable rifles) means the frontline player can clear contact faster than anyone else on the team. The Anvil as a secondary provides close-range burst damage when the fight shifts inside structures.
Two EMPs handle boss phase transitions and Sentinel crossings. The frag covers corridor Hornet clusters before they can push the team back. This loadout costs more per run than the scout or carrier builds: it should be the squad's most experienced player's kit.
Scout
Weapon: Bastinelli marksman rifle (Medium ammo)
Secondary: Canto SMG
Armor: Light chest + light head
Gadgets: Binoculars, one EMP grenade
Consumables: Two medkits, one stim
Safe Pocket: One Hatch Key, one rare item slot
The scout runs light and ranges ahead of the squad. Binoculars for pre-scanning routes, the Bastinelli for 80+ meter engagements against patrols that the squad can't avoid, and light armor to keep the noise profile minimal while moving through terrain.
The Hatch Key in Safe Pocket is deliberate. When the squad needs a silent exit (because another team is in the zone or because the extraction zone is contested) the scout activates the Hatch and the squad converges. The key survives the scout's death because the Safe Pocket survives. If the run goes wrong and the scout dies early, the key is still recoverable for the surviving members.
The Bastinelli's 80+ meter effective range lets the scout engage Sentinels and patrol leaders from positions the frontline and carrier can't reach. One scout shot starting an engagement at range gives the frontline player time to close into their optimal zone before the fight escalates.
Carrier
Weapon: Canto SMG (Medium ammo)
Secondary: Stitcher or starter pistol
Armor: Light chest + light head
Gadgets: Binoculars, one frag grenade
Consumables: Two medkits, one stim
Safe Pocket: Two rare material slots, one exotic slot
The carrier maximizes loot extracted per run. Light armor, high Conditioning skill investment for carry weight, and an SMG that handles the close-range encounters that happen inside loot-dense structures. The carrier isn't designed to lead fights: they're designed to stay alive long enough to bring materials back.
Skill tree investment for the carrier role diverges from solo play recommendations. Carry Weight in the Conditioning branch is the correct second priority after the S-tier Survival upgrades, not Sprint Speed or other Mobility options. The ARC Raiders skill tree tier list covers the specific upgrade order: but for squads with a designated carrier, Conditioning investment pays off faster than for solo or scout builds.
The three Safe Pocket slots (two rare materials, one exotic) reflect the carrier's job: even if the run goes wrong and the carrier dies, the highest-value items make it back to Speranza. Distribute loot to the carrier before extraction whenever practical.
GODEEPER: The carrier and scout roles have specific skill tree investment paths that pay off faster than other builds. ARC Raiders skill tree tier list →
 Moving to extraction. Squad coordination before the extraction call matters more than what happens after it: everyone needs to be positioned before the elevator alarm goes out.
Three Squad Loadout Configurations
1. Balanced Engagement: General Purpose
The Ferro/Bastinelli/Canto distribution above. One frontline, one scout, one carrier. Covers every range bracket, three separate ammo types (Heavy/Medium/Medium: consider swapping one Canto secondary to Stitcher for Light ammo access), and gives the squad two extraction route options running simultaneously.
This is the default configuration for Orange zone sessions where the squad wants to engage ARC units strategically rather than avoid all contact. The frontline handles forced engagements; the scout provides overwatch during cargo elevator activations; the carrier loots while the other two manage the perimeter.
Best for: Orange zone primary runs, balanced loot and combat sessions.
2. High-Volume Loot Push
Player 1: Ferro frontline (same as above)
Player 2: Canto SMG carrier with high Conditioning
Player 3: Canto SMG second carrier with high Conditioning
Two carriers instead of one scout. This configuration maximizes material return per run at the cost of long-range engagement capability: the squad has no Bastinelli, which means Sentinel encounters at range require the frontline player to handle alone while the carriers hold.
The tradeoff is worthwhile for White zone and low-Orange loot sessions where Sentinel density is low and the squad's primary constraint is inventory space, not combat. Two high-Conditioning players can move substantially more material per run than the balanced configuration.
Best for: White zone farming sessions, material grinding runs where combat is minimal.
3. Stealth Coordination
Player 1: Ferro, light armor, stealth-skilled
Player 2: Bastinelli or Canto, light armor, stealth-skilled
Player 3: Canto SMG, light armor, high Conditioning
All three players in light armor, all three with significant Survival branch investment, one Hatch Key per player in Safe Pocket. The squad moves as a single unit and avoids contact rather than managing it.
This configuration requires the most coordination because any one player breaking stealth compromises the whole approach: three simultaneous noise profiles are harder to control than one. But in late Orange and early Red zones where patrol density is high, a stealth squad that can move quietly past encounters loots faster and extracts more reliably than a combat squad that takes damage on every contact.
Requires all three players to have meaningful Detection Radius Reduction investment before this configuration reaches its potential.
Best for: Experienced squads running late Orange or Red zones, players who've committed to Survival branch investment.
GODEEPER: Extraction type selection, the 15-second Raider Hatch window, and the cargo elevator alarm radius: all relevant to squad extraction planning. ARC Raiders extraction guide →
Step-by-Step: Pre-Run Squad Coordination
1. Assign roles before queuing. Agreeing on frontline, scout, and carrier in Speranza (not at the first ARC encounter) prevents two players pulling Ferro in a panic because neither wanted to play carrier.
2. Set Safe Pocket priority by role. Frontline carries quest items. Scout carries Hatch Key. Carrier carries rare materials. This ensures the highest-value items per category are distributed across three Safe Pockets rather than concentrated in one.
3. Confirm extraction plan before dropping. Which type, where, who holds the Hatch Key, who calls the elevator. The extraction plan is set in Speranza. Under pressure in a contested zone is the wrong time to have this conversation.
4. Scout leads, carrier trails. Movement order matters in patrol-dense areas. Scout pre-scans routes 20-30 meters ahead. Frontline moves at the scout's cleared path. Carrier follows with loot inventory actively managed.
5. Distribute high-value loot mid-run. Rare materials found mid-session go to the carrier's Safe Pocket, not left in regular inventory. If the carrier takes early damage and needs to extract, the squad still recovers value.
6. Cargo elevator only when the Hatch is unavailable. If the scout holds a Hatch Key and conditions are right (no active Electromagnetic Storm), the squad uses the silent extraction. The cargo elevator is the backup, not the default.
Tips for Running Squad Loadouts
Redundant weapon types waste ammo supply. Three Ferro users all burn Heavy ammo. Three SMG users have no Sentinel answer. The range distribution across the three roles isn't aesthetic: it's the reason the squad can handle encounters that individual loadouts can't.
Distribute death cost deliberately. The frontline player runs the most expensive kit. If a session goes wrong, the frontline losing their loadout costs more than the carrier losing theirs. Don't put the most valuable crafted equipment on the player most likely to take contact.
Hatch Keys multiply in value per player carrying them. If the carrier also carries a Hatch Key (second Safe Pocket slot), the squad has two independent silent extraction options if the first Hatch location is compromised.
The loot guide matters more for squads than solos. Three players burning through materials replace kits faster. The ARC Raiders loot guide covers which materials to keep for rebuilding crafted kits and which to sell: at squad scale, following those priorities is the difference between sustainable kit replacement and resource bleed.
Don't over-invest in Conditioning before Orange zones. Below Orange, survival rate is the bottleneck, not inventory space. The carrier role's Conditioning advantage doesn't pay off in White zone sessions where encounter density is low. Both players should have the S-tier Survival upgrades before the carrier starts building Conditioning.
Loadout Quick Reference
| Role | Armor | Primary | Zone Focus |
|---|---|---|---|
| Frontline | Medium / Med head | Ferro (Heavy) | Orange → Red |
| Scout | Light / Light head | Bastinelli (Medium) | Orange → Red |
| Carrier | Light / Light head | Canto SMG (Medium) | White → Orange |
| Loot Build ×2 | Light / Light head | Canto SMG (Medium) | White zones |
Frequently Asked Questions
What is the best squad loadout in ARC Raiders? One frontline on Ferro with medium armor, one scout on Bastinelli with light armor and a Hatch Key, one carrier on Canto SMG with high Conditioning. This covers every engagement range, distributes loot capacity across three Safe Pockets, and gives the squad two independent extraction options.
How should three players split roles in ARC Raiders? Frontline handles direct ARC contact (battle rifle, medium armor, EMP). Scout ranges ahead and provides overwatch (marksman rifle, light armor, binoculars). Carrier maximizes material return (SMG, high Conditioning, light armor). One role per player prevents redundant kit costs and covers every scenario without overlap.
Should all squad members use the same weapon in ARC Raiders? No. Three battle rifles waste close-range coverage and stack one ammo type. Three SMGs have no Sentinel or long-range answer. Distributing weapons across Ferro, Bastinelli, and Canto covers every range the game presents while spreading ammo demand across types. Full weapon rankings in the ARC Raiders weapons tier list.
How do squads split extraction in ARC Raiders? All three players extract from one console activation (the squad converges before the frontline or scout activates it. For Raider Hatch exits, the scout pops the key and the squad enters within 15 seconds. Assign extraction caller before the run) the cargo elevator alarm doesn't wait for squad discussion.
What happens when a squad member dies in ARC Raiders? They lose gear outside their Safe Pocket. The run continues for survivors. This is why distributing high-value loot across all three Safe Pockets matters: one player dying doesn't wipe the full run's value if items are spread correctly.
Is it worth having different armor tiers across the squad? Yes, within limits. The frontline runs medium chest and head for damage mitigation. Both other players stay light. Three players in heavy armor makes the squad loudly detectable and removes the option to avoid contact in patrol-dense areas.
Related Reading
- ARC Raiders 1.27.0: Riven Tides Map and All Changes: ARC Raiders 1.27 dropped May 5: Turbine visibility fixes, grenade exploit patched, audio overhaul, and Embark's direct response....
- ARC Raiders Armor Guide: Tiers, Noise & Zone Choices: ARC Raiders armor guide: all three armor tiers compared by noise penalty, protection, and zone fit. Includes head....
- ARC Raiders Dam Guide: Loot, Patrols & Extractions: ARC Raiders Dam guide: Alcantara Power Plant loot, patrol routes, close-quarters tips, and which extractions to use in....
- ARC Raiders Spaceport Guide: Towers, Loot & Vaporizers: ARC Raiders Spaceport guide: Acerra Spaceport POIs, where Vaporizers spawn on the towers, open-terrain extractions, and loadouts that....
References
- ARC Raiders on Steam: official store page, patch notes, and equipment documentation
- ARC Raiders Official Site: Embark Studios' official page with Flashpoint update loadout and vendor details
Was this guide helpful?

Disclaimer
This article is published for informational and entertainment purposes. It does not constitute professional financial, legal, or technical advice. Game performance, online services, patch schedules, and store listings change. Verify critical details (pricing, system requirements, regional availability) with publishers and storefronts before you buy. Affiliate links, where present, help support our editorial work and are labelled in our affiliate disclosure.
About the author

Games Critic
Games writer and reluctant optimist who has reviewed over 400 titles across 9 years. Irish, currently in Berlin. Has strong opinions about tutorial design.
- 400+ games reviewed across 9 years
- Platformer and horror specialist
- Narrative design focus