
GameBrief · General
Beastro Deck Building Guide: Best Cards and Combos 2026

Reviewing
Beastro
Timberline Studio · Timberline Studio
The Beastro deck building guide most players need isn't about the cooking mini-games. Those are intuitive. The knowledge gap is what happens between the kitchen and combat: specifically how the mise en place grid translates into card values, why some ingredient combinations produce special effects while others just add numbers, and when to commit to a mono-flavor strategy versus keeping two suits in play.
Beastro launched June 11, 2026 on Steam ($14.99 during a launch-week discount, now $19.99) and Xbox Game Pass to Very Positive reviews. Timberline Studio built the card system around trick-taking mechanics from Spades and Hearts rather than the energy-management model common in digital deckbuilders. That's not a minor design wrinkle: the strategic levers here are entirely different from what most players expect going in.
TL;DR: Each ingredient placed in the mise en place grid generates one card with a flavor suit and a base number. Ingredients with higher flavor weight shift the dish's dominant profile more sharply. Monster-part ingredients produce the game's strongest cards and should be used immediately. Build toward two dominant flavors per Caretaker once you know their expedition route, and prioritize effect-carrying cards over raw numbers past the first zone.
Beastro deck building guide: how cards are actually generated
Every card in a Caretaker's deck comes from an ingredient you cooked with the previous evening. One ingredient, one card. No card shop, no draft, no outside source. The deck is a direct record of what you fed them.
Each ingredient carries two attributes that determine the card it generates: a flavor suit (one of the five flavors) and a power level that sets the card's base number. Higher-quality ingredients produce cards with higher base numbers. A freshly harvested crop at peak ripeness generates a noticeably better card than the same crop harvested early or left to sit.
The third attribute, which most players miss in the first few hours, is flavor weight. Ingredients don't contribute equally to a dish's flavor profile. An ingredient with high Umami weight pushes the finished dish toward Umami more strongly than one with low Umami weight. This matters because a Caretaker fed a genuinely Umami-dominant meal receives different card abilities than one fed a flat spread of all five flavors. The abilities unlocked through flavor preference matches are the best effects in the game, and they don't announce themselves anywhere in the UI.
Timberline Studio's Xbox Wire launch article put it plainly: "each ingredient unlocking a card," with the Caretaker's "tastes and preferences" determining which abilities get added. The ability isn't a separate unlock. The same ingredient produces a plain card if the dish's flavor profile doesn't match the Caretaker's preference, and a card with a special effect if it does. Same ingredient, different outcome depending on how you built the rest of the meal around it.
 The mise en place grid: ingredient placement determines dish flavor dominance. Pieces with heavier flavor weights push the profile more sharply toward their suit.
How the mise en place grid shapes your deck
The mise en place phase is a spatial puzzle. Ingredients come as Tetris-shaped pieces with different footprints on the plate grid. Placement isn't arbitrary: where you put a piece relative to others, and how much of the plate you fill with any single flavor weight, determines the finished dish's flavor dominance.
Two identical ingredient lists can produce different decks depending on placement order and which pieces fill the most central positions. A large-footprint Umami piece in the center of the plate anchors the entire dish toward Umami even if smaller Salty and Sweet pieces surround it. A large Salty piece placed off-center against a collection of smaller high-weight Umami pieces may lose the profile battle entirely.
Three things to check before placing anything:
First, the flavor weight of each piece. A weight-3 Salty piece contributes three times as much to the Salty profile as a weight-1 Salty piece. Two weight-1 pieces don't equal one weight-2 piece in placement priority.
Second, plate fill percentage. Gaps in the grid waste the power level of nearby ingredients. Tightly filled grids produce cards with higher effective base numbers, because the cooking mini-games reward clean plate assembly with a small quality bonus.
Third, the Caretaker's target flavor. Know which flavor you're aiming for before you start placing. Work backward from that target: put your heaviest-weight ingredient in that flavor down first, then fill around it.
Mono-flavor versus mixed builds
A mono-flavor deck wins more tricks in a matched encounter and bleeds out in every other. A mixed deck is slightly weaker in optimal situations but survives the unexpected.
The trick-taking model means monsters set the flavor of each trick. A monster plays a Salty card with a value of 7; you win the trick by playing a higher Salty card, or take the hit by playing something off-suit. A mono-Salty deck cleans up Salty-heavy encounters. Against a Sweet-heavy zone, it sheds health every round because it has nothing to play into Sweet tricks.
In the first zone, before the second Caretaker joins, run two or three flavors. You don't yet know which enemies each Caretaker faces regularly. The developer guidance from Xbox Wire is blunt here: "Keep a good mix of flavors. You never know what you'll encounter in the wilds." That's not vague advice. It's the actual correct build philosophy for the opening hours.
Once each Caretaker's expedition route stabilizes, specialization pays off. If Oyshi consistently heads into Umami-region territory, cut everything except Umami and one secondary flavor for coverage. If Kalan's route goes through Bitter-heavy zones, give him a Bitter-dominant build with Salty mixed in: Bitter and Salty enhance each other, so a 70/30 split of Bitter/Salty outperforms pure Bitter in Kalan's zones. You need something to play on the off-tricks.
The one situation that always warrants going mono: a boss encounter where the boss's flavor is known in advance. Strip the deck down to one flavor and stack the highest-value ingredients you have. The coverage tradeoff doesn't matter when the entire encounter is one suit.
GODEEPER: For a different approach to suit-based deckbuilding, the Black Jacket guide covers how card removal and suit purification change the math entirely. Black Jacket Deck Building Guide: Best Suits and Combos 2026 →
Which ingredients produce the best cards
Ingredient quality in Beastro runs on two axes: base power level and effect potential. They don't always align, and picking the right one for a given situation is most of the actual deck building.
Crops grown to full maturity and harvested at peak ripeness produce cards at their full power potential. The game tracks ripeness state for farmed produce. A crop at 100% ripeness versus 60% ripeness is a meaningful number difference on the resulting card. Easy to ignore when early combat forgives it, genuinely costly once base numbers need to hit double digits against later enemies.
Effect-potential ingredients are specific crops and gathered items that generate cards with built-in special effects when the dish's flavor profile matches the Caretaker's preference. The Xbox Wire launch coverage mentioned concrete examples: some cards can "put your enemies to sleep, blow away their cards," with environmental interactions like fire causing Sweet cards to caramelize for a bonus. The exact ingredient-to-effect mapping isn't visible in any in-game screen until you've cooked with that ingredient at least once. Every new ingredient is experimental until you've seen its card output.
Monster-part ingredients are the strongest available. They generate cards with multi-suit properties (a single card that counts as both Bitter and Sour in a trick, for instance), unusually high base numbers, or special effects that standard crops can't produce. Monster parts don't re-grow. Each part is one-time. Use them in the cooking session immediately after they arrive. Don't hold past two sessions.
Foraging outside Palo Pori produces ingredients with different flavor profiles than what you can grow on your farm. Sour and Bitter early in the game are more accessible through foraging than through farming. If a Caretaker needs a Bitter-dominant deck and your farm is mostly Salty crops, the forage routes around the village walls are the right call. Replanting takes days; foraging is immediate.
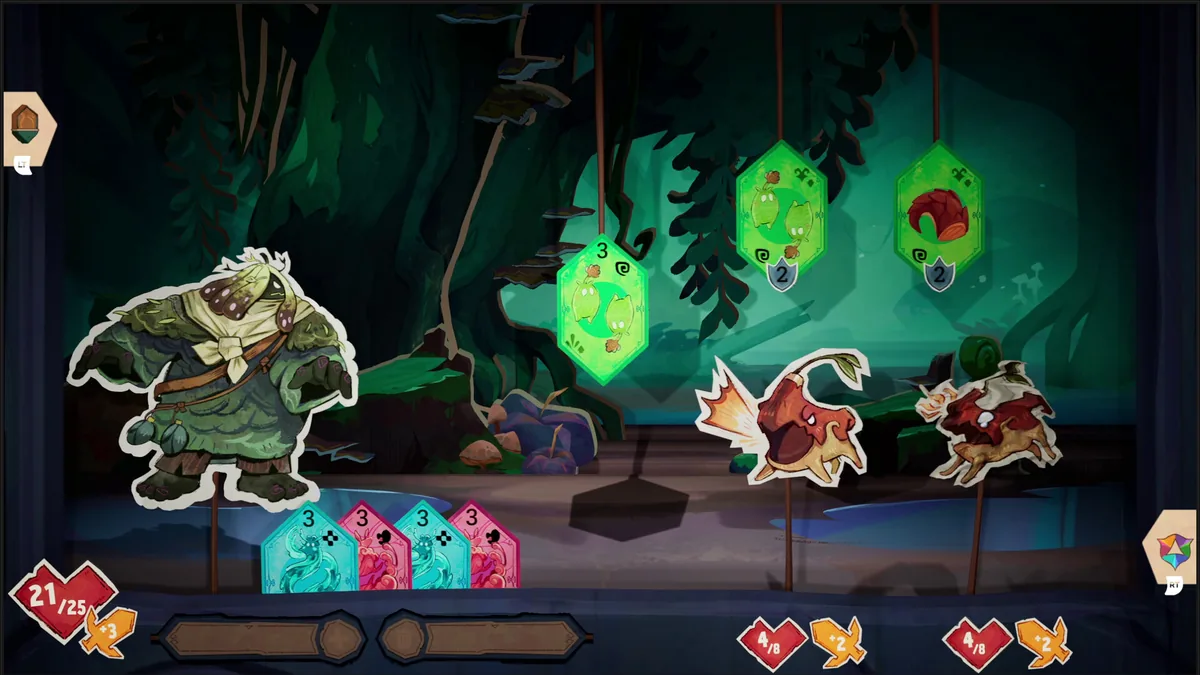 Combat trick-taking: the Caretaker plays a flavor card against the monster's suit. Effect-carrying cards trigger status conditions visible during the trick resolution.
Card effects and when they change the math
Higher number in the matching flavor wins the trick. That's essentially all the rules you need for the first zone. By the second zone, enemies start playing cards with effects, and the gap between a plain high-number card and a slightly lower-number card with a useful effect closes fast.
Sleep effects are the most broadly useful in the game. A card that puts an enemy to sleep skips their next play entirely. In a trick-taking structure, skipping a trick means the enemy forfeits the damage they would have dealt. Against high-value enemies that are genuinely hard to out-number, a sleep card at the right moment can swing two or three points of outcome in a single round. That's the whole fight in some encounters.
Card removal effects eliminate a specific card from the enemy's upcoming plays. The value is tempo: remove their strongest card before the trick where it would have been decisive. Enemy hands are visible in Beastro's puppet theater layout, which makes this effect legible and plannable rather than a guess.
Suit balance effects work when overpowering a monster on numbers isn't realistic. Instead of playing a higher card in the matching suit, a balancing card neutralizes the trick regardless of the number difference. Against an enemy with very high base numbers in their dominant flavor, balancing is often more efficient than trying to out-number them with a crop you haven't had time to fully ripen.
Environmental effects (fire caramelizing Sweet cards, water tempering Salty cards) appear in specific expedition encounters. They're harder to pre-plan for than the others, but once you know a Caretaker's regular route they become consistent. An Oyshi deck with at least two Sweet-suit caramelization cards performs noticeably better in fire-adjacent encounters. Worth tracking the first time you see that environment type.
Cooking timing and ingredient quality
The cooking mini-games affect card quality in ways the tutorial doesn't explain. The chopping mini-game has a combo multiplier: consecutive clean cuts within the timing window add a small bonus to the ingredient's output power level. A fully executed cutting combo on a high-quality crop raises the resulting card's base number by one or two points. Missing a cut resets the combo to zero.
One or two points per card is noise early on. Against later enemies with base numbers in the mid-teens, a deck where every card is two points higher than it would have been with sloppy execution shifts several tricks per expedition. That's the difference between clean runs and grinding through the same encounter twice.
The sauté timing window rewards accuracy over speed. Moving the pan too aggressively degrades the ingredient. Steady and controlled at the pace the animation indicates is faster than rushing and having to compensate. The game isn't timing you against a clock. It's checking whether you matched the rhythm.
Slow down. The daily cycle has no timer. Every mini-game can be taken at whatever pace you need to land the timing correctly. The investment in clean execution compounds across a full evening of cooking into meaningfully better cards by the time combat starts.
Building decks for specific Caretakers
The two Caretakers you get in the opening hours establish the core pattern, and they're meaningfully different to build for.
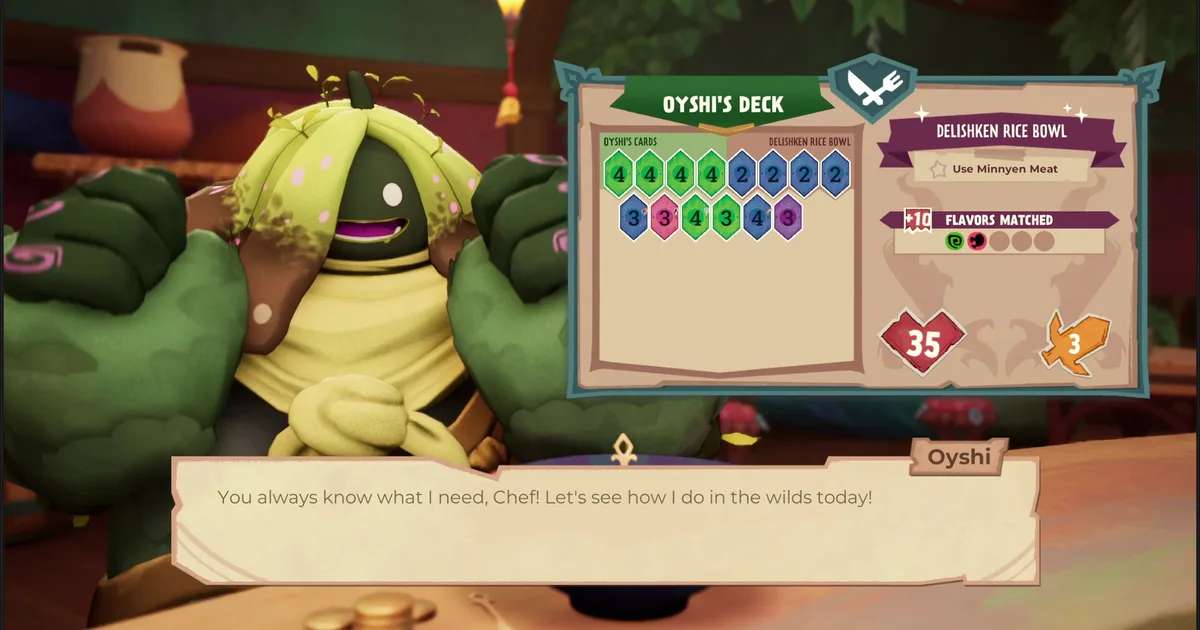
Oyshi (Umami) is the more accessible early build. Umami ingredients appear frequently in the starting farm plots and through foraging near the village walls. A two-ingredient Umami-dominant meal satisfies her preference and produces one or two ability-enabled cards per evening. Her abilities center on steady damage output across multiple tricks rather than single-trick swingers, which pairs well with a Umami/Sour mixed deck in early zones (Sour is Umami's enhancement pair).
Kalan (Bitter) needs more intentional sourcing because Bitter ingredients are less common in early farm options. His ceiling, once properly fed, is higher than Oyshi's in raw trick-winning potential. His preferred dishes take longer to discover. The Xbox Wire developer interview noted he "is very much focused on the mission, plays by the rules." His deck reflects the same quality. It rewards methodical construction over improvisation, and punishes shortcuts more visibly than Oyshi does.
For both: check their patron request during the service phase each evening. That's the clearest signal about what flavor they want in that night's meal. Following the request even partially raises the chance of activating ability-enabled cards in the resulting deck.
GODEEPER: The full Beastro review covers how the Caretaker system lands in the context of the game's 15 to 20 hour length and where the mid-game slows down. Beastro Review: A Cozy Deckbuilder Worth Your Time →
Approaching harder expedition routes
As the story pushes Caretakers into new flavor regions, the expeditions shift from single-flavor monster encounters to mixed-suit enemies and multi-card boss patterns. The same strategies apply, but the tolerances get tighter and the filler card that cost you one health in zone one costs you a run in zone three.
By the time a Caretaker reaches a boss encounter, the deck shouldn't have filler. Every ingredient cooked should have been chosen for its flavor contribution and effect potential. A general-purpose mixed deck that worked fine in the first two zones won't cleanly win boss tricks.
Reserve monster parts for the run immediately before a known boss fight. If you know an expedition ends in a boss encounter, cook with any available monster-part ingredients in that meal. The card those parts generate will be in the active deck for the boss. That's the highest-value use of monster parts: not saving them indefinitely, but timing them so they land where they have the most impact.
Don't go mono for boss fights. Boss encounters include multi-flavor card plays from the enemy. A mono-flavor deck gets exposed in at least one trick per boss round. Two-flavor builds with a clear dominant suit and a secondary neutralizer maintain their win rate better through the full boss sequence than pure mono decks do.
Related Reading
- Beastro Review: A Cozy Deckbuilder Worth Your Time: How the cooking-to-combat loop holds up over 15 to 20 hours, and where the game stumbles mid-run.
- Beastro Tips: 9 Things to Know Before You Start Cooking: Broader new-player advice covering the daily cycle, Caretaker relationships, and farming pacing.
- Beastro Release Date: Cooking Deckbuilder Hits June 11: Launch coverage, platform details, and Xbox Game Pass availability.
- Black Jacket Deck Building Guide: Best Suits and Combos 2026: Another card-suit deckbuilder with a different approach to construction, useful for genre comparison.
- Beastro Flavor Guide: How the 5 Tastes Work in Combat: Beastro flavor guide: 5 tastes, how cooking creates your deck, and which flavor pairs enhance or suppress combat.....
References
- Beastro on Steam: store page, $19.99, Very Positive reviews
- Beastro developer interview, Xbox Wire: Timberline Studio on flavor balance and card strategy
- Timberline Studio official site: developer press page and game overview
Frequently Asked Questions
How do you build a deck in Beastro? You build a Caretaker's deck through cooking, not combat. Every ingredient you place in the mise en place grid generates one card with a flavor suit and a number value. The meal's dominant flavor becomes the deck's primary suit. Cook each evening to update the deck before the Caretaker's next expedition.
What are the five flavor suits in Beastro? The five flavor suits are Salty, Bitter, Sweet, Sour, and Umami. Each flavor is both a card suit for combat and a region-identity for the Caretakers and monsters you encounter. Matching your deck's flavor to a Caretaker's preference unlocks stronger abilities.
Should I build a mono-flavor deck or a mixed deck in Beastro? Mono-flavor decks win more tricks in encounters where the enemy matches that flavor, but they are exposed when monster suits shift. Mixed decks with two dominant flavors cover more situations. Early game, run two or three flavors. Once you understand a Caretaker's expedition route, narrow down to two.
What are monster parts in Beastro and how do they affect cards? Monster parts are rare ingredients Caretakers bring back from expeditions. They carry unusual card-generating properties unavailable from standard crops: higher base number values, multi-flavor suits, or built-in special effects. Use them in the next evening's cooking rather than hoarding them.
Which Caretakers have the strongest combat decks in Beastro? Oyshi, the Umami Caretaker, has strong card abilities when well-fed and is one of the more reliable early-game Caretakers because Umami ingredients are accessible from the start. Kalan, the Bitter Caretaker, has higher potential once you unlock his preferred dishes but requires more investment to feed correctly.
How does the mise en place grid work in Beastro? The mise en place grid is a spatial puzzle where Tetris-shaped ingredient pieces are placed on a plate. Ingredients have flavor values and weights, and placement affects the dominant flavor of the finished dish. The goal is to fill the plate in a way that hits the Caretaker's target flavor profile.
Do card effects matter in Beastro or just the numbers? Card effects become critical past the first zone. Basic trick-taking is won on numbers, but effects like putting enemies to sleep, removing a card from an opponent's hand, or triggering environmental bonuses can swing a run that number comparisons alone would lose.
Is there a challenge mode in Beastro? Beastro's main progression includes increasingly difficult expedition routes as the story advances into new flavor regions. Later routes feature enemies with multi-flavor cards and higher base values that require more intentional deck construction than the opening zones.
Was this guide helpful?
About the author

Senior Critic & Analyst
Former game data analyst turned critic with 11 years covering indie and mid-tier games. Based in Austin. Runs spreadsheets on games most people just play.
- 11 years games criticism
- Former game economy analyst
- Roguelike and strategy specialist
Keep reading




Disclaimer
This article is published for informational and entertainment purposes. It does not constitute professional financial, legal, or technical advice. Game performance, online services, patch schedules, and store listings change. Verify critical details (pricing, system requirements, regional availability) with publishers and storefronts before you buy. Affiliate links, where present, help support our editorial work and are labelled in our affiliate disclosure.
Comments
Loading comments…