
GuideMoonlighter 2: The Endless Vault
Moonlighter 2 Dimensional Effects: Damage and Loot Explained
About the game
Moonlighter 2: The Endless Vault
Moonlighter 2 dimensional effects do not have a verified public damage formula yet. The safest explanation is narrower: Steam documents several dimension-specific relic effects that change how items are protected, overcharged, converted, absorbed, and valued, while the combat label itself is still under-described.
TL;DR: Do not treat Dimensional Effects as a confirmed universal damage multiplier or as a synonym for every status effect. The verified loot layer includes Kalina's Armor and Burn, the Gallery's Shock and Overcharge, and Aeolia's Petrify and Absorb. Those effects can change what survives a run and how much quality reaches the shop. The public sources do not explain a single combat formula.
Moonlighter 2 dimensional effects: quick answer
The current verified answer is that Moonlighter 2 does not publicly define Dimensional Effects well enough to calculate their damage impact. The official Steam store describes combat, weapons, armor, perks, and loot synergies, but it does not include a Dimensional Effects glossary. A Steam discussion records players asking exactly what the phrase means, and the replies do not establish an authoritative formula.
What you can verify is the adjacent relic system. Steam Community documentation describes dimension-specific effects for Kalina, the Gallery, and Aeolia, plus universal placement rules. Those mechanics interact with damage-adjacent states and loot outcomes, but the sources do not prove that the phrase Dimensional Effects is a single name for all of them.
Key Takeaways
- No checked source publishes a universal Dimensional Effects damage multiplier, status formula, or scaling table.
- The official store confirms that Moonlighter 2 combines weapons, armor, perks, and arranged loot synergies, not what this label calculates.
- Steam Community documentation verifies Kalina's Armor and Burn, the Gallery's Shock and Overcharge, and Aeolia's Petrify and Absorb as relic mechanics.
- Shock can create Overcharge, and a second Shock can destroy an already Overcharged relic. Battery can remove Overcharge.
- Petrify turns a relic into same-rarity Aetherium, while leftover Aetherium is destroyed at the end of a run.
- Absorb destroys specified relics and adds their Quality to the resulting item. That is a loot and quality interaction, not proof of a combat damage multiplier.
- The official 1.0 hotfix names poison damage, electric field damage, Wound, and Ignite separately, without defining any of them as Dimensional Effects.
Overview
There are two questions hiding inside searches for “Moonlighter 2 dimensional effects.” The first asks what a combat tooltip or perk means. The second asks how the three dimensions alter relic handling. The first still lacks an authoritative public answer. The second has useful, testable rules, so this guide keeps those layers separate instead of turning a likely connection into a fake formula.
The official Steam store page says Moonlighter 2 has “dynamic combat with various weapon classes, armor sets, and powerful perks” and asks players to arrange loot to unlock item synergies. That supports the broad systems context, not a claim about Dimensional Effects. The official 1.0 hotfix also treats poison damage, electric field damage, Wound, and Ignite as named combat and perk behaviors, but it never defines them through the Dimensional Effects label.
One Steam discussion captures the evidence gap in plain language. A player asks, “What do you mean a perk makes ‘dimensional effects’ stronger?” The thread shows that players were looking for a description, while the replies offer hypotheses rather than a developer explanation. One commenter also refers to an older weapon tooltip that used “ailments” before 1.0. That historical community comment is useful context, but it is not a verified current definition.
Step-by-Step
Use the following process whenever a perk, weapon, or relic mentions Dimensional Effects. It lets you make decisions with the mechanics that are documented while keeping the unknown combat term in its proper place. If a tooltip supplies a specific number in your own build, record that exact text and patch version rather than borrowing a number from an unrelated relic interaction.
1. Read the exact tooltip before assigning a meaning: Capture the weapon, perk, dimension, and patch context. The public sources do not supply a universal formula, so “stronger Dimensional Effects” is not enough evidence to calculate damage, ailment potency, duration, or area of effect.
2. Separate the combat label from the backpack relic rules: The Moonlighter 2 price guide already documents the universal placement layer and the three dimension-specific effect pairs. Use those rules for relic planning, but do not silently rename every relic trigger as a combat Dimensional Effect.
3. Identify which dimension's relic rules you are using: Kalina uses Armor and Burn, the Gallery uses Shock and Overcharge, and Aeolia uses Petrify and Absorb. These names are documented by the Steam Community relic guide and are the reliable starting point for loot decisions.
4. Protect or convert loot before chasing value: Armor can protect another relic from Burn, while an unprotected Burned relic is destroyed. Shock creates Overcharge, but a second Shock destroys an already Overcharged relic. Battery removes Overcharge. In Aeolia, Petrify creates same-rarity Aetherium, and Absorb destroys specified relics while adding their Quality to the resulting item.
5. Check quality and sale consequences after the run: The Gallery quality loop documented by Steam Community guides uses Shock and Overcharge as inputs. Prototype-158 gains 6 quality for each Overcharged relic each time it is Shocked, and Signal Twin doubles the quality given by Shock. That is a confirmed relic interaction and a useful example of loot value changing without claiming it is the Dimensional Effects damage formula.
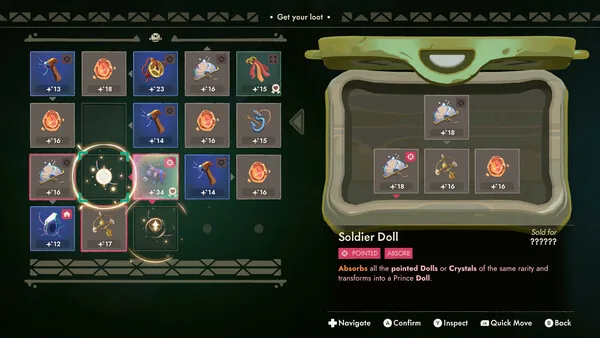 The Soldier Doll tooltip visibly shows Absorb and its pointed-relic conversion rule, a concrete loot effect that can be checked in-game.
The verified effect map
| Layer | What the checked sources establish | What they do not establish |
|---|---|---|
| Combat label | The phrase appears in player-reported tooltip and perk questions | A universal damage multiplier, status list, duration, or scaling formula |
| Kalina relics | Armor can shield another relic from Burn; Burn destroys an unshielded relic | That Armor or Burn is the same thing as the combat label |
| Gallery relics | Shock creates Overcharge; a second Shock destroys Overcharge; Battery removes it | That every Shock interaction changes enemy damage |
| Aeolia relics | Petrify creates same-rarity Aetherium; Absorb adds destroyed relic Quality to the result | That Aetherium conversion is a combat effect |
| Quality loop | Prototype-158 and Signal Twin have documented Shock and Overcharge interactions | A general quality bonus for every Dimensional Effect |
This distinction is the useful answer for now. It gives you a real decision tree for relics and stops the guide from presenting a community interpretation as if Digital Sun had published a stat sheet.
How the documented relic effects change loot
The dimension rules matter because they change whether loot remains in your backpack, changes form, or carries more Quality into the shop. They are not a minor naming detail. They can create a large difference between a relic that survives to be priced and one that is consumed during the run.
Kalina: Armor and Burn
The documented Kalina pair is defensive and destructive. Armor can protect another relic from Burn. A relic that is Burned is destroyed unless it is Shielded. Therefore, if a Kalina layout places a valuable item in the path of Burn, the first question is whether an Armor or Shield effect covers it. The source confirms the survival rule, not a damage number for the combat label.
The Gallery: Shock and Overcharge
Shock puts a relic into Overcharged. The danger is repeat exposure: an Overcharged relic is destroyed if it is Shocked a second time. Battery can remove Overcharge, which makes it a cleanup or protection tool rather than a reason to apply Shock blindly.
The quality example is why the Gallery deserves separate attention. The documented Prototype-158 effect gains 6 quality for each Overcharged relic when it is Shocked, and Signal Twin doubles the quality given by Shock. If you are optimizing the result, count the Overcharged relics and plan the Shock timing. Do not generalize that exact 6-point value to Dimensional Effects as a whole.
Aeolia: Petrify and Absorb
Petrify turns a relic into Aetherium of the same rarity. Any Aetherium left at the end of the run is destroyed. Absorb destroys the specified relics and adds their Quality to the resulting item. This is a direct loot-conversion decision: keep the ingredients if you need them, or accept their destruction when the resulting item's quality is the goal.
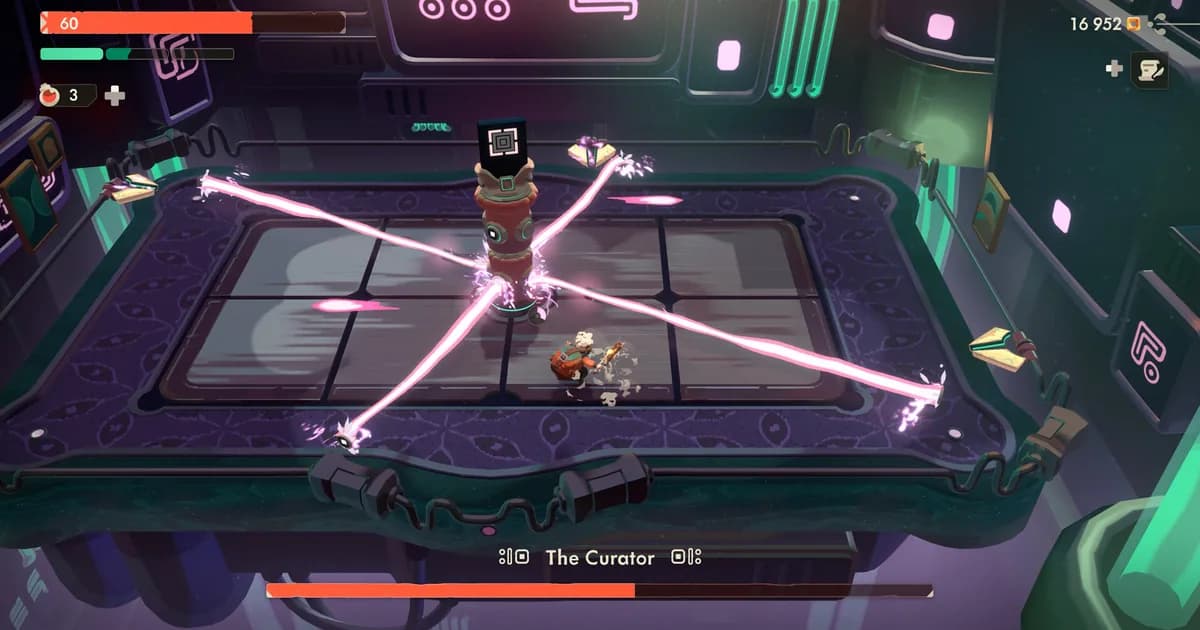
 Combat visibly contains damage numbers and effect feedback, but this screenshot does not identify a universal Dimensional Effects multiplier.
Tips
The best way to play around Dimensional Effects today is to be precise about what you know. Treat the term as a tooltip question that needs patch-specific evidence, then use the fully documented relic rules to make the immediate backpack decisions. This avoids wasting a run on a guessed status interaction and keeps quality planning reproducible.
Treat damage claims as unverified until the tooltip gives a number
Do not turn the phrase “stronger Dimensional Effects” into a percentage. The sources checked for this guide do not state whether it changes raw damage, ailment potency, duration, hit count, or something else. The official hotfix's separate references to poison and electric field damage are a reason to keep those categories separate.
Use a before and after test for relic quality
For a Gallery test, record the number of Overcharged relics, Shock Prototype-158, and compare its Quality before and after. The Steam guide's documented 6-per-Overcharged-relic rule and Signal Twin's doubling effect give you a reproducible benchmark. This tests a relic chain rather than pretending to measure the undefined combat label.
Protect valuable ingredients before optimizing the result
Burn and repeat Shock can destroy items. Petrify creates Aetherium that can expire at the end of a run, and Absorb consumes its input relics. Sort your backpack with the survival rule first, then chase the higher-quality outcome. The Rune Dice relics guide is a useful comparison if you want another game where item order and synergy matter.
Recheck after a patch
Digital Sun's official 1.0 announcement says, “Your feedback has had a real impact on the game.” The post lists new equipment, challenges, Codex pages, and ongoing changes, while the later hotfix corrects named weapon, perk, enemy, and relic-description issues. If a tooltip changes, trust the new text and patch notes over a pre-1.0 community explanation. Our Moonlighter 2 review gives the broader release context.
GODEEPER: For the full backpack placement rules, Shop Perks, price tiers, and the documented 999-quality example, read the Moonlighter 2 price guide.
GODEEPER: If your next goal is completion rather than loot math, use the Moonlighter 2 achievements guide for the 56 Steam entries and the conditions Steam actually publishes.
Common Mistakes
The biggest mistake is answering an under-documented term with a confident list of mechanics. These are the traps to avoid:
- Calling every status effect a Dimensional Effect: poison, electric field damage, Wound, and Ignite are named in official notes, but no checked source equates them with the label.
- Using the old ailments tooltip as current proof: a Steam commenter reports that wording changed before 1.0. That is historical community evidence, not a current developer glossary.
- Treating relic effects and combat effects as identical: Kalina, Gallery, and Aeolia have documented relic rules, but the sources do not say those rules define the combat term.
- Applying Shock twice without checking Overcharge: the documented second-Shock consequence is destruction of an already Overcharged relic.
- Assuming Aetherium is permanent: leftover Aetherium is destroyed at the end of the run according to the relic guide.
- Inventing a universal quality bonus: the 6-point Prototype-158 rule belongs to a specific Gallery relic interaction, not every Dimensional Effect.
For comparison, the Farever Gear guide and Core Crusher beginner guide both show why named loot systems deserve their own rules instead of one broad “more damage” explanation.
Frequently Asked Questions
What are Dimensional Effects in Moonlighter 2?
The game does not currently publish a complete public definition. The verified neighboring system is the set of dimension-specific relic effects: Armor and Burn, Shock and Overcharge, and Petrify and Absorb.
Do Dimensional Effects increase damage?
No checked source supplies a universal damage multiplier or formula. Official notes mention several damage and perk categories without defining them as Dimensional Effects.
Are Dimensional Effects the same as ailments?
That is not confirmed. A community comment reports older “ailments” wording, but it does not establish the current 1.0 meaning.
What does Shock do?
Shock puts a relic into Overcharged. A second Shock destroys an already Overcharged relic, while Battery can remove Overcharge.
How do these effects change loot?
Armor can prevent Burn destruction, Petrify creates same-rarity Aetherium, and Absorb consumes specified relics while adding their Quality to the result. Overcharge can also feed a documented quality combo.
Where should I start with relic planning?
Start with the Moonlighter 2 price guide, then verify the exact tooltip on your current build before making any combat claim.
Related Reading
- Moonlighter 2 Tips: 9 Rules for Your First Hours Guide: Moonlighter 2 tips for early shop and dungeon runs: manage your backpack, sell safely, keep
- Moonlighter 2 Weapons Tier List: 4 Types Ranked (2026): Moonlighter 2 weapons tier list ranks the 4 verified core types, explains each documented combat
- Moonlighter 2 Review: Why the 3D Leap Actually Works: broader context for combat, loot, and the shop loop.
- Rune Dice Relics Guide: Best Builds: another relic-synergy system with order-sensitive planning.
- Dark Scrolls Best Builds: All 9 Heroes Ranked: a different take on perk and build interactions.
- Lost Castle 2 Weapons Tier List: a comparison point for weapon-specific combat decisions.
- Gambonanza Tips Guide: another systems-heavy game where exact interactions matter.
References
- Moonlighter 2: The Endless Vault on Steam: official store description for combat, weapons, armor, perks, loot arrangement, and item synergies.
- Moonlighter 2 official 1.0 announcement: launch details, new equipment and challenges, and the developer statement that “Your feedback has had a real impact on the game.”
- Moonlighter 2 official 1.0 Hotfix 1: separate references to poison damage, electric field damage, Wound, Ignite, weapon behavior, and relic-description fixes.
- What even is a dimensional effect?: Steam discussion documenting the public explanation gap and community hypotheses, not an authoritative formula.
- Perfect Price (Greed & Glory) by Jz: Steam Community guide documenting universal placement rules and Kalina, Gallery, and Aeolia relic effects.
- How to get 999+ quality relics in 1.0 by Totoro: Steam Community guide documenting Prototype-158, Signal Twin, Shock, Overcharge, and the 6-quality interaction.
- Moonlighter 2 Announcement Trailer: official video used for visual context, not as evidence for the undocumented formula.
Was this guide helpful?
About the author

News Reporter
Games journalist and news hound with 7 years covering industry moves, studio announcements, and patch notes. Chilean. Writes tight, edits tighter.
- 7 years games journalism
- Industry and esports specialist
- Early access coverage
Keep reading

Moonlighter 2 Achievements: All 56 Steam Unlocks Listed
Guides · 13 min
Moonlighter 2 Bosses Guide: All 6 Fights Explained
Guides · 9 min
Moonlighter 2 Weapons Tier List: 4 Types Ranked (2026)
Guides · 9 min

Moonlighter 2 Price Guide: Tiers, Perks and Relic Effects
Guides · 16 min
Moonlighter 2 Review: Why the 3D Leap Actually Works
Reviews · 8 min
Valheim Best Weapons: Complete Tier List by Biome (2026)
General · 30 min
Game deals · affiliate links
Disclaimer
This article is published for informational and entertainment purposes. It does not constitute professional financial, legal, or technical advice. Game performance, online services, patch schedules, and store listings change. Verify critical details (pricing, system requirements, regional availability) with publishers and storefronts before you buy. Affiliate links, where present, help support our editorial work and are labelled in our affiliate disclosure.
Comments
Loading comments…