GameBrief · Guides
Kristala Elder Samwise Boss: Beat the Phase 2 Spin

This Kristala Elder Samwise boss guide covers the fight most players call the hardest in the game, and the specific reason why: phase 2 breaks the rule the whole game taught you. For three bosses Kristala drilled deflection, and then Elder Samwise's phase 2 spinning combo demands evasion instead. This guide covers the two-phase split, the tornado you have to dodge, the recovery window players attack into, and the Malediction build that shortens the dangerous half.
TL;DR: Elder Samwise is Kristala's fourth boss and the community pick for hardest. Phase 1 is a normal deflect-and-counter fight. Phase 2 changes the logic: its spinning combo requires sustained evasion, not deflection, so dodge through it instead of parrying. Players report you should only attack once his combo strings have fully ended, watch for a fast follow-up, and back off the tornado rather than trading through it. A Malediction build that stacked in phase 1 carries over and melts phase 2 faster than its health bar suggests. Community reports from after this guide was written describe additional attacks (a stomp, ranged blasts, a possible third phase) that aren't covered here, so verify against your current patch. Xbox players: verify you are past the locked-menu patch.
Kristala Elder Samwise: the fight that breaks the rule
Kristala spends three bosses teaching you one thing: deflect. Lophi taught the parry, the Grottorot Golem added spatial awareness, Hiratrola rewarded reading heavy wind-ups. Then Elder Samwise's phase 2 throws that training out. That is why community consensus leans toward it as the most mechanically demanding boss in the game.
The trick is recognizing that you are fighting two different encounters. Phase 1 is manageable with the standard deflect-and-counter rhythm, and it gives you the tools to read the boss's approach. Phase 2's spinning combo pattern requires sustained evasion rather than deflection, which is a different ask than anything earlier. Players who try to parry their way through phase 2, doing what worked all game, are the ones who call it impossible. Players who switch to evasion when the spin starts find it hard but fair.
Key takeaways
- Elder Samwise is the fourth boss and the community pick for hardest.
- Phase 1 is a standard deflect-and-counter fight.
- Phase 2's spinning combo demands sustained evasion, not deflection.
- Back off the tornado attack; trying to trade through it loses.
- Only attack once his combo strings have fully ended, not in mid-combo gaps.
- Watch for a fast follow-up attack after what looks like the end of a combo.
- A Malediction build that stacked in phase 1 melts phase 2 faster than it looks.
Phase 1: the normal fight
Phase 1 is the part of Elder Samwise that plays by the rules you know. It is manageable with standard deflect-and-counter rhythm, and its pattern set gives you the time to read the boss before the fight's logic changes.
Use phase 1 deliberately, not just to survive but to set up phase 2. This is where you bank Malediction curse stacks if you are running that build, and where you learn the boss's tells, because some of them carry into the harder half. Treat phase 1 as the calm before the spin: keep your deflection clean, build your resources, and arrive at the phase transition with full mana, a heal, and a read on the boss's timing. The transition is one of the few safe windows to top off before everything gets harder.
GODEEPER: Elder Samwise builds on the deflection rhythm earlier bosses teach. Make sure that foundation is solid first. Kristala Hiratrola Boss Guide →
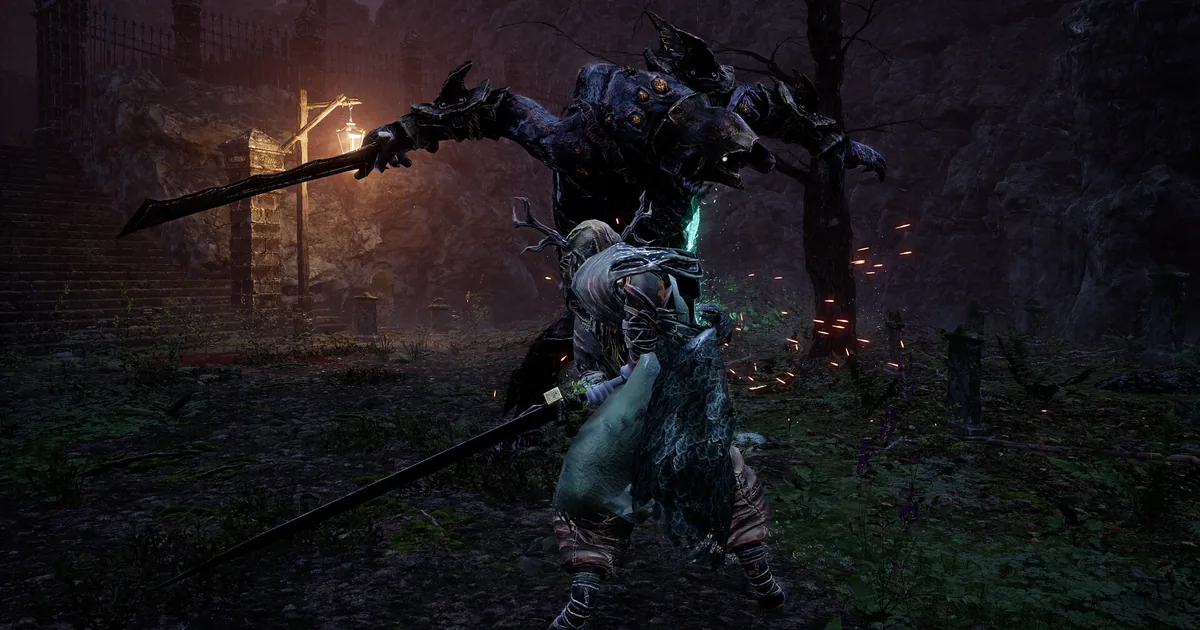
Phase 2: evade, do not deflect
This is the fight. Phase 2's spinning combo pattern requires sustained evasion rather than deflection, and internalizing that switch is the whole battle. The instinct that kept you alive for three bosses, hold position and parry, gets you hit here. You have to move.
The tornado is the centerpiece. Players report the working approach is to back off when it starts and re-engage once it ends. It is genuinely frustrating, because disengaging cedes your offensive pressure, but eating the tornado is worse. Reframe it: the spin is a hard reset on the exchange, not a window to exploit. Disengage, wait it out, and resume your rhythm when it finishes.
The other phase-2 threat worth knowing is a fast follow-up attack after what looks like the end of a combo. Players who clear the fight describe learning the tells for this and respecting that committing early gets punished. Exact combo lengths circulating in community discussion vary, and this guide can't independently confirm a specific hit count, so read your own fight rather than counting hits from memory. The lesson across all of it: phase 2 punishes the aggression that phase 1 allowed.
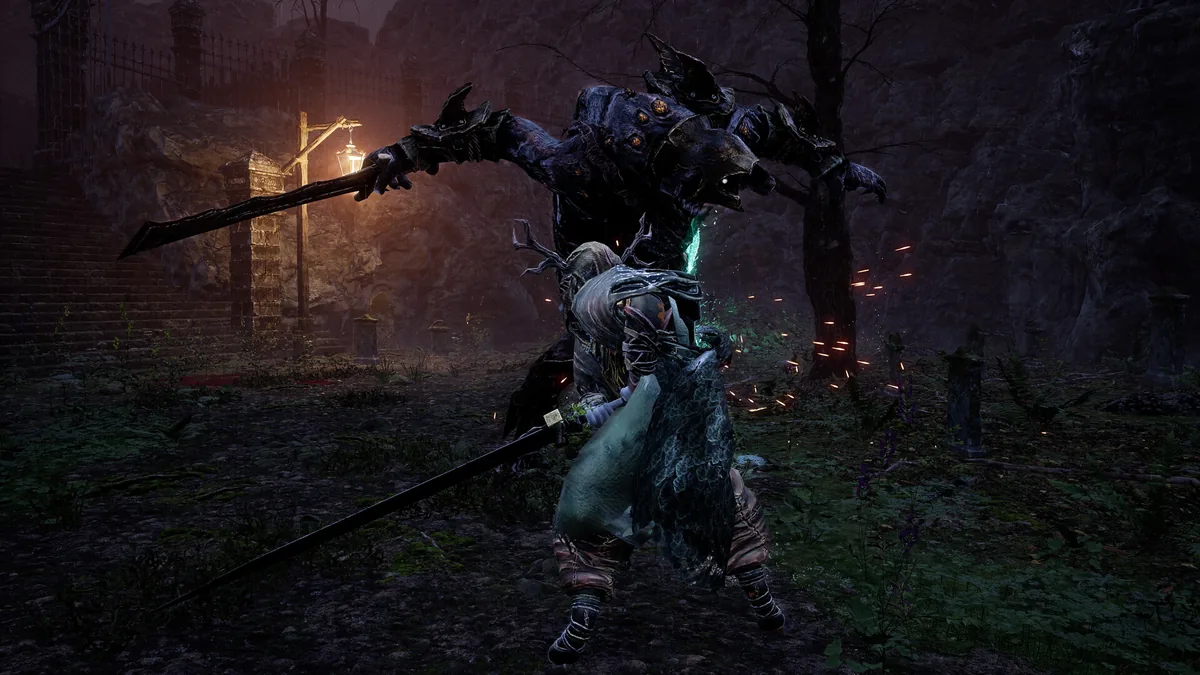 Phase 2 breaks Kristala's deflection rule. The spinning tornado has to be evaded, not parried, so back off when it starts and re-engage only when it ends.
When to attack: the recovery window
Because phase 2 is so punishing to aggression, your damage has to come from a precise window. Only attack once a combo string has genuinely ended, not the gaps you think you see mid-combo, which the fast follow-up punishes.
This is a patience test more than a reflex test. The temptation is to squeeze a hit in between the boss's attacks, and that temptation is exactly what the follow-up attack is designed to punish. Discipline means surviving the full combo, confirming it has actually ended, landing your hit or your spell, and resetting. One clean hit per recovery window, repeated, beats the run that tried to out-trade the boss and ate a combo for it.
If you are running Malediction, those recovery windows are also where your spell damage lands, and the curse stacks do the heavy lifting so you do not need many of them.
The Malediction payoff and a build note
The build that shortens this fight is the curse-stacking Malediction setup. Curse pressure from phase 1 carries into phase 2, so if your stacks are solid coming out of the first half, Elder Samwise's phase 2 health depletes faster than it looks. That matters more here than on any earlier boss, because every second you shave off the evasion phase is a second less exposure to the tornado and the combos.
Prep accordingly: visit the nearest Ellarial Font before the fight and build a sustained two-phase spell set, not your exploration loadout. Bank mana through deflections in phase 1, keep your curse stacks climbing, and let them carry into phase 2 so your limited recovery-window attacks hit harder.
 Prep before you commit. Rebuild your spell set at the nearest Ellarial Font for a sustained two-phase fight, then bank Malediction stacks in phase 1 so they carry into the evasion phase.
One hard note for Xbox players: there was a locked-menu issue that prevented skill investment, and fighting Elder Samwise without your skills is a real disadvantage. The patch addressing it shipped after launch, so verify you are running the current build before you attempt the boss, do not fight it handicapped.
The mental shift that beats it
More than any earlier Kristala boss, Elder Samwise is won in your head before it is won in your hands. The reason players bounce off it is not that their execution is bad, it is that they keep applying the deflection reflex the game spent hours building, into a phase that punishes it. Beating the fight starts with accepting that phase 2 is a different game and committing to playing it differently.
Concretely, that means making three deliberate switches when phase 2 begins. Switch from parry to dodge as your default defensive action. Switch from "punish every gap" to "punish only the recovery animation." And switch from holding ground to giving ground, backing off the tornado instead of standing in it. None of these are natural after three deflection-focused bosses, which is exactly why the fight feels so hard the first few attempts.
Once those switches are conscious rather than reflexive, the boss becomes readable. The tornado stops being a wall and becomes a reset you wait out. The combos stop being unfair and become patterns you survive before striking. And the Malediction stacks you carried from phase 1 quietly close out a health bar that looks more intimidating than it is. The hardest boss in Kristala is hard because of a habit, and the win comes from breaking it.
GODEEPER: Malediction stacks are doing real work in this fight even when you're not actively casting. Here's how the school compares to Eminence. Kristala Spells Guide: Eminence vs Malediction Explained →
Frequently Asked Questions
How do you beat Elder Samwise? Deflect through phase 1, then switch to evasion for phase 2's spin. Attack only in his recovery animation, and back off the tornado.
Why is it the hardest boss? Phase 2 demands evasion after the game spent three bosses teaching deflection, plus a fast follow-up attack that catches early commits.
How do you survive the tornado? Evade it, do not trade. Back off when it starts and re-engage when it ends.
When can you attack? Once a combo string has genuinely ended, not in the mid-combo gaps. Exact combo counts vary by community report and possibly by patch, so read your own fight rather than a specific number.
Best build? Malediction curse stacking; phase 1 pressure carries into phase 2 and shortens the dangerous evasion phase.
Where is it? The fourth boss, reached by unlocking the required key statues. Xbox players should verify they are past the locked-menu patch.
Related Reading
The Kristala Boss Guide: All 5 Bosses overviews every fight and where Elder Samwise ranks.
The Kristala Hiratrola Boss Guide covers the third boss and the deflection rhythm phase 1 relies on.
The Kristala Complete Guide is the hub for every Kristala system, from clans and combat to bosses and builds.
- Kristala Lophi Boss Guide: Parry Timing & How to Win: Kristala Lophi boss guide: why his yellow attacks should be parried not dodged, when to dodge the jump....
- Kristala Grottorot Golem Boss: The Arena-Edge Kill: Kristala Grottorot Golem boss: the environmental edge kill, why the arena cuts both ways, the dungeon-reset problem, and....
- Kristala Elder Satine Boss: The Final Deflection Test: Kristala Elder Satine boss guide: the most deflection-heavy fight in the game, the jumpscare attack that breaks the....
- Kristala Clans: Eminence, Malediction, and Which to Pick: Kristala clans guide: the Eminence vs.
- Kristala Spells Guide: Eminence vs Malediction Explained: Kristala spells guide: Eminence schools deal immediate damage, Malediction builds curse over time.
- Kristala Beginners Guide: Stats, Fonts, and Clan Tips: Kristala beginners guide: stat priorities, Ellarial Font order, and clan tips for a dark fantasy.
- Kristala Combat Guide: Parry Timing and Mana Loop Tips: Kristala combat guide: deflect attacks to build mana, then cast.
References
- Kristala on Steam: official store page, updates, and patch notes
- r/Kristala community: player discussion and boss-fight tips
Was this guide helpful?
About the author

Critical game theorist with a background in film criticism. Writing for print and digital outlets since 2015. Specialises in genre analysis and design heritage.
- Background in film criticism
- 10 years games coverage
- Genre theory and design history specialist
Keep reading


Disclaimer
This article is published for informational and entertainment purposes. It does not constitute professional financial, legal, or technical advice. Game performance, online services, patch schedules, and store listings change. Verify critical details (pricing, system requirements, regional availability) with publishers and storefronts before you buy. Affiliate links, where present, help support our editorial work and are labelled in our affiliate disclosure.