GameBrief · General
Sunderfolk Bard Guide: Music Note System and Best Builds
Reviewing
Sunderfolk
Secret Door · Dreamhaven
The Sunderfolk Bard is the class that makes everyone else better. Every time you move, music notes drop and buff all nearby allies. No card spent, no activation required: the buff happens because you repositioned. In a three or four player group, this is one of the most efficient support mechanics in the game.
The reason the Bard is tricky for new players isn't the complexity. It's the habit. Playing a strong card and staying put feels productive. It isn't. The Bard's value is in the movement, and if you don't move, the notes don't drop.
TL;DR: Bard is S tier, especially in 3-4 player groups. Music notes drop on movement and buff all nearby allies for free. Your priority each turn: decide where to end up before deciding which card to play. Berserker plus Bard is the best 2-player pairing. Bard plus Rogue enables flanking setups the Rogue otherwise can't easily access.
Sunderfolk Bard: quick answer
Bard is S tier in Sunderfolk. The music note system generates team-wide buffs (damage, damage reduction, healing) on every Bard movement, without spending any card resources. In a 3-4 player group, a Bard who repositions well every turn makes the whole party hit harder than its members would on their own.
The one requirement: you have to move. Every Bard turn should end in a different position from where it started.
Key takeaways
- Music notes drop on movement. No movement, no notes
- Your priority sequence each turn: position first, card second
- Notes scale with how many heroes are in range: one nearby hero vs. four dramatically changes the value of each move
- Bard is most valuable in 3-4 player groups. In solo, it's outperformed by Berserker and Ranger
- Best 2-player pairing: Berserker plus Bard. Strongest 4-player comp: Berserker, Bard, Pyromancer, Ranger
- Bard plus Rogue is a strong pairing because notes help the Rogue set up stealth flanks
- Don't stand still to play a better card. The note generation usually outweighs the card value difference
How the music note system works
Every time the Bard moves to a new grid position, music notes appear in the surrounding area. Heroes who are adjacent to or within range of those notes receive buffs: damage bonuses, damage reduction, healing, or a combination.
The system has one mechanic you have to internalize: notes only appear on movement. If the Bard doesn't change position during a turn, no notes drop, and no passive buffs apply to the team that turn. This is why standing still to play a higher-damage card is usually wrong: you're trading the note generation against the marginal damage of one better card.
GODEEPER: Full S-tier breakdown with Berserker matchup analysis, how the pair performs in 2-4 player groups, and which compositions work for each group size. Sunderfolk Class Tier List: All 7 Heroes Ranked →
The scaling matters. One hero adjacent to the note zone gets that hero's share of the buff. Four heroes adjacent to the note zone all get the buff simultaneously, without the Bard doing anything additional. In a full party, every Bard repositioning turn generates more total value than any single damage card in the game. In solo, there's no one to buff, which is why solo Bard underperforms relative to Berserker and Ranger.
Think of each Bard turn as two decisions, in order. First: where do I need to end this turn to put as many heroes near my notes as possible? Second: given that endpoint, which card fits? Reversing the order (picking the card first, then moving) means playing good cards from positions that generate zero note value.
Best Bard builds
Bard's card pool includes direct buffs, movement enablers, and some modest damage options. The builds:
Positioning build. Prioritize cards that extend your movement range or drop additional notes per turn. The goal is covering more ground each turn so more teammates are in range simultaneously. This build is most valuable in 4-player groups where one Bard move can cover three or four heroes instead of one or two.
Support amplifier build. Mix movement cards with cards that directly buff your highest-damage teammate. If you're running Berserker plus Bard, some cards that specifically increase the Berserker's damage or reduce the hits it absorbs complement the passive note system. This build is more role-specific than the positioning build but higher ceiling when you have a clear carry.
Hybrid. Rotate between movement and direct buff cards based on encounter layout. Some rooms have tight corridors where a single Bard position covers the entire team; in those situations, movement-heavy cards are less necessary and direct buffs do more work. Reading the map before the encounter starts helps.
For a first run: positioning build. It requires the least coordination, works in any group composition, and trains the movement habit that makes Bard effective before you start making more precise card choices.
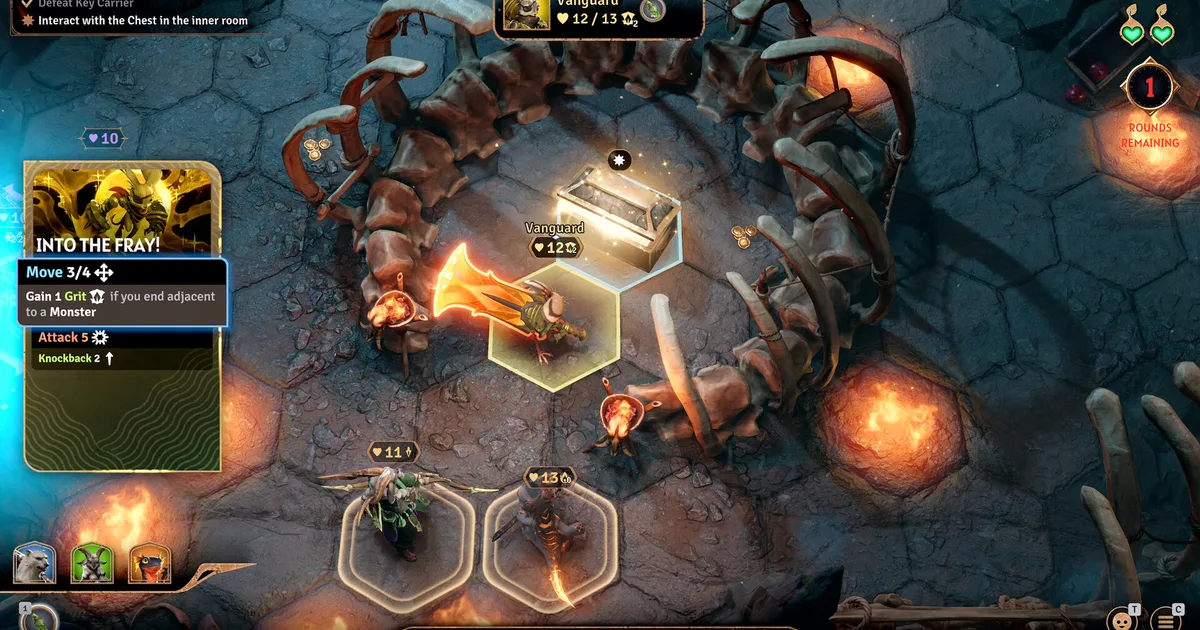
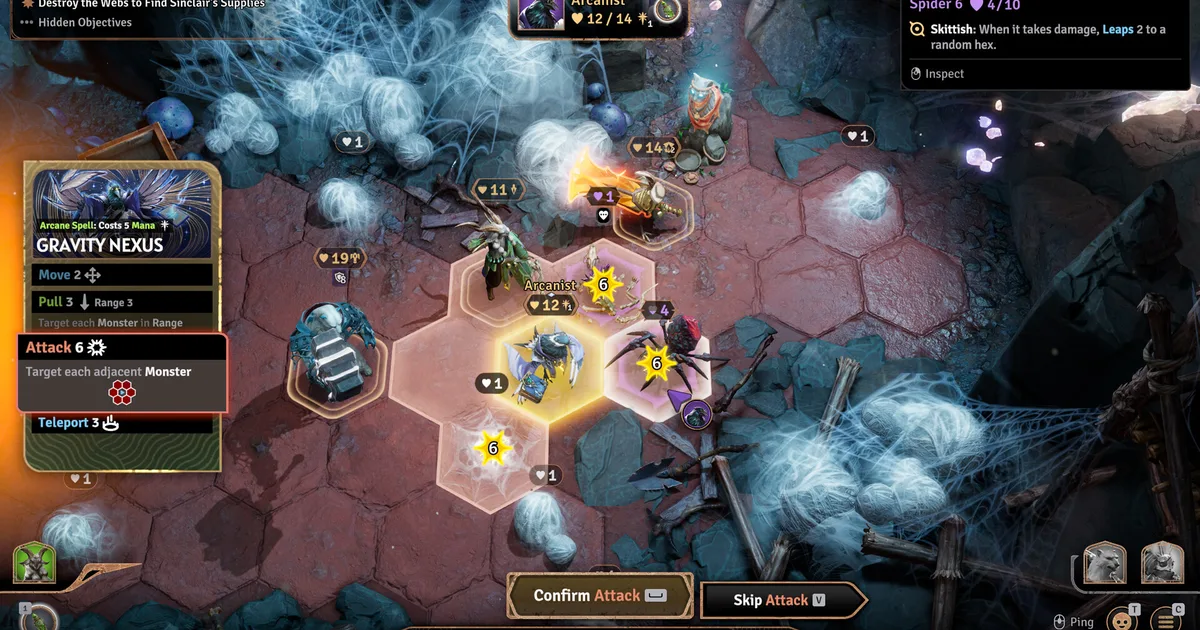
 The positioning build in action: Bard ends its turn adjacent to three heroes, dropping note zones on each one simultaneously.
Bard in a group
With Berserker: The core S-tier pairing. Berserker holds the front line; Bard repositions behind them to keep notes landing on the Berserker and any other heroes nearby. Berserker doesn't need healing support, so the Bard can focus on positioning rather than playing defensive cards. The combination clears most encounters without requiring high mechanical precision.
With Rogue: Less obvious but strong. The Rogue needs specific board states to set up stealth flanks. The Bard's movement and note generation help the Rogue get the positioning it needs because Bard turns generate buffs that make sub-optimal Rogue setups viable. If your Rogue is struggling to chain burst effectively, check whether the Bard is covering the note zone the Rogue is attacking from.
With Pyromancer: Bard's buffs increase Pyromancer damage, which means fire spread hits harder. Keep the Bard on the same side of the room as the Pyromancer so notes land on the Pyromancer during fire engagements. The Berserker delivers targets; Bard buffs the Pyromancer doing the damage.
With Arcanist: Bard and Arcanist together create control encounters where enemies are repositioned and allies are buffed simultaneously. The combination is more fragile than Berserker-anchored comps (no frontline damage absorption) but creates situations where enemies never reach the desired position.
 Status effects persist across turns and stack. Planning around an enemy's upcoming buff or debuff is as important as choosing your own action.
GODEEPER: Bard slots into almost any comp, but the party still needs the right shape around it. Sunderfolk Beginner Guide: Best Classes and Party Tips →
Tips for Sunderfolk Bard
Move every turn. This bears repeating because it's the most common Bard mistake. Even a small repositioning generates notes. Standing still to play a slightly better card almost never outweighs the lost note generation.
Count how many heroes are near your intended endpoint before moving. One hero in range gives one hero's worth of buffs. Three heroes in range gives three heroes' worth from the same move. Take two seconds before moving to check where your teammates will be.
Bard doesn't need to be adjacent to enemies to generate value. You're not a frontline class. Staying at medium range, positioned to cover teammates, is correct. Moving into melee to play a damage card sacrifices your positioning for marginal output.
Rogue players in your party rely on the Bard's notes for setup. If you have a Rogue, make sure note zones overlap with the positions the Rogue is trying to reach. Check in before the encounter starts: "where are you flanking?" then position to cover that tile.
Related Reading
- Sunderfolk Complete Guide: All 7 Classes, Co-op Tips 2026: full hub covering all 7 classes, party compositions by group size, and links to every Sunderfolk guide on the site.
- Sunderfolk Berserker Guide: Protector's Fury and Best Builds: the S-tier frontline class. Berserker plus Bard is the strongest duo pairing in the game.
- Sunderfolk Class Tier List: All 7 Heroes Ranked 2026: tier rankings for all original heroes, Bard vs Berserker matchup analysis, and optimal party compositions for 2-4 players.
- Sunderfolk Beginner Guide: Best Classes and Party Tips: first-run picks, party composition by group size, and the three most common early mistakes.
- Sunderfolk Vanguard Guide: Grit, Retaliation, Best Builds: Sunderfolk Vanguard guide: the Update 2.0 retaliation tank with Grit passive. Counters 2 damage per hit. Best builds,....
- Sunderfolk Arcanist Guide: Teleport Builds and Tips 2026: Sunderfolk Arcanist guide: teleport repositions enemies and allies. Pull combos, solo vs party builds, and why patch 2.0....
- Sunderfolk Pyromancer Guide: Fire Builds and AoE Tips 2026: Sunderfolk Pyromancer guide: fire spread hits multiple enemies but the class dies fast. Correct positioning, frontline requirements, and....
- Sunderfolk Ranger Guide: Range Builds and Party Tips 2026: Sunderfolk Ranger guide: A tier ranged damage and traps. How to maintain distance, what to target first, and....
- Sunderfolk Rogue Guide: Stealth Builds and Tips 2026: Sunderfolk Rogue guide: C tier for most players, technically powerful for experienced ones. Stealth, flanking mechanics, and when....
- Sunderfolk Online Co-op Guide: Setup, Fixes, and Party Tips: Sunderfolk online co-op supports 1-4 players on Steam and Epic.
References
- Sunderfolk on Steam: official store page, patch notes, developer updates
- r/Sunderfolk: class discussion, build sharing, community tips
Frequently Asked Questions
Is the Bard good in Sunderfolk? Bard is S tier, especially in 3-4 player groups. Music notes drop on every Bard movement and buff all nearby allies for free. In a full four-player party, a Bard who repositions well every turn is the highest-value support class in the game.
How do music notes work? Every time the Bard moves to a new position, notes appear nearby and buff heroes in range with damage bonuses, damage reduction, and healing. No card is spent for this: the buff happens because you moved. Notes don't drop if the Bard stays in place.
Is Bard good for 2 players? Yes, still S tier, but less dominant than in larger groups because the notes only buff two heroes. Berserker plus Bard is the recommended 2-player pairing. At 4 players, Bard's value roughly doubles relative to 2-player because the notes buff twice as many heroes per movement.
What's the best Bard build? Positioning build: cards that extend movement range and increase note drop area. Works in any group composition. For experienced players, a support amplifier build (movement cards plus direct buffs targeting your highest-damage teammate) has a higher ceiling in specific group compositions.
Bard or Berserker for a first run? Berserker. It doesn't require the movement discipline Bard needs, and its value is self-contained. Bard is the better pick once you understand how note positioning works, but the habit takes a run or two to develop. Play Berserker first, then Bard once you know the encounter layouts.
Does Bard work well with the Rogue? Better than expected. Bard's notes help the Rogue reach the positioning it needs for stealth flanks. If your Rogue is struggling to set up burst combos, check whether the Bard is covering the tiles the Rogue attacks from.
Was this guide helpful?
About the author

Indie & JRPG Critic
Indie game evangelist and lifelong JRPG fan covering small studios since 2017. Mumbai-born, London-based. Writes the way she talks.
- 7 years indie games coverage
- JRPG and visual novel specialist
- Narrative design focus
Keep reading


Disclaimer
This article is published for informational and entertainment purposes. It does not constitute professional financial, legal, or technical advice. Game performance, online services, patch schedules, and store listings change. Verify critical details (pricing, system requirements, regional availability) with publishers and storefronts before you buy. Affiliate links, where present, help support our editorial work and are labelled in our affiliate disclosure.