
GuideRomestead
Romestead Iron: Where to Find It and How to Farm It
Romestead iron is where the crafting progression hits its biggest wall. Players who push through the Desert biome and defeat the Cyclops expect the next tier to open up cleanly. Then they enter the Volcanic biome and spend two sessions unable to locate a single iron node. The ore exists; it just follows a pattern most guides skip.
Sponsored

About the game
Romestead
Beartwigs
TL;DR: Iron ore is reliably farmable only in the Volcanic biome (the Desert has a rare trace source, but Volcanic is the route that works). Ground nodes concentrate near dungeon entrances and along the biome's outer ring. For passive production, a quarry must be both Level 5 AND inside the Volcanic zone. Firescale Armor, the Volcanic tier gear set, needs Iron Nails + Ember Cloth + Cured Hide at Leatherworker Level 5. Bring Aloe Salves before entering.
Sponsored

Where is iron ore in Romestead? (quick answer)
Iron ore is reliably farmable only in the Volcanic biome. The Desert has a rare trace source, but it's not something you can plan a farming route around. Romestead ties each ore tier primarily to one biome: copper is a Plains resource, the Desert produces tin for bronze, and Volcanic is where iron actually becomes farmable. If you haven't reached the Volcanic biome yet, there's no real shortcut.
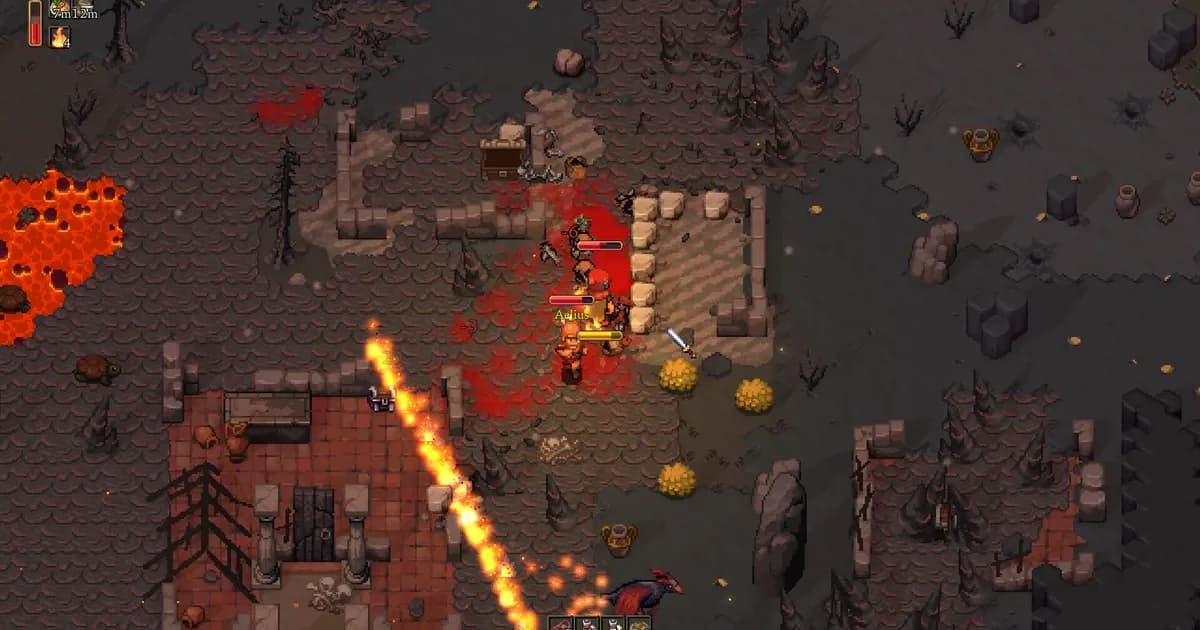
Once you're in the Volcanic zone, iron ore spawns on the ground as regular ore nodes, similar to how copper appears in the Plains. The distribution favors the periphery of the biome and clusters around dungeon entrances. Burnt settlement ruins are another reliable spot.
GODEEPER: Full breakdown of every Volcanic biome boss, drop table, and armor crafting chain. Romestead Biome Guide: All 4 EA Biomes, Bosses, Resources →
Key takeaways
- Iron ore is only reliably farmable in the Volcanic biome; the Desert has a rare trace source, but it's not a real alternative
- Ground nodes concentrate near dungeon entrances, along the outer ring, and near burnt settlements
- A quarry must be Level 5 AND physically located inside the Volcanic zone to produce iron passively
- Firescale Armor uses Iron Nails + Ember Cloth + Cured Hide at Leatherworker Level 5
- The Vulcan temple puzzle needs exactly 4 Iron Rods for 4 fixed levers, then a second step: an altar offering back at your base
- The Volcanic biome gives the Blacksmith a passive production bonus and a permanently lit furnace
- Aloe Salves are recommended preparation before entering; fire damage and burn hazards are present
Why iron is a Volcanic-biome resource
Romestead's resource system scales by biome in a linear chain. Plains gives copper. Desert gives tin, which combines with copper to produce bronze. Volcanic gives iron, the third metal tier and the one that gates Firescale Armor and the endgame crafting options.
This design means you can't short-circuit the progression. Getting to the Volcanic biome requires defeating the Cyclops in the Desert, which requires Tectonic Armor from Cyclops Shards, which requires having a Blacksmith at Level 5. The full Romestead Biome Guide covers this chain in detail.
The practical implication for iron farming: don't enter the Volcanic biome in Desert-tier gear expecting an easy session. The mob density is higher, enemies hit harder, and iron nodes tend to cluster in contested areas near dungeons. Going in with Tectonic Armor and a stock of Aloe Salves is the minimum viable prep.
How to find iron ore ground nodes
Iron nodes spawn on the ground throughout the Volcanic biome, not just at fixed points. The distribution isn't random, though. Community reports consistently point to three high-density areas:
Biome periphery. The outer edges of the Volcanic zone, where it borders the Desert, have higher iron node density than the interior. This is also the area where mob pressure is slightly lighter than deep Volcanic territory, making it a better farming zone for early trips when your gear is marginal.
Near dungeon entrances. Iron nodes cluster around dungeon entrance areas. Some sessions you'll find three or four nodes within 30 seconds of a single dungeon. Dungeon-adjacent farming works well for mid-session ore gathering when you're already running dungeon content.
Near burnt settlements. The ruins of burnt settlements scattered through the biome are another reliable iron spawn point. Players who systematically clear each settlement find consistent node counts. These areas often have buried containers as well, which adds to the return trip value.
The enemy density in all three of these zones is real. Going in with full Tectonic and a supply of Aloe Salves makes the difference between a productive iron run and a quick death with empty hands.
The Volcanic biome's lava pools and ash-grey terrain mark the only zone where iron ore ground nodes appear; the hostile environment that makes manual farming dangerous also concentrates nodes near dungeon entrances.
Setting up a Level 5 Volcanic quarry for passive iron
Ground farming works for early sessions. Passive production from a quarry is better for long-term supply. The conditions for a quarry to produce iron are specific and both must be true at the same time:
- The quarry must be physically placed inside the Volcanic biome
- The miner assigned to it must be Level 5 or higher
A Level 5 quarry in the Plains, Forest, or Desert outputs stone, copper, flint, and charcoal only. The biome determines the ore ceiling, not just the level. A quarry in the Desert produces tin bar, which is useful context: each biome has its own ore tier, and a Level 5 miner in that biome is what unlocks it.
For the Volcanic quarry, the output upgrade once conditions are met is significant. Instead of spending sessions manually farming ground nodes under mob pressure, a properly placed Level 5 quarry generates iron passively while you handle other settlement tasks.
The Volcanic biome also gives the Blacksmith a passive bonus: a permanently lit furnace and a production rate increase. This stacks well with a steady quarry output. If you're running multiple Blacksmith operations, getting at least one building into the Volcanic zone's range of the bonus speeds up smelting iron ore into the bars and nails you need.
What iron is used for
Iron has two main uses in the Volcanic biome:
Firescale Armor. The Volcanic gear tier, Firescale, is crafted at Leatherworker Level 5 using Iron Nails, Ember Cloth, and Cured Hide. It's the armor that carries you through the Volcanic biome's harder dungeon content and the two legendary bosses. Getting a full set requires a consistent iron supply and a Leatherworker progression investment.
Vulcan temple puzzle. This is a two-step process, and most guides (this one included, before this update) only cover the first half. Step one: craft exactly 4 Iron Rods at the Blacksmith and place one into each of the temple's 4 fixed stone levers, then pull all four. A jar appears once all four are active; break it and Vulcan sends you back to your base. Step two: interact with your altar, where Vulcan requests a specific offering (materials tied to Clay Pit, Quarry, or Blacksmith production, and this requirement varies by save). Bring the requested offering back to the plate in front of the temple to actually unlock the entrance.
Both uses draw from the same iron supply, which makes the quarry setup more valuable than it might seem on a first pass through the biome.
Romestead's Blacksmith building with its furnace active; in the Volcanic biome, the furnace gains a passive production bonus that makes iron ore smelting faster than in any other zone.
GODEEPER: All 5 Romestead bosses, including the two Volcanic legendary fights that Firescale Armor helps you survive. Romestead Bosses: All 5 Bosses and How to Beat Them
Tips for Volcanic biome iron farming
A few things that reduce wasted sessions in the Volcanic zone:
Enter in full Tectonic. Desert-tier armor is the minimum for safe Volcanic exploration. Enemies there will two-shot characters in Forest or Plains-tier gear. The Cyclops fight in the Desert is the gate for a reason.
Stock Aloe Salves before going. The developer flagged Aloe Salves as recommended preparation specifically for the Volcanic biome. Fire damage and burn hazards appear in that zone in a way they don't elsewhere. Run out of Aloe Salves mid-session and the return trip gets much harder.
Prioritize the outer ring first. The periphery has both better iron node density and lower mob pressure compared to the interior. Farm outward-in rather than diving straight toward dungeon interiors on your first Volcanic visits.
Baker Level 7 for extended sessions. Community players report that a Baker at Level 7 unlocks a recipe that provides strong healing output and useful buffs for Volcanic farming runs. If your Baker is close to Level 7, pushing that unlock before major Volcanic farming sessions pays off.
Assign Vulcan early. Of the seven gods in Romestead's system, Vulcan governs fire, forges, and construction materials. His Blacksmith upgrade path directly combines with the Volcanic biome's passive furnace boost. See the Romestead Gods Guide for his full branch before committing worship points.
Related Reading
- Romestead Biome Guide: All 4 EA Biomes, Bosses, Resources: Covers every biome in sequence, including the Volcanic bosses, Firescale armor chain, and what waits past iron gear.
- Romestead Bosses: All 5 Bosses and How to Beat Them: Both legendary Volcanic bosses are in here, with drop tables that show which Firescale pieces drop from each.
- Romestead Buildings Guide: All Buildings and Build Order: Blacksmith and Leatherworker progression details, including the level gates for Firescale crafting.
- Romestead Tips: 12 Things to Know Before Your First Night: Preparation fundamentals for players still getting settled before attempting Volcanic content.
- Romestead Gods: All 7 Deities and Who to Worship First: Vulcan's tree connects directly to the Volcanic Blacksmith bonus; this guide explains his full upgrade path.
- Romestead Co-op Guide: 1 to 8 Players, Roles, Scaling: Romestead co-op guide: role split for 2-8 players, wave scaling, Blacksmith defense priority, Altar Level 2 teleportation unlock,....
Frequently Asked Questions
Where is iron ore in Romestead? Iron ore is reliably found only in the Volcanic biome, the fourth biome in Early Access. The Desert has a rare trace source, but Volcanic is the only route worth farming. Ground nodes concentrate near dungeon entrances and along the biome's outer ring.
Can you get iron ore from a quarry in Romestead? Yes, but only if the quarry is placed inside the Volcanic biome AND the miner assigned to it is Level 5 or higher. A Level 5 quarry in any other biome outputs stone, copper, flint, or charcoal only; biome placement controls which ore tier the quarry can access.
What is iron used for in Romestead? Iron is used to craft Iron Nails (for Firescale Armor at Leatherworker Level 5) and Iron Rods (for the Vulcan temple entrance puzzle). Both are crafted at the Blacksmith from smelted iron ore.
What is Firescale Armor made of? Firescale Armor requires Iron Nails, Ember Cloth, and Cured Hide, crafted at Leatherworker Level 5. It is the Volcanic biome's gear tier and the armor you need for the two legendary endgame bosses.
How do I enter the Vulcan temple? Craft exactly 4 Iron Rods and place one into each of the 4 fixed stone levers, then pull all four to make a jar appear. Break the jar, and Vulcan sends you home to make an altar offering (the specific materials he wants vary by save) before the temple entrance actually opens.
What should I bring to the Volcanic biome? Aloe Salves are the developer-recommended preparation due to fire damage and burn hazards. Full Tectonic Armor from the Desert is the minimum viable gear. A stock of food from a high-level Baker extends the session.
Does the Volcanic biome give a Blacksmith bonus? Yes. The Volcanic biome passively grants the Blacksmith a permanently lit furnace and a production bonus. This makes smelting iron ore faster and is one reason to place production buildings near the Volcanic boundary.
References
- Romestead on Steam: official store page, Beartwigs Early Access details
- r/Romestead on Reddit: community forum, including iron farming threads and Volcanic biome tips
- Reddit r/Romestead: "Where is iron ore?" thread, multiple player confirmations of spawn patterns and quarry requirements; "Volcano biome boss temple" thread, community-confirmed iron rod puzzle solution
- Romestead Complete Guide Hub: aggregated guide index for all Romestead content
Was this guide helpful?
About the author

Indie & JRPG Desk
GameBrief's byline for indie, JRPG, visual novel and cozy games. Warm, direct, and willing to say which one to buy.
- Indie, JRPG and visual novels
- Early access and survival
- Sources listed per article
Keep reading
Romestead Villagers Guide: Recruit, Assign & Keep Happy
General · 9 min
Romestead Buildings Guide: All 25 Buildings & Build Order
General · 17 min
Romestead Roadmap 2026: What Beartwigs Has Confirmed
General · 7 min
Romestead Bosses: All 5 Bosses and How to Beat Them
General · 9 min

Romestead Tips: 12 Things to Know Before Your First Night
General · 8 min
Romestead Professions: All 8 Starting Classes Ranked
General · 9 min
Sponsored
Disclaimer
This article is published for informational and entertainment purposes. It does not constitute professional financial, legal, or technical advice. Game performance, online services, patch schedules, and store listings change. Verify critical details (pricing, system requirements, regional availability) with publishers and storefronts before you buy. Affiliate links, where present, help support our editorial work and are labelled in our affiliate disclosure.
Comments
Loading comments…