
GameBrief · General
Timberborn Beginner Guide: Dams, Wheels, and Drought Tips
Reviewing
Timberborn
This Timberborn beginner guide skips the general tour and goes straight at the one system that actually decides whether a colony survives: water. It's not a resource bar you top off between builds, it's the thing that decides whether your colony survives its first real drought, and most beginners don't realize that until a reservoir they're proud of turns brown overnight. Below: dams, water wheels, irrigation range, and the drought and badtide cycle that gets harder every time it repeats.
TL;DR: Water Wheels need a double block width of flowing water and stop working entirely if the water rises to axle height, so don't flood your own power source. Irrigation loses 6 blocks of range for every level of elevation you climb. Droughts on Normal run 5 to 9 days, but cycle 1 is capped near 38% strength on purpose, so your first drought will lie to you about how ready you are.
Timberborn beginner guide: how water actually works (quick answer)
Water moves downhill and pools the way real fluid does, which means Dams, Levees, and terrain shape where it goes. Water Wheels convert that flow into power, and only work in flowing water of a specific depth. Irrigation spreads out from any water source below 50% pollution, but elevation eats into its range fast. Every cycle alternates a calm Temperate season with a Hazardous Weather season that brings drought and, eventually, contaminated badtide water, and both get progressively worse the longer your colony runs.
Timberborn beginner guide: key takeaways
- Timberborn hit 1.0 on March 12, 2026, developed and published by Mechanistry, currently $34.99 on Steam with 40,843 reviews at 96% positive ("Overwhelmingly Positive")
- Water Wheels generate 270 hp per m3/s of flow and need a double block width of moving water; they flood and stop producing power if the water level reaches the axles
- Dams hold water at roughly 0.65 blocks with a spillway gap at the top, so they always leak a little rather than acting as a hard wall
- Irrigation range drops by 6 blocks for every elevation level you climb, which matters enormously once you start terracing
- Normal-difficulty droughts run 5 to 9 days, but the first cycle is intentionally weakened (capped near 38% strength) and ramps to full intensity by around cycle 6
- Badtide odds climb from a 40% base chance to 70% after five straight droughts and 100% after seven, so contamination becomes a near-certainty the longer you go without a diversion plan
Overview
This guide covers the water side of Timberborn specifically: how Dams, Water Wheels, and irrigation actually behave, and how the drought and badtide cycle escalates over a save. It doesn't cover faction picks, building costs, or combat, since there isn't any. If you want the fuller picture of what 1.0 changed and whether the game's worth your time at all, our Timberborn review covers that side.
What you do need before this is useful: a colony past its first hour or two, with a river or lake on the map (every official map has one) and at least a basic understanding that beavers need Water, not just food, to survive. If you're stacking Timberborn against another resource-management loop, Valheim's iron farming guide shows how a very different survival game handles its own resource bottleneck. Everything below assumes the current 1.0 build, verified against Mechanistry's own launch materials and the game's dedicated wiki as of August 2026. None of the water system changed in a way that breaks this since launch, but Timberborn is still an actively patched game, so treat exact numbers as accurate to 1.0 rather than eternal.
Step-by-Step: Setting Up a Water System That Survives Its First Drought
1. Place your first Dam before you think you need one: A Dam is a simple 1x1 structure that blocks water flow up to roughly 0.65 blocks of height, with a small spillway gap at the top that lets excess water spill over rather than backing up indefinitely. That matters for planning: a Dam is never a perfect wall. It's a basic fluid control building with no dynamic behavior, unlike Floodgates or Valves, which you unlock later and which do let you open or close flow on demand.
The mistake almost every new player makes is building their Dam reactively, once a drought warning already appears. Build one across a natural narrowing in your river as soon as you can afford the logs (a single Dam costs 20), even before you're sure you'll need the reservoir it creates. As of Update 6, Dams no longer have to sit directly on the ground, so you have more freedom to place one on raised terrain if your map's geography calls for it.
2. Place Water Wheels where they won't flood themselves: Water Wheels are unlocked from the start and convert flowing water into power at a rate of 270 hp per m3/s. Output scales directly with the volume and speed of the current passing under the wheel, so a sluggish trickle isn't going to run much of anything. They need a double block width of flowing water to function at all, and they're strictly undershot: they draw power from current moving underneath them, not water falling on top.
Here's the part that catches people out. If the water level in front of a Water Wheel rises high enough to reach the axles, it becomes Flooded and simply stops generating power, full stop, until the level drops again. That's easy to trigger by accident: build a reservoir upstream of your wheel to prepare for a drought, and you can quietly kill the power source you were trying to protect. Place Water Wheels downstream of anywhere you plan to pool water, not in the middle of it.
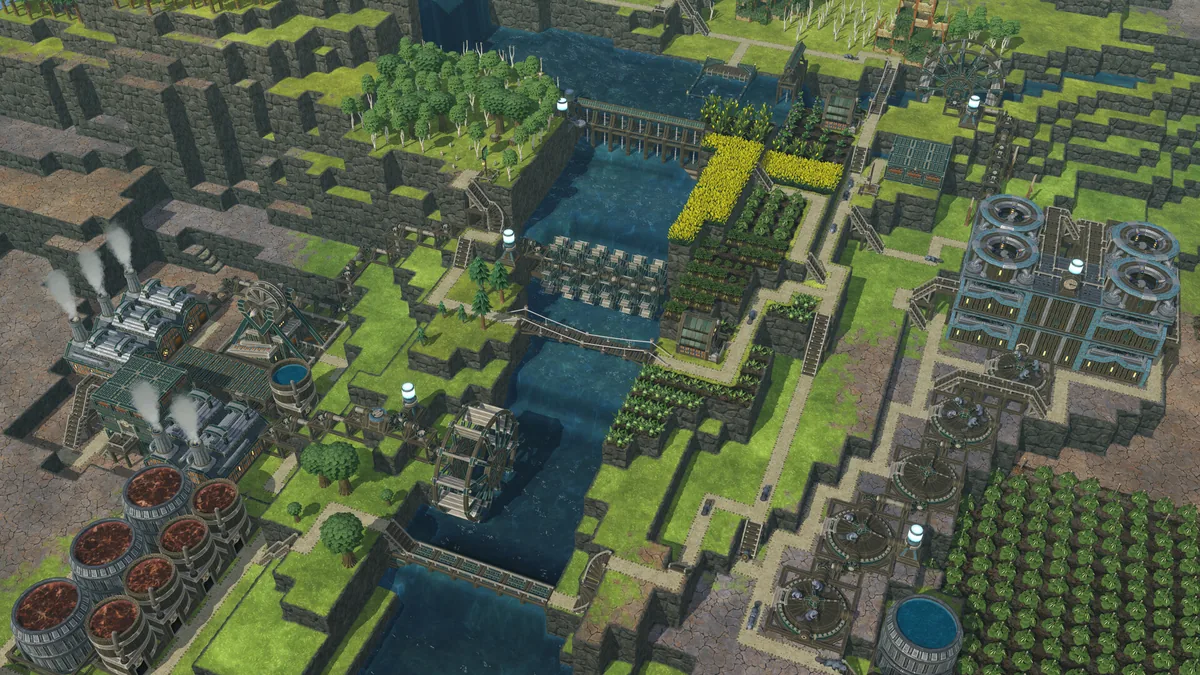 Multiple Water Wheels lined up across a single channel, the kind of setup that stops generating entirely if the pool behind the dam rises to axle height.
GODEEPER: If balancing a power source against a resource you can't fully control clicks for you, Outbound's approach to the same problem is worth a look. Outbound Energy Guide: Solar, Wind, and Battery Setup →
3. Irrigate without losing range to elevation: Irrigation spreads out from any water source, Dam pool, or pond, but only if the water is below 50% pollution; it reaches maximum range at 0% pollution and effectively stops helping crops as contamination climbs. Ponds irrigate in a rough circle rather than a diamond, and blocks don't need direct line of sight to the water source, only a reasonably short path through the terrain around them.
The number that trips up beginners building Timberborn's signature vertical, terraced colonies: every block of elevation you climb above your water source cuts irrigation range by 6 blocks. Going down doesn't cost you anything. So if you're planning a farm on a terrace two levels above your river, you're already losing 12 blocks of reach before you've placed a single crop. For efficiency, 3-block-wide channels evaporate less water and carry irrigation further than narrow ones, and the most space-efficient setup is a 3x3 puddle fed by a Fluid Dump, which does cost a worker and a small amount of drinkable water to run.
4. Build your badwater diversion before your reservoir, not after: This is the single most repeated lesson across Timberborn's community: plan where contaminated badtide water will go before you build the reservoir it might ruin. One player on r/Timberborn built a large reservoir, only to get hit with a Bad Tide Approaching warning the moment the last Dam went in, with nothing unlocked but basic Dams, Levees, and Floodgates to react with. Another commenter summed up the fix that would have prevented it: "the real lesson here is build your badwater diversion before your reservoir."
A simple diversion channel, a side path with its own Floodgate that carries bad water around your main supply and off the map, costs almost nothing next to the reservoir it protects. Do this before your first badtide, not during it. It's the same "protect it before you need it" instinct that shows up across the genre, including in Romestead's own beginner survival tips for its night raids.
Understanding Timberborn's drought and badtide cycle
Timberborn structures its year as a Cycle: one calm Temperate season followed by one Hazardous Weather season that brings drought and eventually badtide. How long each side of that cycle lasts depends on difficulty. Easy droughts run about 2 to 4 days, Normal runs roughly 5 to 9 days, and Hard stretches to 15 to 30 days, with Temperate seasons shrinking correspondingly (Easy gives 16 to 19 days of calm, Normal 13 to 17, Hard as little as 5 to 8).
Here's the number most beginner guides skip entirely: your first drought is not representative of what's coming. On Normal difficulty, cycle 1's drought is handicapped to a maximum of roughly 38% of its full strength, and that handicap fades gradually until it disappears completely by around cycle 6. If your colony breezes through its first drought, that's the game being deliberately gentle with you, not proof your water setup works.
Badtide follows the same escalation pattern from a different angle. The base chance of a badtide occurring is 40%, but it climbs to 70% after five consecutive droughts and hits 100% after seven, meaning contamination stops being a maybe and becomes a certainty the longer a save runs without you building a diversion. Multiple players on r/Timberborn confirmed this in practice: the first badtide they hit was short enough to be, in one commenter's words, "more of a warning shot" than a real threat, which lines up with the wiki's own numbers on ramping severity.
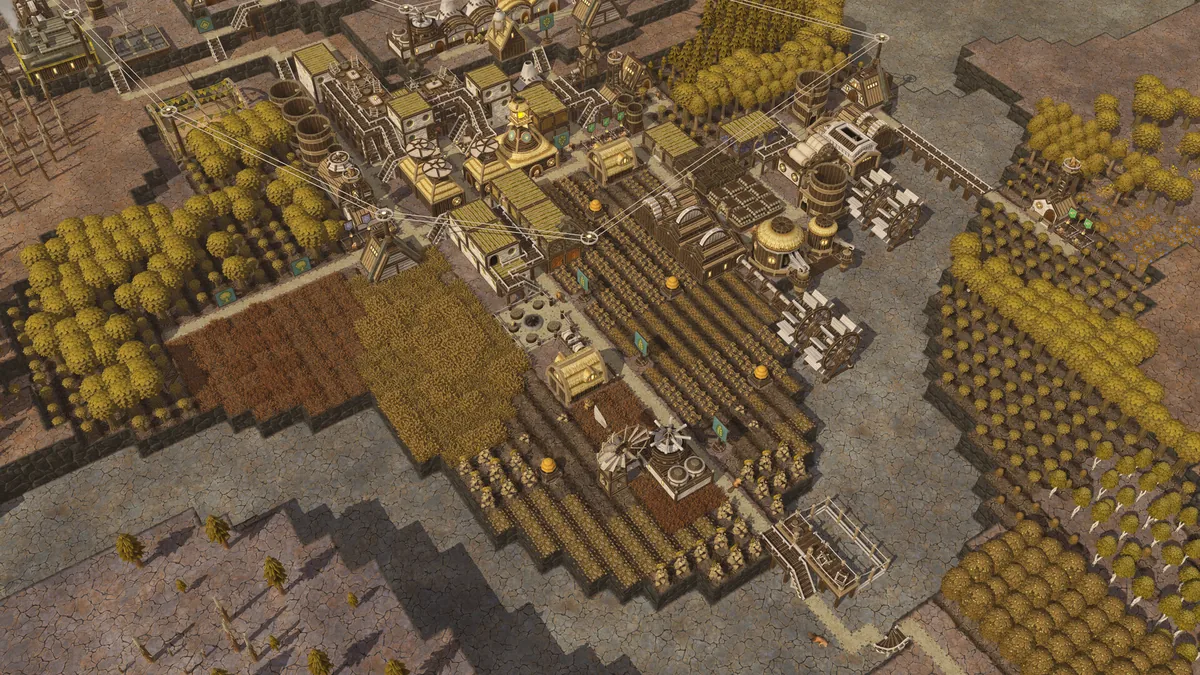 A colony well into a Hazardous Weather season, with cracked terrain spreading outward as the local water table drops.
Tips
Don't panic-build mid-drought
Once a drought is underway, throwing up new Dams or Floodgates costs logs and worker time you don't have to spare. If your water level drops below roughly a third of your reserve, it's more effective to pause non-essential construction and let existing storage carry the colony than to start new water infrastructure with a stockpile that's already shrinking.
Your faction changes your water math
Folktails and Iron Teeth don't just look different, they draw power and pump water differently, which changes how you should plan around droughts. Folktails lean on Wind Turbines and pump shallower by default; Iron Teeth lean on Engines and dedicated water wheels and pump deeper from the start, at the cost of a harsher early resource curve. If you're new, our full Timberborn review breaks down exactly how those two factions diverge outside of water, too.
Reservoir shape matters more than reservoir size
A wide, shallow reservoir loses more surface area to evaporation than a narrow, deep one holding the same volume. If a map's geography allows it, favor depth. It's a smaller build, and it survives longer once the badtide clock starts running. Subnautica 2's base building guide covers a similar depth-vs-surface-area tradeoff, just underwater instead of above a river.
Watch the Thirst status, not just the resource counter
Beavers drink between 2 and 3 units of water a day (about 2.1 on average), and once Thirst hits zero and Dehydrated appears, there's roughly 4.29 days before a beaver actually dies of it. That's more buffer than the UI makes it feel like, and panicking the moment you see one Dehydrated icon usually causes worse decisions than the dehydration itself would.
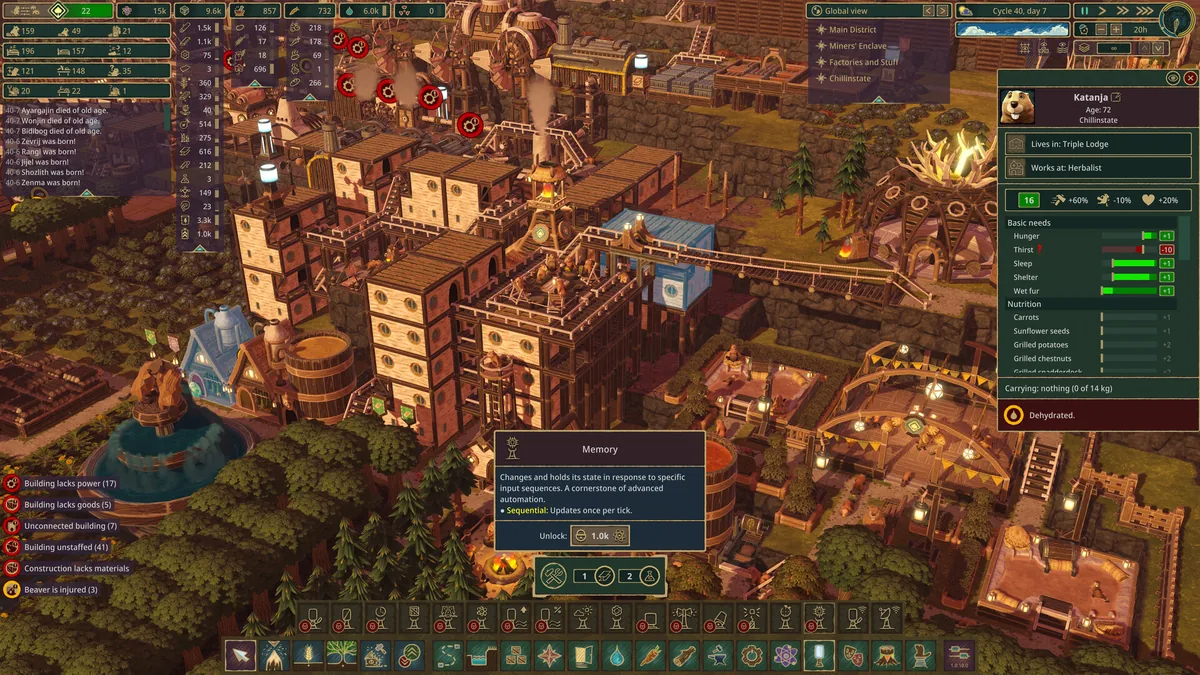 The Dehydrated status appears once Thirst bottoms out, which is the cue to check water access, not to immediately panic.
GODEEPER: Water isn't the only survival system worth planning around before it becomes an emergency. Valheim Base Building Guide: Comfort, Wards, Portals → covers the same "build it before you need it" instinct in a very different game.
If you're coming from another survival-builder and want a broader set of first-colony habits, Romestead's beginner survival tips cover a lot of the same "plan ahead, don't panic" ground from a different game's angle.
Common Mistakes
Building the reservoir before the diversion. Covered above, but it's worth repeating as its own mistake because it's the most common one on record: a beautiful reservoir with nowhere for badwater to go is a liability, not an asset, the moment the first Bad Tide Approaching warning shows up.
Trusting cycle 1's drought as a benchmark. Because the first drought is capped near 38% strength on Normal, colonies that "pass" it with room to spare often assume their water storage is sufficient. It isn't tested yet. Re-check your buffer again after cycle 3 or 4, once the handicap has mostly worn off.
Placing Water Wheels upstream of planned reservoirs. If you know you'll dam a stretch of river later, don't put a Water Wheel in the section that will end up underwater. Flooded wheels don't produce a reduced amount of power, they produce none.
Ignoring elevation when planning irrigated farms. Losing 6 blocks of irrigation range per level of height adds up fast on Timberborn's vertical maps. A farm three terraces above its water source can end up with almost no usable irrigated land, which reads as a bug the first time it happens to you. It isn't; it's the elevation penalty working as intended.
Skipping badtide defenses because your walls look solid. A colony that's invested in Palworld-style base defense instincts (thick perimeter, few entry points) can still get blindsided here, because Timberborn's threat isn't raiders, it's contaminated water finding the one low point in your terrain you didn't wall off.
If Timberborn is your first colony sim, it's worth knowing what else sits in the genre before you commit hundreds of hours to one game. Our roundup of base-building and colony sim games covers eight picks with different core loops, and Abiotic Factor's complete guide hub is a good next stop if you want a co-op survival sim with a very different threat model (portals and cryptids instead of drought cycles).
Related Reading
- Timberborn Review: The Beaver City-Builder Nails 1.0: the full verdict on 1.0, including how Folktails and Iron Teeth diverge beyond water.
- Outbound Energy Guide: Solar, Wind, and Battery Setup: a different survival-builder's take on balancing a power source against a resource you can't fully control.
- Romestead Tips: 12 Things to Know Before Your First Night: beginner survival habits from a different colony-builder that carry over well.
- Valheim Base Building Guide: Comfort, Wards, Portals 2026: another example of building defensive infrastructure ahead of a threat instead of during one.
- Abiotic Factor Beginner Guide: Tips and First Steps 2026: first-hours advice for a different co-op survival sim, useful if you're stacking multiple base-builders in rotation.
References
- Timberborn on Steam (40,843 reviews, 96% positive, at time of writing)
- Mechanistry official developer site
- Lumberpunk City-Builder Timberborn Launches into 1.0 official 1.0 launch press release
- Water Wheel, Dam, Irrigation, and Weather pages on the dedicated Timberborn Wiki
- r/Timberborn: "Help me save my first reservoir!!!", the community thread this guide's diversion-first advice is drawn from
- Timberborn Official Version 1.0 Launch Trailer
Frequently Asked Questions
How much water does a Timberborn colony actually need? Beavers drink between 2 and 3 units of water a day, averaging around 2.1. Once Thirst hits zero and the Dehydrated status appears, it takes about 4.29 days before a beaver dies, so there's a real buffer to react in.
How do Water Wheels work in Timberborn? They need a double block width of flowing water and generate power proportional to current speed, 270 hp per m3/s at the standard size. If water rises to axle height they flood and stop producing power entirely.
Why isn't the land around my reservoir irrigating? Water under 50% pollution irrigates nearby terrain, maxing out at 0% pollution, but every block of elevation you climb cuts irrigation range by 6 blocks. Build reservoirs at field height, not above it.
How long do droughts last in Timberborn? On Normal difficulty, droughts run roughly 5 to 9 days, but the first one is deliberately weakened, capped near 38% strength, ramping to full intensity by around cycle 6. Cycle 1 is not a fair test of your setup.
What's the difference between a Dam and a Levee for water control? A Dam blocks water up to about 0.65 blocks high with a spillway gap that lets excess overflow, and has no dynamic control. Levees and Floodgates give finer control, which matters once you're diverting badtide water.
Is Timberborn hard for beginners? Building and combat are gentle. Water is not: droughts and badtides escalate on a schedule, and a bad diversion choice on cycle 1 can wreck a reservoir before cycle 3's badtide hits, the most common beginner mistake reported on Reddit.
Was this guide helpful?
About the author

Senior Critic & Analyst
Former game data analyst turned critic with 11 years covering indie and mid-tier games. Based in Austin. Runs spreadsheets on games most people just play.
- 11 years games criticism
- Former game economy analyst
- Roguelike and strategy specialist
Keep reading




Disclaimer
This article is published for informational and entertainment purposes. It does not constitute professional financial, legal, or technical advice. Game performance, online services, patch schedules, and store listings change. Verify critical details (pricing, system requirements, regional availability) with publishers and storefronts before you buy. Affiliate links, where present, help support our editorial work and are labelled in our affiliate disclosure.
Comments
Loading comments…