ARC Raiders · Guides
ARC Raiders Queen Boss Guide: Weak Points & How to Kill
ARC Raiders Queen boss guide: break a leg to expose the joints, burn the head core, and fight from inside the deactivated Harvester to survive the mortars.
Reviewing
ARC Raiders
Embark Studios
This ARC Raiders Queen boss guide covers the biggest fight in the game: the towering spider-like machine that guards the Harvester Event. The Queen is an armored wall of mortars, lasers, and EMP pulses, and shooting her body does nothing. The whole fight comes down to one sequence: break a leg to expose her core, then burn the core down. This guide breaks down her weak points, her attack set, the Harvester cover that makes the fight survivable, and whether she is worth triggering at all.
TL;DR: The Queen only appears during a Harvester Event, and she is one of the largest ARC enemies in the game. Her body is armored, so target the two weak points: shoot a leg's armor to expose the yellow joint, focus-fire to break the leg, and that opens the Head Core. A weak spot on her head also opens during her laser attack. Fight from inside the deactivated Harvester after finishing its puzzle, the roof blocks her mortars and the doorways give clean sightlines. She has mortars, lasers, EMP pulses, and ground slams. She returns roughly 1,000 points and guards strong loot, but you still have to extract with it.
ARC Raiders Queen: the Harvester Event boss
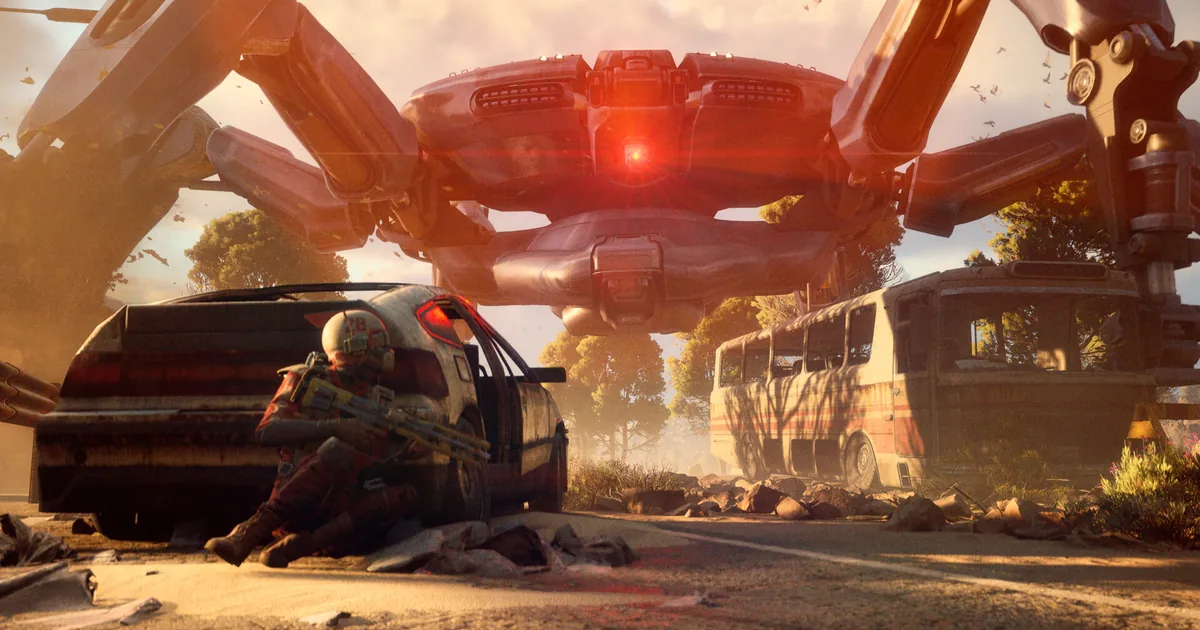
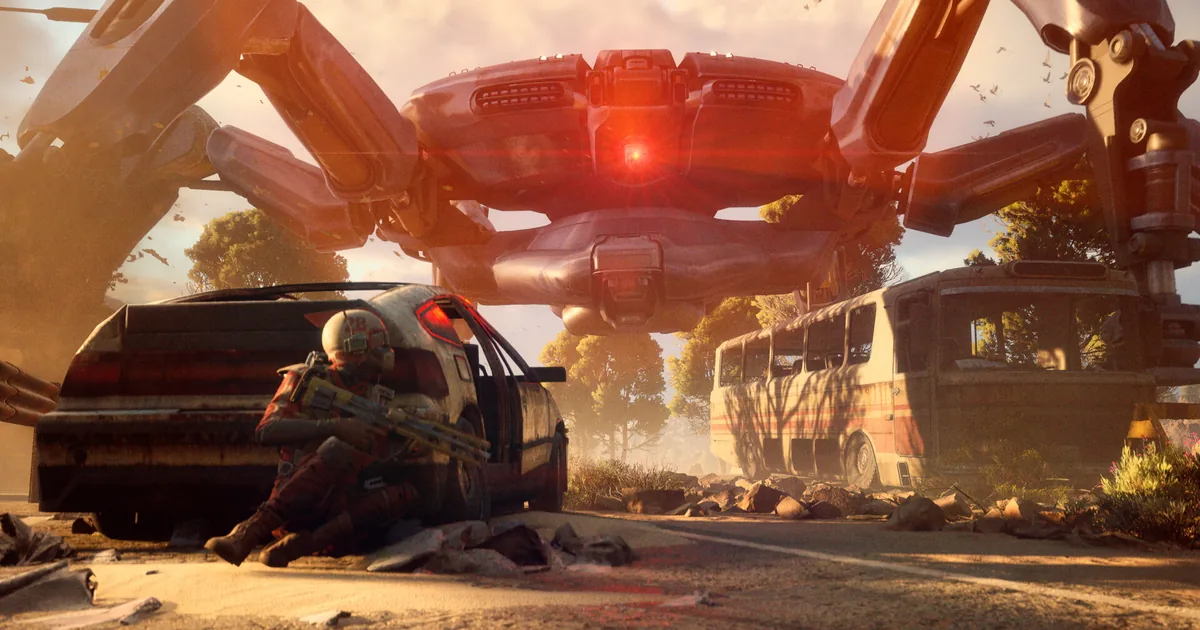
The Queen is not a boss you go and find. She appears only when a Harvester Event is active on the map, showing up to guard the Harvester and the valuable resources around it. No event, no Queen. When she does spawn, you cannot miss her: she is one of the largest ARC enemies in the game, a massive spider-like machine that towers over the arena.
That framing matters because it makes the Queen an opt-in fight. You choose to engage her by committing to the Harvester Event, which means you should only do it when you are equipped and have an extraction plan. She is the top of the ARC food chain, and walking into her event underprepared is how raids end with nothing extracted.
Key takeaways
- The Queen only spawns during a Harvester Event; she is one of the largest ARCs.
- Her body is armored. Damage comes from two weak points only.
- Break a leg: shoot leg armor to expose the yellow joint, focus-fire to break it.
- Breaking a leg opens the Head Core; the head also opens during her laser attack.
- Fight from inside the deactivated Harvester: roof blocks mortars, doorways give sightlines.
- Attacks: mortar barrages, laser beams, EMP pulses, ground slams.
- She returns roughly 1,000 points and strong loot, but you must extract to keep it.
Weak points: legs first, then the core
The Queen's body is plated, and shooting it directly wastes ammo. The entire damage plan runs through two weak points, in order.
The leg joints come first. Shoot a leg's armor to strip it and expose the yellow weak point on the joint underneath. Then focus that joint, all your fire on one leg, until the leg breaks. Spreading damage across multiple legs is the most common mistake; it is slower and it delays the part of the fight that actually matters.
Breaking a leg opens the Head Core. That is the payoff. Once the core drops into view, switch every gun onto it and burn it down. The core is where the real damage happens; the legs are just the lock you have to pick to reach it. There is also a second window: during her laser attack, a weak spot opens on top of her head, giving you bonus core damage if you are positioned to hit it.
So the rhythm is: expose a joint, break the leg, burn the core, and use the laser-attack opening as extra core time. Everything else she has is just noise you need to survive while you execute that sequence.
GODEEPER: The Queen is the apex of the ARC roster. Know the smaller machines you will face on the way to her. ARC Raiders Enemy Types Guide →
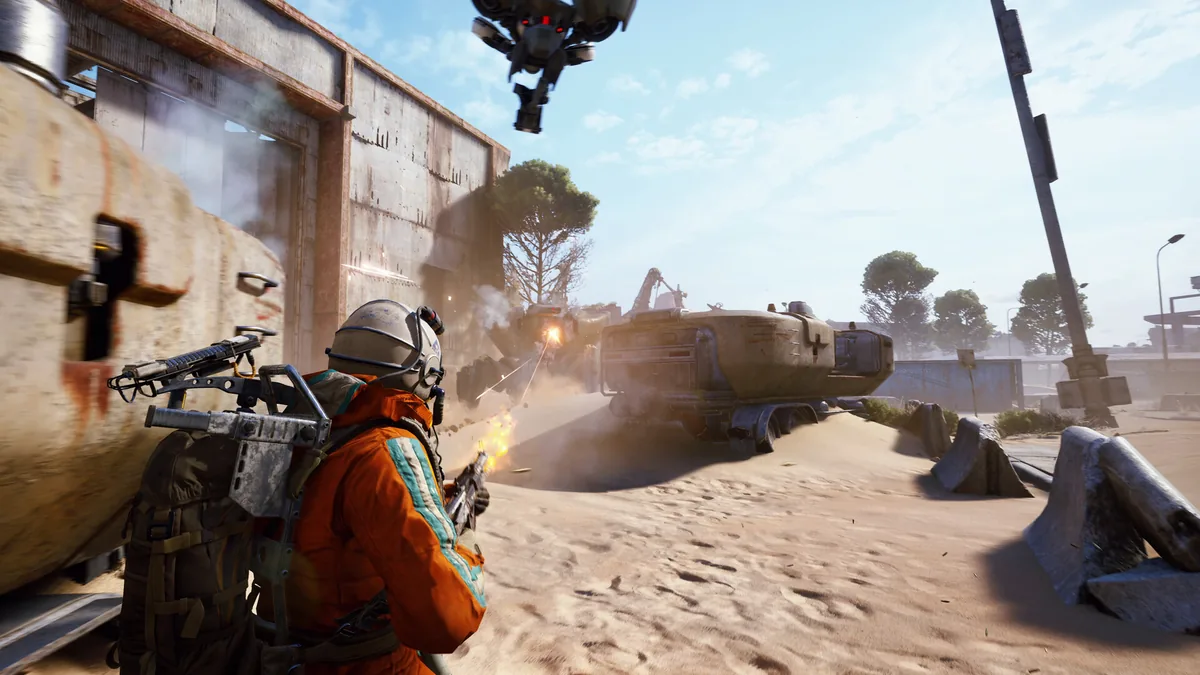
Her attacks: why you fight from cover
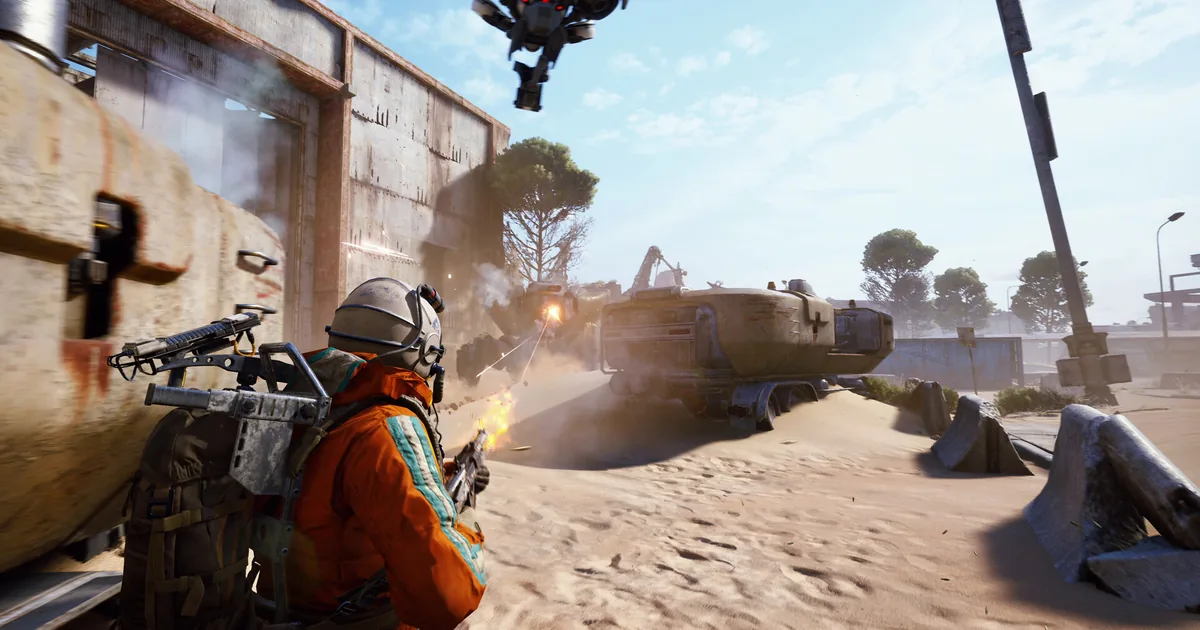
The Queen throws a devastating array of attacks: mortar barrages, sweeping laser beams, EMP pulses, and ground slams. Each one shapes how you position.
The mortars are the reason you do not fight her in the open. They rain area fire across the arena, and standing in the open while you try to focus a leg joint gets you killed by splash you never saw coming. You need a roof.
The laser beams sweep the field and are dangerous, but they are also the opening for the head weak spot, so a good squad treats the laser as both a threat to dodge and a damage window to exploit. The EMP pulses can disable gear, so expect moments where your equipment goes dark and plan to not be mid-commit when it happens. The ground slam is the close-range punish, which is the main argument against hugging her legs in melee range.
 Cover is the whole game against the Queen. Her mortars rain area fire across open ground, so a wall or roof between you and her turns the fight from chaos into a focused damage race on her legs.
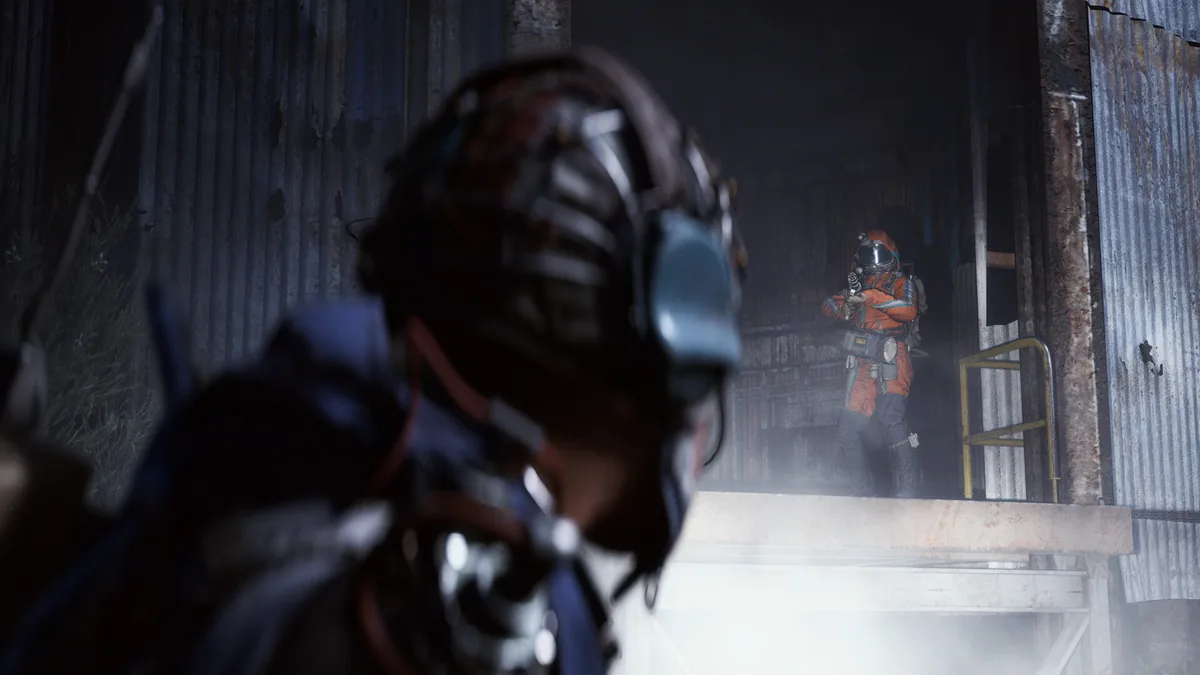
The Harvester is your fortress
The single biggest tactical upgrade for this fight is where you stand. Fight the Queen from inside the deactivated Harvester after you finish its puzzle.
Once the Harvester puzzle is done, the structure becomes a fortified base. Its roof blocks her mortar fire, removing the area threat that punishes open-ground fighting, and its doorways provide clean sightlines to her legs and core. You get a protected firing position that lets your squad focus damage on one joint without eating a mortar barrage for it.
This is the difference between a manageable fight and a scramble. From inside the Harvester, the Queen becomes a stationary armored target you chip down through a doorway. Out in the open, she is a mobile mortar platform that out-damages you. Finish the puzzle, get under the roof, and fight from there.
Squad coordination and the solo question
The Queen is built as an end-game, squad-coordinated fight, and the break-a-leg-then-core plan rewards focus fire. As soon as the shells are in the air, everyone unloads on a single leg joint. A squad that all hits the same joint breaks the leg in a fraction of the time it takes one player, which means the core opens sooner and you spend fewer cycles dodging her attacks.
Soloing her is possible but hard. The whole time-to-kill stretches out because you have to break a leg alone before the core ever opens, and a longer fight means more mortar barrages, more laser sweeps, and more EMP windows to survive. If you go solo, lean even harder on the Harvester for cover and bring sustained-damage weapons over burst, since you need consistent uptime on the joint and then the core.
For loadout specifics, the squad guide covers the weapon and gear splits that make the focus-fire plan work, and matching roles before the event triggers saves you from improvising under mortar fire.
GODEEPER: A coordinated Queen kill starts with the right gear split before the event triggers. ARC Raiders Best Squad Loadouts →
Is she worth it?
The Queen guards valuable resources, and she returns roughly 1,000 points each, enough that two Queen kills in a single extracted raid can clear a two-star threshold without touching any other enemy. That is a strong payout for one fight.
The catch is the word "extracted." Killing the Queen is only half the job; you still have to leave the map with the loot. A Queen kill that ends in a failed extraction is points you never banked. So the honest answer is that she is worth it when your extraction plan is solid and your squad is equipped, and a trap when either is shaky. Do not trigger the Harvester Event as a coin flip. Trigger it when you can win the fight and get out.
 The Queen is only half the threat. Other raiders know the Harvester drops big loot too, so the post-kill extraction is often where a good run dies. Plan your exit before you ever trigger the event.
Frequently Asked Questions
How do you kill the Queen? Break a leg to expose the joint, focus-fire to break it, then burn the Head Core that opens. Use the laser-attack head opening for bonus core damage, and fight from the deactivated Harvester.
Where does she spawn? Only during an active Harvester Event. No event, no Queen.
What are her weak points? The leg joints (yellow, under the armor) and the Head Core that opens after a leg breaks or during her laser.
What attacks does she have? Mortar barrages, laser beams, EMP pulses, and ground slams.
Can you solo her? Possible but hard. The longer time-to-kill exposes you to more attack cycles. Use Harvester cover and sustained-damage weapons.
Is she worth it? Yes for the ~1,000 points and loot, but only if you can extract with it.
Related Reading
The ARC Raiders Enemy Types Guide covers every ARC machine from small units up to the Queen.
The ARC Raiders Best Squad Loadouts breaks down the gear splits that make a coordinated Queen kill work.
The ARC Raiders Endgame Guide explains the point thresholds and where Queen kills fit into farming.
- ARC Raiders Matriarch Boss: Break Armor, Hit the Core: ARC Raiders Matriarch boss: shatter the armor with a Hullcracker, shred the Head Core, stop firing when the.
- ARC Raiders Vaporizer Guide: Down the Flying Laser ARC: ARC Raiders Vaporizer guide: shoot the rotors to ground it, hit the belly core, break line of sight.
- ARC Raiders Turbine Guide: How to Kill the Aerial ARC: ARC Raiders Turbine guide: read its red, yellow, blue light phases, hit the core only when it lands.
- ARC Raiders Maps Guide: All 6 Zones and Extractions: ARC Raiders maps guide covering all 6 zones with extraction points, key POIs, difficulty ratings,.
- ARC Raiders Crafting Guide: Workbenches, Recipes, Materials: ARC raiders crafting guide: workbench recipes, the Ferro stack, how to level vendor relationships, and.
- ARC Raiders Frozen Trail: What the October Expansion Adds: ARC Raiders Frozen Trail is the next big expansion, due October 2026.
- ARC Raiders Electromagnetic Storm: What It Does and When: ARC Raiders electromagnetic storm: what the modifier does, which extractions it disables, and how to.
References
- ARC Raiders on Steam: official store page, updates, and patch notes
- Embark Studios: the developer behind ARC Raiders
Was this guide helpful?
Keep reading

Disclaimer
This article is published for informational and entertainment purposes. It does not constitute professional financial, legal, or technical advice. Game performance, online services, patch schedules, and store listings change. Verify critical details (pricing, system requirements, regional availability) with publishers and storefronts before you buy. Affiliate links, where present, help support our editorial work and are labelled in our affiliate disclosure.
About the author

News Reporter
Games journalist and news hound with 7 years covering industry moves, studio announcements, and patch notes. Chilean. Writes tight, edits tighter.
- 7 years games journalism
- Industry and esports specialist
- Early access coverage