ARC Raiders · Guides
ARC Raiders Matriarch Boss: Break Armor, Hit the Core
ARC Raiders Matriarch boss: shatter the armor with a Hullcracker, shred the Head Core, stop firing when the shield pops, and survive the phase 3 swarm.
Reviewing
ARC Raiders
Embark Studios
This ARC Raiders Matriarch boss guide covers the map-condition event boss and the two-weapon plan that beats it: shatter the armor, then shred the exposed core. The Matriarch is a three-phase fight that escalates from a stationary target into a moving, swarm-summoning nightmare, so ammo discipline and add management decide it. This guide covers where it spawns, the Head Core weak point, the Hullcracker-and-Equalizer combo, the shield mechanic, and how to survive the phase three swarm.
TL;DR: The Matriarch is a map-condition event boss, usually on Dam Battlegrounds (safest), Blue Gate, or Spaceport. Break its armor with a Hullcracker to expose the bright red Head Core (the Reactor), then shred the core with an Equalizer or Jupiter. Leg joints and body cores are secondary weak points. It has three phases: phase two adds mobility, mortars, missiles, and flashbang mines; phase three summons a full ARC swarm. When it pops its defensive shield, stop firing, the barrier eats bullets, grenades, and Jupiter shots, so wait it out. Carry EMP grenades for phase transitions and save resources for the phase three swarm. Worth roughly 1,000 points.
ARC Raiders Matriarch: an event boss in three phases
The Matriarch is not a boss you go find on a fixed map. It is a map-condition event boss: it only appears when the condition is active, usually on Dam Battlegrounds, Blue Gate, or Spaceport. When the event goes live, it sits near the Floodgates POI on the Dam, and that map is the one to pick if you have the choice, because the terrain gives more cover than Blue Gate.
What makes the Matriarch demanding is escalation. It is a three-phase fight that starts as a damage race against a heavily armored target and ends as a chaotic survival scramble against a summoned swarm. Each phase asks more of your positioning, your ammo economy, and your ability to manage adds. Walk in treating it like a single damage check and phase three will overwhelm you. Walk in pacing your resources across all three phases and it is beatable, even solo with the right kit.
Key takeaways
- The Matriarch is a map-condition event boss on Dam Battlegrounds, Blue Gate, or Spaceport.
- Dam Battlegrounds is the safest arena (more cover, boss near the Floodgates POI).
- Break armor with a Hullcracker to expose the red Head Core, then shred it.
- Weak points: Head Core (Reactor) primary; leg joints and body cores secondary.
- Three phases: phase two adds mobility and area denial; phase three summons a full swarm.
- When the shield pops, stop firing, it denies bullets, grenades, and Jupiter shots.
- Carry EMP grenades for phase transitions; save resources for the phase three swarm.
Weak points: break armor, expose the core
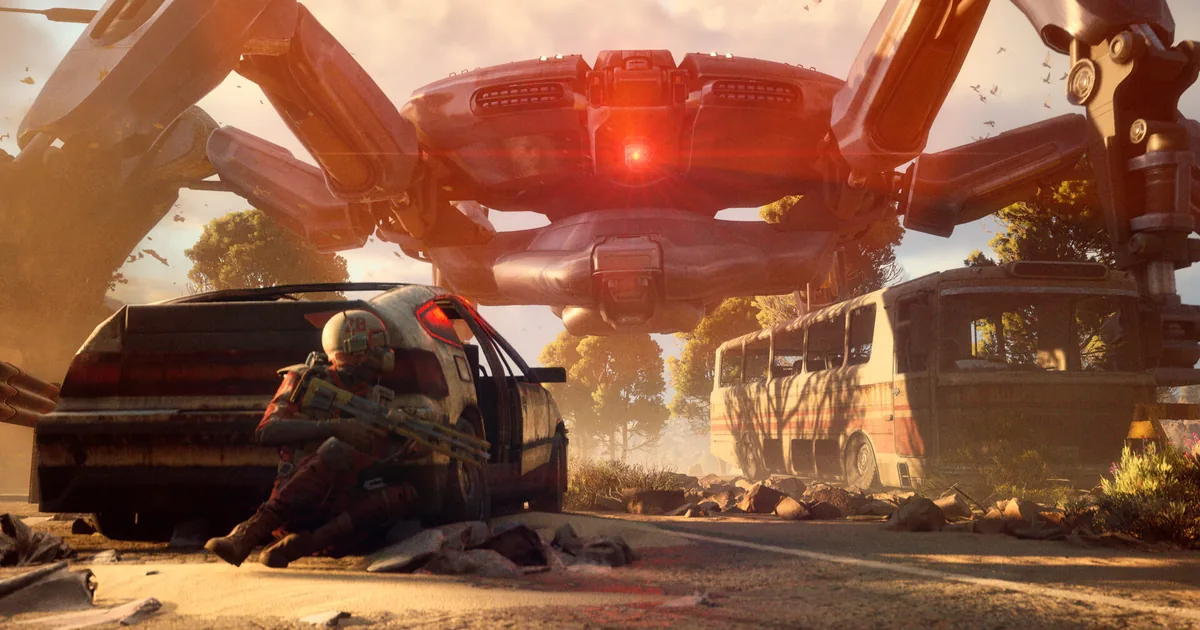
The damage plan is the same shape as the Queen's, armor first, core second, but the target is the head. The Matriarch's major weak spot is the Head Core, also called the Reactor, sitting behind a circular armored hole in its head. You cannot damage it through the plating, so step one is always breaking that armor.
That is the Hullcracker's job. Use a Hullcracker as your primary to shatter the armor plating, and once you have blasted it off, a bright red Head Core exposes. The moment you see red, that is the target. Its secondary weak points, the leg joints and the large red cores in the main body, give you something to chip when the head is covered, but the head is where the fight is won.
In a squad, make the callout discipline explicit: the instant anyone exposes red, everyone focuses fire on the core. The Matriarch's HP pool is large enough that scattered damage drags the fight into its worst phases, so concentrated fire on the exposed core during every window is how you keep the fight short.
GODEEPER: The Matriarch shares the armor-then-core pattern with the game's other giant boss. Compare the two fights. ARC Raiders Queen Boss Guide →
The weapon plan: Hullcracker plus Equalizer
This is a two-weapon fight and bringing only one gun is the common mistake. Bring a Hullcracker to shatter the armor and an Equalizer or Jupiter to shred the exposed core. The Hullcracker opens the Head Core; the Equalizer's sustained armor-shredding fire or the Jupiter's burst finishes it once it shows red.
The Equalizer rewards preparation. Pre-spool it before the engagement begins so you have sustained fire ready the instant the core exposes, rather than spinning up while the window closes. Its weakness against fast movers is irrelevant against the Matriarch's large body, this is exactly the sustained-DPS-on-a-big-target scenario the Equalizer is built for.
Round out the kit with EMP grenades for the phase transition windows. The transitions are where the Matriarch is most vulnerable and most dangerous at once, and an EMP buys you a clean moment to reposition or burst the core. Carry at least two, and hold them for transitions rather than spending them on adds.
 Bring two roles, not one gun: a Hullcracker to shatter the Matriarch's armor and an Equalizer or Jupiter to shred the red Head Core once it exposes. Pre-spool the Equalizer so sustained fire is ready the instant you see red.
The shield: stop firing
The single biggest ammo-waster in the fight is the Matriarch's defensive shield. When it pops the shield, stop firing altogether. The barrier denies bullets, Wolfpacks, grenades, and even Jupiter shots, so every round you put into it is wasted.
This is harder than it sounds, because the instinct in a boss fight is to keep dumping damage. Players lose half their ammo to the shield out of pure momentum. Treat the shield as a hard "hold fire" signal: the moment it goes up, lower your guns, reposition or deal with adds, and save your ammo until it fades, then immediately resume focusing the core. In a long three-phase fight, the ammo you conserve during shield windows is the ammo that lets you finish phase three.
Surviving the phases
The fight escalates, so your resource management has to anticipate the worst phase. Phase one starts immediately on spawn, a relatively clean damage race on the armor and core. Phase two makes her far more aggressive: she starts moving toward your squad and layers in area denial, mortars, missiles, and flashbang mines. Now you are dodging while you damage, and the cover on Dam Battlegrounds earns its keep.
Phase three is the chaotic finale: she calls in all types of ARCs, a swarm that includes bombardiers, bastions, leapers, rocketeers, and clouds of wasps, hornets, and balls. This is where unprepared runs die, not to the Matriarch herself but to the swarm she summons. The counter is to arrive at phase three with ammo and resources banked, and in a squad, to assign someone to add control while the others keep focusing the core. Burn the core as fast as you can in earlier phases so phase three is as short as possible, every second you shave off phase one is a second less swarm to survive.
 Phase three is the killer: the Matriarch summons a full ARC swarm of bombardiers, leapers, and flyers. Bank ammo in the earlier phases and assign add control in a squad so the swarm does not finish what the boss could not.
Solo versus squad, and whether to engage
The Matriarch is beatable solo with the right kit, but it is built as a squad fight, and the difference shows in phase three. Solo, you are the only one breaking armor, shredding the core, and managing the swarm, which stretches the fight long enough that the phase three add cloud becomes the real threat. If you solo it, lean hard on the Dam Battlegrounds cover, pre-spool the Equalizer, and treat every shield window as a moment to reset rather than push.
In a squad, split the roles before the event triggers. Designate who carries the Hullcracker to break armor and who carries the Equalizer or Jupiter to shred the core, so the moment red exposes, the core-shredder is already on target. Assign one player to phase three add control, because the swarm is what wipes coordinated groups that forgot to plan for it.
As with the Queen, the honest question is whether the fight is worth it for your run. The Matriarch returns roughly 1,000 points and strong loot, but it is a long, escalating fight that ends in a swarm, and you still have to extract afterward. Engage it when you have the two-weapon kit, EMP grenades, and an extraction plan, ideally on Dam Battlegrounds for the cover. Skip it if your loadout is thin or your exit is uncertain, a failed Matriarch run late in a raid costs you everything you were carrying.
GODEEPER: Dam Battlegrounds is the cover to lean on for this fight, whether you're soloing or splitting roles. ARC Raiders Dam Guide: Loot, Patrols & Extractions →
Frequently Asked Questions
How do you kill the Matriarch? Break the armor with a Hullcracker to expose the red Head Core, then shred it with an Equalizer or Jupiter. Stop firing when the shield is up.
Where do you find it? A map-condition event boss on Dam Battlegrounds, Blue Gate, or Spaceport. Dam is safest, near the Floodgates POI.
What is its weak point? The Head Core (Reactor) behind the head armor, primary; leg joints and body cores secondary.
What are its phases? Three: phase two adds mobility and area denial (mortars, missiles, mines); phase three summons a full ARC swarm.
Best weapon? Hullcracker for armor plus Equalizer or Jupiter for the core. Pre-spool the Equalizer and carry EMP grenades.
What do you do when it shields? Stop firing, the shield eats bullets, grenades, and Jupiter shots. Wait it out, then resume on the core.
Related Reading
The ARC Raiders Queen Boss Guide covers the other giant boss and its armor-then-core pattern.
The ARC Raiders Enemy Types Guide covers every ARC machine, including the swarm units the Matriarch summons.
The ARC Raiders Best Squad Loadouts breaks down the gear splits that make a coordinated Matriarch kill work.
- ARC Raiders Vaporizer Guide: Down the Flying Laser ARC: ARC Raiders Vaporizer guide: shoot the rotors to ground it, hit the belly core, break line of sight.
- ARC Raiders Buried City Guide: Loot Zones & Extractions: ARC Raiders Buried City guide: the four regions, best loot POIs like Library and Grandioso, where ARCs spawn,.
- ARC Raiders Endgame Guide: Trials, Expeditions & Season 4: ARC Raiders endgame starts at purple loadout: Trials scoring thresholds, Season 4 challenge breakdowns, Expeditions, and Cantina Legend.
- ARC Raiders Blue Gate Guide: Loot, Augments, Tips 2026: ARC Raiders Blue Gate guide: the reinforced reception augment spot, underground headhouse section, and what this starter map.
- ARC Raiders Turbine Guide: How to Kill the Aerial ARC: ARC Raiders Turbine guide: read its red, yellow, blue light phases, hit the core only when it lands.
- ARC Raiders Riven Tides Guide: Shockwave, Loot, and Secrets: ARC Raiders Riven Tides guide: Shockwave clears the coastal mist, the Panorama Azzurro hotel loot is deceptively light,.
- ARC Raiders Stella Montis Guide: Loot, Blueprints, PvP: ARC Raiders Stella Montis guide: endgame zone, night-exclusive Tempest and Wolfpack blueprints, free loadout strategy, and why it's.
- ARC Raiders Maps Guide: All 6 Zones and Extractions: ARC Raiders maps guide covering all 6 zones with extraction points, key POIs, difficulty ratings,.
- ARC Raiders Crafting Guide: Workbenches, Recipes, Materials: ARC raiders crafting guide: workbench recipes, the Ferro stack, how to level vendor relationships, and.
- ARC Raiders Frozen Trail: What the October Expansion Adds: ARC Raiders Frozen Trail is the next big expansion, due October 2026.
- ARC Raiders Electromagnetic Storm: What It Does and When: ARC Raiders electromagnetic storm: what the modifier does, which extractions it disables, and how to.
References
- ARC Raiders on Steam: official store page, updates, and patch notes
- Embark Studios: the developer behind ARC Raiders
Was this guide helpful?
Keep reading


Disclaimer
This article is published for informational and entertainment purposes. It does not constitute professional financial, legal, or technical advice. Game performance, online services, patch schedules, and store listings change. Verify critical details (pricing, system requirements, regional availability) with publishers and storefronts before you buy. Affiliate links, where present, help support our editorial work and are labelled in our affiliate disclosure.
About the author

Games Critic
Games writer and reluctant optimist who has reviewed over 400 titles across 9 years. Irish, currently in Berlin. Has strong opinions about tutorial design.
- 400+ games reviewed across 9 years
- Platformer and horror specialist
- Narrative design focus