
GuideRisk of Rain 2
Risk of Rain 2 Interactables: Shrines, Printers, Scrappers
Scrap first, print second. Every other machine is a trade of gold, health or time.
VerdictUse a Scrapper before every printer, roll Shrine of Chance only with spare gold, and leave Mountain and Order for runs that are already winning.
Risk of Rain 2 interactables are the machines and shrines that turn random drops into a build. The one rule worth memorizing: scrap first, print second, because a 3D Printer eats a random item of the matching rarity unless you hold scrap. Everything else (shrines, drones, portals) is a trade of gold, health or time, and most of them are worth it only when they fix the next fight.

Sponsored

About the game
Risk of Rain 2
Hopoo Games
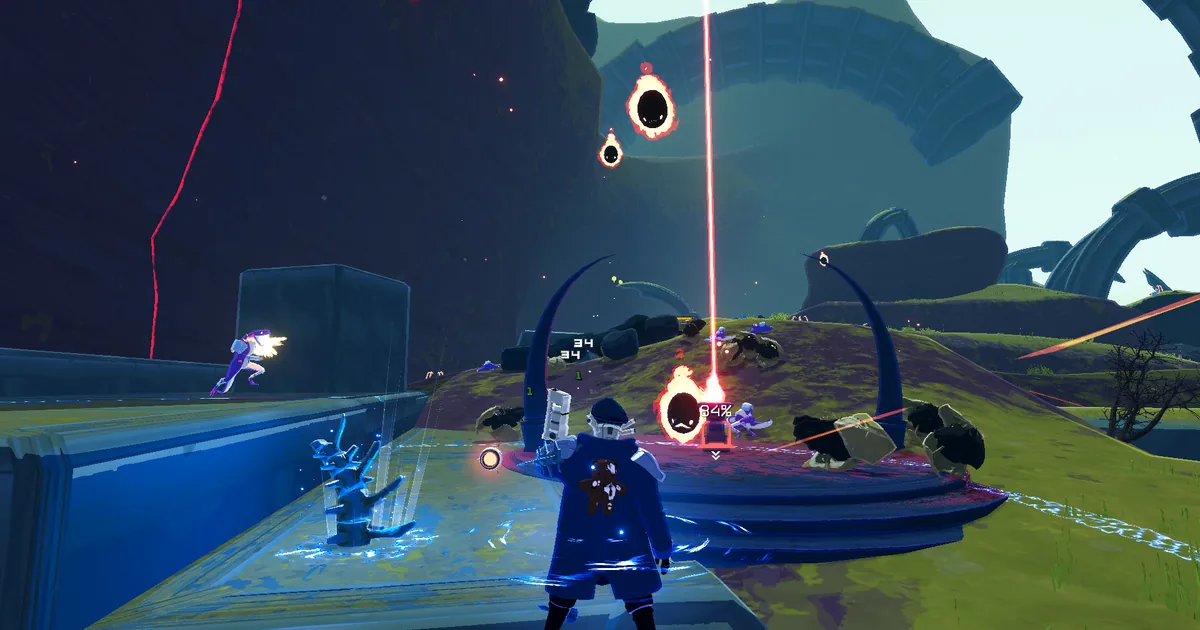 A stage is more than chests. Holdout zones, shrines, drones and stage machines all compete for the time and gold that make a run stronger. Screenshot: Risk of Rain 2 Steam store page
Updated 2026-10-15: Corrected the Scrapper (it scraps up to 10 stacks of one item per use; it has no 10-stack limit), the Cleansing Pool (it takes Lunar items only and pays out a Pearl or Irradiant Pearl) and the Shrine of Order (one Lunar Coin turns each rarity into a single random item). Added the nine interactables from Hallowed Concepts.
Sponsored

What are Risk of Rain 2 interactables? (quick answer)
Interactables are the objects a survivor can activate during a run: chests, shrines, drones, printers, Scrappers, portals and stage-specific machines. Gold is spent and lost within the run, Lunar Coins carry over between runs, and items are your build. The Risk of Rain 2 complete guide hub covers the wider loop; this page is the object-by-object call.
BESTPRICE: Want Risk of Rain 2? Eneba sells a Steam key: Buy on Eneba →
Step by step: the best interactable order on a stage
- Read the room before spending. Note the Teleporter, nearby chests, printers, scrappers, shrines, drones, and any stage-specific object. The Risk of Rain 2 stages guide helps with route context, but the actual spawn layout remains randomized.
- Find the item that is guaranteed value. A visible chest, multishop, printer, or drone is worth comparing against a risky shrine. Do not spend all your gold before knowing whether the next interactable is better.
- Protect the build before printing. If a printer shows an item you want, scrap unwanted same-rarity items first. That makes the printer draw from scrap before it consumes a build-defining item.
- Use shrines with a reason. Chance can be worth a surplus roll, Combat can create money and progress, Mountain can improve a boss reward, and Blood can convert safe health into cash. Each should answer a specific build or route problem.
- Start the Teleporter when the stage has paid out. A perfect full clear is rarely worth the time cost. Once the next fight is covered, trigger the event and leave.
- Recheck DLC machines by ownership. Some objects only appear when the relevant DLC is enabled. Do not assume a guide describing a Drone Combiner or Temporary Item Distributor applies to a base-game run.
Chests, shops, and the gold economy
The ordinary chest is the baseline gold purchase: open it for the item category its model represents. Multishop terminals offer several choices for one payment, which is often better than a blind chest when the displayed options solve an immediate weakness. Equipment barrels and equipment shops are separate decisions because active items need a survivor who can use them, not just a high rarity label.
Gold is earned from enemies and spent on stage objects. It does not need to be hoarded for the next stage, but time does matter. On the early stages, open enough purchases to make the next Teleporter safer. On a late stage, prioritizing a legendary chest, a printer, or a route machine can justify more searching than a small common chest.
The Risk of Rain 2 achievements guide includes Challenges for shrines, printers, and portals. If a run is already pursuing a specific achievement, that goal can change the normal spending order, but do not sacrifice a winning build just to force a low-value checklist action.
Shrines and risk trades
The Shrine of Chance displays its gamble openly. The right question is whether the next roll is worth the gold you could spend on a guaranteed purchase. Image: Risk of Rain 2 Wiki (riskofrain2.wiki.gg). Game art is the property of Gearbox Publishing.
| Interactable | Cost or trigger | Practical use |
|---|---|---|
| Shrine of Blood | Health | Converts survivable health into gold. Avoid when low, when healing is weak, or during an Eclipse level where damage cannot be repaired reliably. |
| Shrine of Combat | Activation and combat | Starts an enemy encounter that can pay out gold and progress. Use it when you have room to fight and enough damage to finish quickly. |
| Shrine of the Mountain | Activation | Adds another Teleporter boss and improves the event's reward. Treat it as a difficulty button, not free loot. |
| Shrine of Chance | Gold | Rolls for a reward with a chance to fail. It is strongest when you have surplus money and weakest when one failed roll delays a required chest. |
| Shrine of the Woods | Gold | Heals nearby allies and drones. It is a recovery tool, but its value depends on how much health the team can preserve while waiting. |
| Cleansing Pool | A Lunar item | Takes a random Lunar item (Lunar equipment included) and gives a Pearl, or rarely an Irradiant Pearl. Use it to dump a Lunar that is hurting the run. |
| Shrine of Order | One Lunar Coin | Turns every item of each rarity into one randomly chosen item of that rarity. Only on Rallypoint Delta, Conduit Canyon and Commencement. A gamble that can make or wreck a build; use it late, if at all. |
| Altar of Gold | Gold and route decision | Opens the route to the Gilded Coast when the run can afford the price and time. |
Shrines do not share one universal value. A Shrine of the Mountain is a good click for a strong multiplayer build that wants a better Teleporter payout and a bad click for a fragile first-stage run. A Shrine of Blood is a way to convert health into gold, not healing. The Risk of Rain 2 Eclipse guide explains why Blood and Woods become less attractive when the mode cuts healing or makes damage permanent.
3D Printers: when to print and what you risk
The output is visible before you commit. The danger is not the displayed item, it is the random same-rarity item the printer may consume. Image: Risk of Rain 2 Wiki (riskofrain2.wiki.gg). Game art is the property of Gearbox Publishing.
A 3D Printer produces the item shown on its face. It consumes one item of that rarity from the survivor's inventory, and the consumed item is selected randomly unless scrap is available. That makes the printer a build filter: it is powerful when you have spare items of the correct tier and dangerous when every item in that tier matters.
The safe sequence is simple:
- Use a Scrapper on unwanted items of the printer's rarity.
- Confirm the printer can draw enough scrap for the desired number of outputs.
- Print only after checking that the displayed item improves the build more than the items you are sacrificing.
- Leave the printer alone when the pool contains irreplaceable utility or mobility items.
The items and artifacts guide explains item categories and rarities. The printer decision is narrower: rarity is the eligibility rule, not a guarantee that the input item has equal value to the output. A common movement item can be more important than another common damage item, even though the machine treats them as equals.
Some DLC printers have special behavior or item categories. Mili-Tech and Overgrown 3D Printers are separate wiki entries, and Alloyed Collective adds machines that should not be collapsed into the ordinary printer rule. Check the displayed object before applying a vanilla printer habit.
Scrappers: turn bad drops into protected future prints
A Scrapper turns selected items into same-rarity scrap. It is most valuable immediately before a printer, not as an automatic way to erase a mediocre item. Image: Risk of Rain 2 Wiki (riskofrain2.wiki.gg). Game art is the property of Gearbox Publishing.
A Scrapper exchanges the item you pick for scrap of the same rarity. Picking an item scraps up to 10 of its stacks at once, and you can't choose fewer. Lunar, Equipment, Void and Meal items can't be scrapped. Scrap is not a general currency for chests. Its main job is to make a 3D Printer deterministic enough to use without sacrificing the rest of a build.
Use a Scrapper when all three conditions are true:
- The item is replaceable or actively conflicts with the run's plan.
- A visible printer has a better output for the current survivor.
- The scrap quantity is enough to protect the next print.
Do not scrap a merely unfamiliar item just because a tier list ranks it below average. A run may need movement, healing, proc chance, or defense more than it needs another damage item. The best Scrapper decision is about the next fight and the next printer, not a universal keep-or-delete list.
Drones and battlefield helpers
Repairing a drone converts gold into a companion. Gunner, Missile, Incinerator, Equipment, Emergency, and Healing Drones fill different jobs, while turrets and DLC drones add more specialized help. A drone can be a good purchase when the stage is crowded or when the survivor's kit benefits from extra targets, but it is not free damage: it costs gold and can die.
Alloyed Collective adds Transport Drone, Junk Drone, Cleanup Drone, Jailer Drone, Barrier Drone, Bombardment Drone, Freeze Drone, and new shops such as the Triple Drone Shop. It also adds Drone Scrapper and Drone Combiner. The expansion's official notes describe Remote Operation as a multiplayer safety valve: a dead player can pilot an ally drone until revival through a stage transition or Seeker's Meditate.
Gearbox's Alloyed Collective launch trailer shows the Drifter and Operator survivor cards at 0:22, then a "New Drones" banner over a tunnel full of drones at 0:25 and the new items at 0:40. It is the quickest look at what the drone machines feed.
That makes drone interactables part of the co-op economy rather than decoration. A full lobby should decide who gets an equipment drone, who repairs a high-value combat drone, and when to leave an expensive machine behind so the Teleporter can start. The Risk of Rain 2 bosses and Alloyed Collective guide covers the expansion's broader route context.
Portals and environment-specific objects
Not every useful object is a purchase. Newt Altars spend a Lunar Coin to open the Blue Portal to the Bazaar Between Time. The Artifact Portal leads to Bulwark's Ambry, the Celestial Portal leads to A Moment, Fractured when available, and the Void route uses its own portals and realms. These objects change the destination of a run, so use the Risk of Rain 2 stages guide before assuming a portal is an optional side room.
Environment-specific objects also carry survivor unlocks and achievement conditions. Examples include the Fuel Array route to REX, the pressure plates in Abandoned Aqueduct, the Alloy Vulture Nests in Siren's Call, the Compound Generator in Sky Meadow, the Glass Frog in Commencement, and the Halcyon objects added by DLC routes. The current survivor guide tells you who the route unlocks; this page's rule is to identify the object before spending the resource it asks for.
What is not in the system
Risk of Rain 2 has no persistent base-building, workshop crafting tree, or town economy. Item combination exists in specific objects such as the Scrapper, printer, cauldrons, and the Alloyed Collective machines, but there is no free-form recipe book. That is why a generic “crafting guide” would be a poor fit for this cluster. The real search intent is “what does this object do?” and “should I spend this item here?”
The distinction also prevents a common mistake: treating gold, Lunar Coins, and items as interchangeable currencies. Gold is run-local and funds most stage purchases. Lunar Coins persist and open specific Lunar interactions. Items are build power, and converting one into scrap is a strategic loss even when the result is useful.
Common interactable mistakes
- Printing before scrapping. This is the fastest way to lose a good item to a random same-rarity draw.
- Spending all gold at the first chest. Keep enough flexibility to buy the object that solves the next fight.
- Using Blood at low health. Gold cannot repair a run that the shrine's health cost already ended.
- Activating Mountain without a boss plan. More Teleporter bosses can turn a good reward into a failed event.
- Treating a Portal as free time. Every alternate realm changes the route and may remove the normal ending.
- Assuming DLC interactables are universal. Read the object name and check which expansion adds it.
Our take
We'd keep it simple: scrap, then print, and spend the rest of a stage's gold on whatever makes the next Teleporter fight shorter. Shrine of Chance is for spare gold, Blood is for spare health, and Mountain is for a run that is already ahead and has the damage for the Mithrix fight later. Skip the Shrine of Order unless the build is already lost, and don't strip a stage bare when the clock is the real cost.
How we checked this
- On 2026-10-15 we read the Risk of Rain 2 wiki (riskofrain2.wiki.gg) pages for Interactables, 3D Printers, Scrapper, every shrine in the table, Altar of Gold, Cleansing Pool, Newt Altars, Drones, Alloyed Collective and Hallowed Concepts as raw wikitext.
- We watched Gearbox's Alloyed Collective launch trailer and took frames every three seconds.
- We didn't replay stages for this update; costs and odds are the wiki's.
Frequently Asked Questions
What does a Scrapper do?
It turns the item you pick into scrap of the same rarity, up to 10 stacks of it per use. Lunar, Equipment, Void and Meal items can't be scrapped.
How does a 3D Printer work?
It produces the displayed item and consumes a random same-rarity item from your inventory. Scrap is used before regular items.
Should I use Shrine of Chance?
Only when the possible reward is worth the gold and a failed roll will not block a better guaranteed purchase.
What does Shrine of the Mountain do?
It increases the number of bosses in the next Teleporter event and improves the event's reward.
Is there crafting in Risk of Rain 2?
There is no general crafting or base-building system. The run economy is built around gold, Lunar Coins, item conversion, shrines, drones, and route objects.
Which DLC adds new interactables?
Survivors of the Void, Seekers of the Storm, and Alloyed Collective each add objects. Alloyed Collective added the Drone Scrapper, Drone Combiner, Temporary Item Distributor, Triple Drone Shop and Access Node. Hallowed Concepts, the newest expansion, added nine more, including the Hallowed Shrine, Shrine of Compulsion, Shrine of Descent and the Ritual Gong.
Related Reading
- Risk of Rain 2 Complete Guide: the cluster hub for survivors, items, stages, bosses, DLC, and mods.
- Risk of Rain 2 Items and Artifacts Guide: item tiers, artifacts, and the objects that reshape a build.
- Risk of Rain 2 Stages Guide: Maps, Loops and Routes: route choices, hidden realms, and portals.
- Risk of Rain 2 Eclipse Guide: All 8 Modifiers Explained: why health, healing, gold, and risk trades change at higher difficulty.
- Risk of Rain 2 Achievements Guide: 205 Challenges Explained: Shrine, printer, portal, and survivor unlock conditions.
- Risk of Rain 2 Bosses and Alloyed Collective DLC Guide: current expansion machines and route context.
References
- Risk of Rain 2 wiki: Interactables: current object categories, shrines, drones, printers, scrappers, and DLC additions.
- Risk of Rain 2 wiki: 3D Printers: printer input and output behavior.
- Risk of Rain 2 wiki: Scrapper: scrap limits and excluded item categories.
- Risk of Rain 2 on Steam: official game and DLC context.
- Risk of Rain 2 Steam Global Achievements: current interactable-related completion goals.
- Risk of Rain 2 wiki: Hallowed Concepts: the newest expansion's interactables.
- Risk of Rain 2: Alloyed Collective Launch Trailer: Gearbox's YouTube channel
Was this guide helpful?
About the author

Systems & Economy Desk
GameBrief's byline for roguelikes, strategy and simulation. Reads patch notes, wiki tables and Steam stats and puts the numbers on the page.
- Roguelikes, strategy and simulation
- Builds, progression and economy
- Sources listed per article
Keep reading

Risk of Rain 2 Acolyte and Enforcer: Every Skill and Unlock
General · 9 min

Risk of Rain 2 Mithrix Guide: All 4 Phases and Escape
General · 15 min
Risk of Rain 2 Eclipse Guide: All 8 Modifiers Explained
General · 10 min

Risk of Rain 2 Simulacrum Guide: Waves and Rewards
General · 10 min

Risk of Rain 2 Stages: Which Maps Appear at Stages 1 to 5
General · 16 min
Risk of Rain 2 Prismatic Trials Guide: Seed and Rewards
General · 9 min
Sponsored
More game deals
Disclaimer
This article is published for informational and entertainment purposes. It does not constitute professional financial, legal, or technical advice. Game performance, online services, patch schedules, and store listings change. Verify critical details (pricing, system requirements, regional availability) with publishers and storefronts before you buy. Affiliate links, where present, help support our editorial work and are labelled in our affiliate disclosure.