
GameBrief · General
Emberward Guide: Maze Builds and Tower Priorities (2026)
Reviewing
Emberward
Refic Games · Refic Games
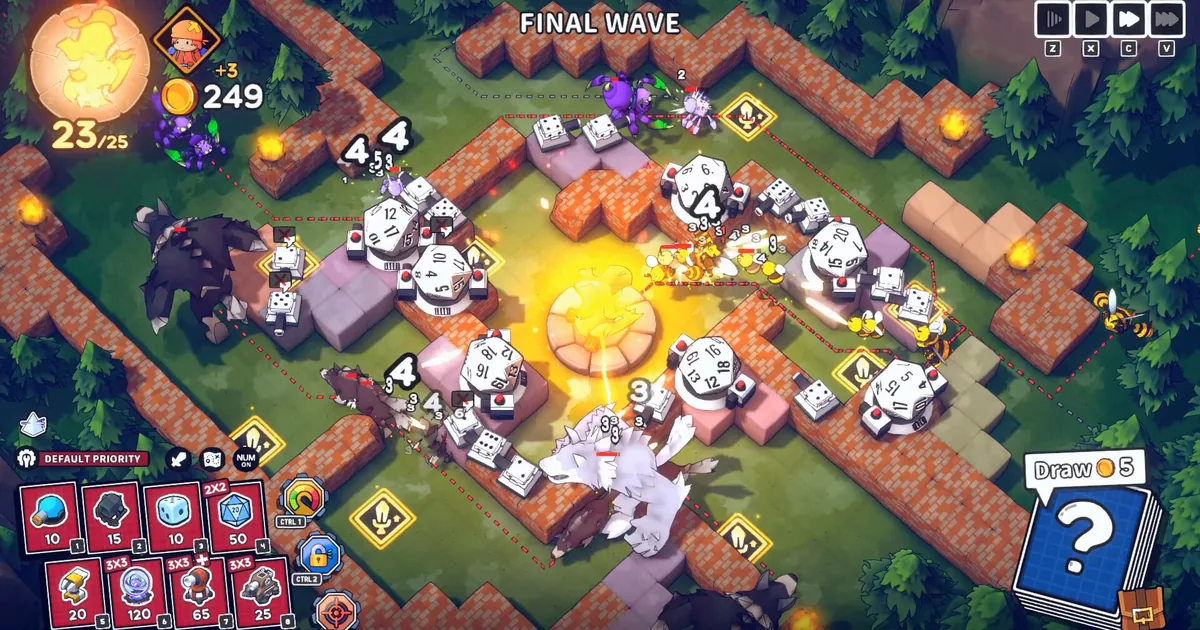
Emberward guide advice starts with one rule: build the enemy route before you build the damage. Refic Games' tower defense roguelite has reached 1.0, and its central puzzle is still the relationship between tetromino-shaped block cards, tower footprints, and the time enemies spend inside a tower's range.
This is a practical 1.0 guide for first runs and early clears. It covers the maze decisions that matter before wave one, how to choose tower roles when the shop or card draw is random, and what the Void Depths update changes. It does not pretend that a fixed damage ranking will stay accurate after the next balance patch.
TL;DR: Build a long route with repeated passes through the same firing lanes, then place small reliable towers before committing space to 2x2 and 3x3 pieces. Use runes and relics to strengthen a plan instead of spreading every element across the board. Emberward is now a full 1.0 release with five campaign regions, the Void Flame, 100 achievements, and the new Volcano and Sentry towers.
Emberward guide: what is the right first-run plan? (quick answer)
The best first-run plan is a switchback or spiral route with a few concentrated firing lanes. Start with small towers that cover those lanes, leave room for one large footprint, and spend new blocks on route length before adding decorative detours. The route is the build. Towers only convert that route into damage.
Emberward guide: key takeaways
- Draw the route first. A tower cannot compensate for a maze that gives every enemy one quick pass.
- Keep the early path readable and extend it in sections. A half-finished maze is safer than a grand plan that leaves the fire source exposed.
- Use small footprints to stabilize the first waves, then place 2x2 and 3x3 towers where their size will create a real coverage advantage.
- Treat runes as part of the build. A range or damage bonus is worth more on a tower that sees the lane repeatedly.
- Give different towers different jobs. Single-target, area damage, path coverage, and tracking are not interchangeable.
- Check the next wave before spending all your currency. The next enemy type should influence whether you draw, build, upgrade, or save.
- The 1.0 game has five campaign regions. Void Depths is the new fifth region, and clearing it on Normal difficulty or higher unlocks Void Flame.
Overview: what changed in Emberward 1.0?
Emberward 1.0 is the finished release that adds a fifth campaign region and expands the endgame systems around it. The current Emberward Steam page lists the game as released on September 17, 2026 by Refic Games, with an introductory US price of $16.99, down 15% from $19.99 through October 1. The page showed an Overwhelmingly Positive English rating at 97% from 2,576 reviews when checked on September 21.
The update's largest addition is Void Depths. The official launch notes describe a region built around void zones, portals, support items from the Academy, and a corruption source deep in the area. Clearing Void Depths on Normal or higher unlocks Void Flame. The update also adds 15 achievements, bringing the game to exactly 100, plus Volcano Tower, a 3x3 piece that fires magma orbs, and Sentry Tower, a 1x1 tower that enters Alert Mode after waiting without attacking.
Basic Tower is retired in 1.0. That is an easy detail to miss if you learned the game from older videos or Early Access guides. The rest of the game still follows the same broad loop: build a maze before battle, place towers on the blocks, add runes after a battle, collect relics and tower cards, and use talents to improve future runs. The official launch trailer shows the density that late runs can reach, but it is the route underneath that density that decides whether the board holds.
The developer's own summary of the new region is the right way to think about the whole game: 1.0 "brings the focus back to what Emberward was all about: maze building." That is why this Emberward guide treats tower choice as a placement problem before it treats it as a damage problem.
Step-by-Step: build a maze that buys tower time
An effective Emberward maze gives enemies several meaningful passes through your defense without leaving the fire source open during construction. Build in layers: establish a route, stabilize its first firing lane, then add length and larger tower pockets as the economy allows.
1. Read the entrances and the fire source: Before spending anything, trace where enemies can enter and where they must reach. Mark the likely final approach to the fire source in your head. Your safest first block is one that turns that approach into a lane a tower can see, not one that merely makes the board look longer.
2. Sketch a switchback before locking the route: Community players repeatedly recommend a zigzag, switchback, or spiral shape because it makes enemies cross the same defensive bands more than once. The official game description confirms that blocks change the monster route and tower positioning; the exact shape is a strategy choice, not a required blueprint. If the starting terrain does not support a full spiral, build two parallel lanes with a turn at the end.
3. Place the first small towers on repeated lanes: Use your first low-footprint towers where the route turns or doubles back. Do not put every tower beside the spawn point. A tower that fires for one short stretch may look busy while a tower in the middle of a switchback gets several chances at the same group. Keep one reliable piece close enough to the fire source to catch anything that survives the first line.
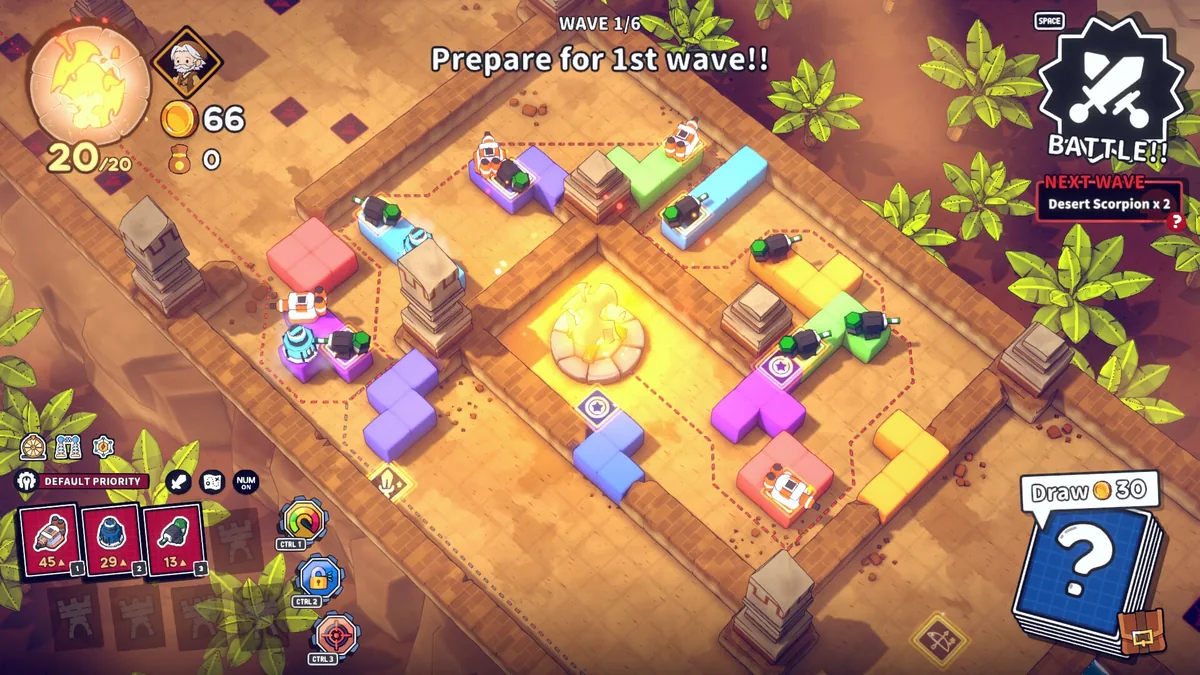 An early desert board shows the useful starting question: where can a small set of towers cover the route more than once?
4. Buy route length before visual symmetry: When you have enough currency for another block or a new tower, ask which purchase increases time on target. A block that creates a second pass for an existing tower usually has more immediate value than a new tower placed at the end of a short lane. A neat rectangle is not a strategy. It is just a neat rectangle.
5. Reserve space for one large footprint: Tower cards can occupy different shapes, including 1x3, 2x2, and 3x3 footprints. Put down small pieces first, but do not fill every useful tile. Leave a pocket where a larger tower can sit beside a long lane without closing the path. If a 3x3 tower is part of your plan, build the surrounding route first and place the large card after you know which tiles must remain open.
6. Add a second job before adding a third element: Once the first lane works, add a complementary role. Pair a single-target tower with area damage, or pair raw damage with slowing or path coverage. The store page specifically calls out Poison Towers that span monster paths, Drone Towers that track enemies, and D20 Towers whose damage rises with the roll. Those descriptions are more useful than a universal tier list because each piece solves a different board problem.
7. Check targeting before the next wave starts: The game shows a priority control near the tower cards. Use it to distribute damage rather than letting every tower overkill the first enemy in line. A few towers should keep pressure on the front of the wave, while others should reach tougher or farther-back targets. If a lane is failing, watch where the surviving enemy was when it escaped. That tells you whether you needed more range, more path length, or a different target priority.
This sequence also explains why a copied build can fail. The same tower cards behave differently on a tight map, a wide map, or a board with a bad entrance. Copy the decision order, not the screenshot.
GODEEPER: Shapez 2 also rewards players who treat layout as the real build system, though its problems are production flow rather than enemy pathing. Shapez 2 Tips Guide: Beginner Factory Planning →
Emberward guide: tower priorities by role, not a fixed tier list
The useful tower ranking in Emberward is situational. Sniper is valuable when a long sightline lets it stay on a large enemy, while Fireball is valuable when a route keeps groups together. The developer uses those two examples in the 1.0 balance notes, which is a better framework than claiming one tower is always S tier.
Reliable coverage for the first waves
Prioritize a cheap, dependable tower that can cover a turn or a straight lane without demanding the entire maze. The early goal is to survive while drawing more blocks and cards. A generalist that is slightly less exciting than the largest card is often the correct first purchase because it starts earning time immediately.
This is also where the old Basic Tower assumption causes confusion. Basic Tower was removed in 1.0, so a guide or video that tells you to build it is describing an earlier version. Read the card that is actually in your hand and ask what lane it can cover before assuming an old opening still applies.
Single-target damage for large enemies
Use a long-range or high single-target option on a lane that stays visible for a long time. Sniper is the clearest official example. It wants distance, a stable route, and a target that will remain alive long enough for repeated shots to matter. Do not hide it behind a short corner where it sees the wave for one second.
Large-target towers are especially good near the middle or end of a route when another tower has already thinned smaller enemies. If your single-target card is doing all the work at the entrance, the rest of the maze is probably not contributing enough.
Area damage and path-spanning control
Fireball represents the area-damage role in the developer's 1.0 explanation. It wants clumped enemies and a route that forces groups to travel together. Poison Towers serve a different path-spanning role, applying their effect across monster paths rather than simply firing at one target. Place these where the route feeds enemies into a predictable line.
The test is simple: if enemies spread out before reaching the tower, the area option loses value. If they bunch up on every turn, it gains value. This is why a tier list written without the board in view is misleading.
Tracking, luck, and the new 1.0 pieces
Drone Towers track enemies, giving you a way to pressure targets that do not stay in a clean lane. D20 Towers trade certainty for a damage roll, and the official store description says a higher number means higher damage. Use them where the surrounding defense can cover an unlucky result instead of making the whole run depend on one roll.
Volcano Tower is a new 3x3 1.0 option that fires magma orbs and has a high chance to apply burning. It needs room, but it can be worth the footprint when several routes feed into its range. Sentry Tower is the opposite kind of commitment: a 1x1 piece that waits, then greatly increases attack speed when a monster appears. Its small footprint makes it easier to fit into a cramped board, but it still wants a route that gives its alert window something to hit.
The Lost Castle 2 Frozen Cave Mage Tower guide is a useful comparison for readers who enjoy building around one unusual tower. The games do not share a ruleset, but both reward asking what a large or specialized piece needs from the room around it.
Runes, relics, and talents: spend around a plan
Runes are the part of Emberward's progression that turns a decent route into a build. After battles, the game lets you add runes to block cards. Those runes can improve towers, grant blocks special abilities, or change their size, so the right question is not whether a rune looks strong in isolation. The question is whether it improves the lane that already wins your run.
Start by pairing the bonus with the tower's job. A range bonus belongs on a tower that is blocked by corners or needs to cover a second pass. A damage or attack-speed effect is more valuable on a tower that already has uptime. A large block bonus is useful when it creates a tower pocket or extends a route, but it can also close the only path to the fire source if you place it without checking the new shape.
Relics and talents should follow the same rule. If your board is built around area damage, do not spend every later pick on a single-target upgrade simply because its number is larger. If your route is short, range can matter more than raw damage. If your route is long and enemies stay bunched, an area effect can outperform a second generalist.
The icy official screenshot below makes the point visually. The board has portals, rune-marked tiles, several large towers, and a next-wave preview. A build like this is not strong because every tile is filled. It is strong because the route, the bonuses, and the tower footprints are making the same decision together.
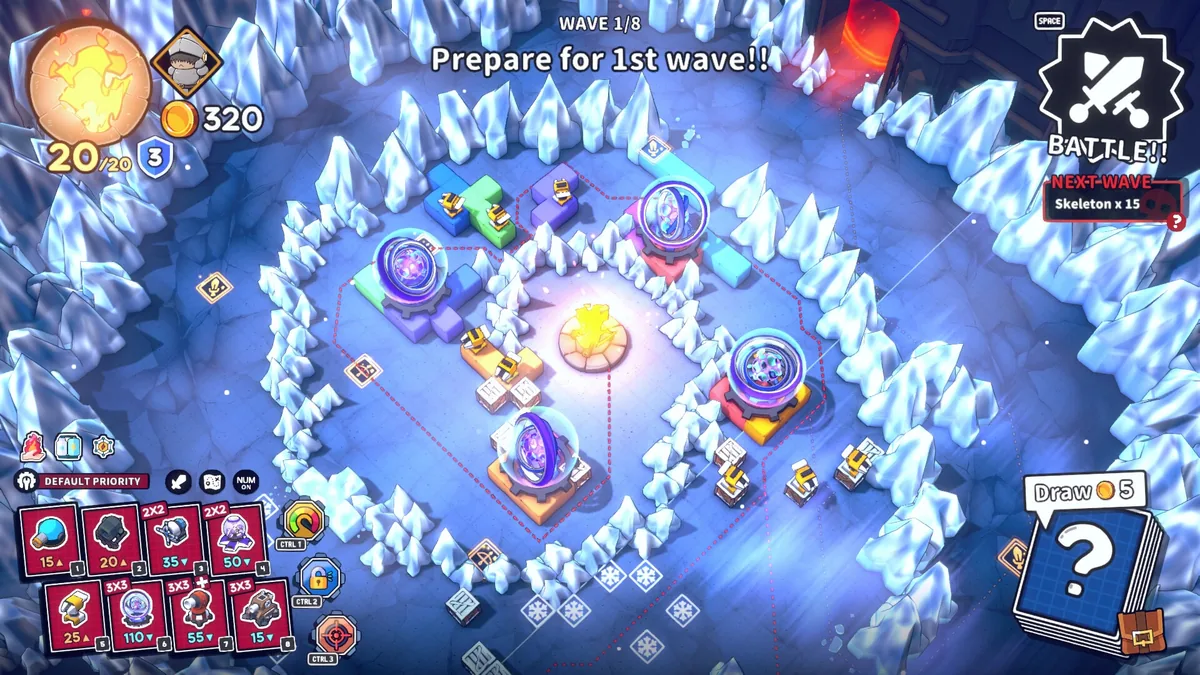 Portals, rune tiles, and large tower footprints make the route itself part of the build in an icy region.
GODEEPER: If you prefer planning a build around upgrades and synergies instead of path geometry, Rift Wizard 3 Builds Guide: Best Synergies → covers a more spell-focused version of the same roguelite problem.
Emberward guide for Void Depths and the 1.0 endgame
Void Depths is the fifth campaign region and the main reason older Emberward advice needs a 1.0 qualifier. The official launch notes say the area uses void zones, portals, support items borrowed from the Academy, and a final corruption source. The map asks you to think about route length in places where ordinary wall placement is not enough.
Do not rebuild your entire early-game approach around an endgame screenshot. The basic order still works: identify the route, protect the first firing lane, preserve a large-tower pocket, and use runes to strengthen a repeated pass. Void Depths adds more route questions. It does not remove the need to solve the route first.
Clearing the region on Normal or higher unlocks Void Flame. The launch update also temporarily changes access to Special Event Characters and Infernal Shards for players who had unlocked them during Early Access, then restores them after the new region is cleared. That is progression context, not a reason to rush the region before your regular maze fundamentals are stable.
The Rift Wizard 3 late-game guide is a good adjacent read if the part you enjoy is pushing a run beyond the point where the basic build works. For a broader roguelite comparison, the Best Indie Roguelites list places Emberward's maze-building loop beside other current options.
Common mistakes in Emberward
Most failed Emberward runs are caused by spending space in the wrong order. Fix the board before you chase a different tower card.
- Maxing path length while losing coverage: A longer route is only useful when towers can see it. Draw the path on paper or with the game's planning tools, then place a tower where the route turns back into view.
- Filling every tile with small towers: Small pieces solve early problems, but a board with no open 2x2 or 3x3 pocket cannot use the cards that might carry later waves. Keep one construction area free.
- Building every tower at the entrance: The first enemy is not always the most important target. Put some coverage in the middle and save a final piece near the fire source for leaks.
- Ignoring the next-wave preview: The next enemy group tells you whether the immediate problem is crowd control, single-target damage, or more time on the route. Spend after reading it.
- Copying Early Access advice into 1.0: Basic Tower is retired, Void Depths is new, and the game now has 100 achievements. Old videos can still teach the route concept, but they are not a current card list.
- Treating a numeric tier list as permanent: The official balance notes explain that towers are judged by how difficult their ideal use is. A specialized tower can be better than a generalist on one board and worse on the next.
Tips for steadier clears
The fastest way to improve is to review where the first enemy leaked and change one part of the route on the next attempt. That single comparison teaches more than replacing the whole tower loadout.
- Keep your best damage lane long enough to see the same enemy group twice.
- Build large towers after the route has a stable shape, not before. Moving a 3x3 plan is expensive in space.
- Put a range-dependent tower where the route bends around it. Straight lanes often waste its extra reach.
- Use one fallback tower near the fire source. It is not glamorous, but it turns a nearly solved wave into a recoverable one.
- If your area damage is underperforming, check whether the maze is separating enemies before they reach it.
- If your single-target tower is underperforming, check whether it is wasting shots on small enemies or losing line of sight at a corner.
- When a rune changes a block's size, redraw the route before the next battle. The new footprint can close a lane that looked safe one turn earlier.
The Shapez 2 automation guide makes a similar point about bottlenecks: the visible machine is rarely the whole problem. In Emberward, the bottleneck is the amount of useful tower time your path creates.
Frequently Asked Questions
What is the best maze shape in Emberward?
Build a route that makes enemies pass the same tower positions more than once, usually through switchbacks or a loose spiral. A longer path is useful only when your towers can actually see it.
What towers should beginners use in Emberward?
Start with a mix of reliable coverage, one long-range or single-target tower, and one area or control option. Sniper and Fireball are official examples of different strengths, while Poison, Drone, and D20 towers fill distinct roles.
How do tower sizes work in Emberward?
Towers occupy different footprints, including 1x3, 2x2, and 3x3 shapes. Plan the block layout around the largest tower you want to use, because a powerful tower is useless if its footprint closes your route.
What changed in Emberward 1.0?
Version 1.0 added the Void Depths region, Void Flame, 15 achievements, Volcano Tower, Sentry Tower, and several system changes. The update also retired Basic Tower and brought the game to exactly 100 achievements.
How do runes work in Emberward?
After battles, runes can enhance towers, give block cards special abilities, or double a block's size. Place the right block under a tower that sees repeated enemy passes so the bonus affects the part of the defense doing the most work.
Is Emberward an Early Access game?
No. Emberward released out of Early Access on September 17, 2026 after its Early Access period began in June 2024. Refic Games says it will continue updating the 1.0 game.
Related Reading
- Shapez 2 Complete Guide Hub: the site's wider factory-building cluster, useful if the layout puzzle matters more to you than combat.
- Lost Castle 2 Builds Guide: another roguelite reference for turning a random run into a coherent plan.
- Risk of Rain 2 Items and Artifacts Guide: a comparison point for how random upgrades reshape a run.
- Iron Nest Heavy Turret Simulator Review: a more direct turret-defense comparison with a different approach to positioning.
- Rift Wizard 3 Beginner Tips Guide: early-run advice for a turn-based roguelite where build choices also compound over time.
- Shapez 2 Blueprint Library Guide: a layout-focused reference for saving and reusing designs.
- Shapez 2 Manufacture Mode Guide: another example of choosing a production shape around its constraints.
- Rift Wizard 3 Spell Guide: a role-based way to compare specialized tools instead of forcing one ranking.
- Risk of Rain 2 Survivors Guide: an adjacent read on adapting a run to the options that appear.
- Lost Castle 2 Weapons Tier List: a comparison for readers who still want category-level prioritization.
- Tabletop Tavern Advanced RTS Strategy: another route-planning reference for a roguelike strategy game.
- Cursemark Weapons Tier List: a different take on ranking tools when context changes their value.
- Slay the Spire 2 Beginner Guide: a broader roguelite primer on preserving a coherent run plan.
References
- Emberward on Steam: current US price, review snapshot, features, tower examples, and release status.
- Emberward 1.0 Is Out Now: official launch notes for Void Depths, Void Flame, the 100-achievement total, new towers, and 1.0 changes.
- Emberward v0.4.10 update notes: official tower, control, pathfinding, and interface update context.
- Refic Games official site: developer link listed on Steam.
- Emberward 1.0 Launch Trailer: official Refic Games video uploaded after the 1.0 release.
- r/emberward: community strategy discussions used as player-advice context, not as an official mechanic reference.
Was this guide helpful?
About the author

Senior Critic & Analyst
Former game data analyst turned critic with 11 years covering indie and mid-tier games. Based in Austin. Runs spreadsheets on games most people just play.
- 11 years games criticism
- Former game economy analyst
- Roguelike and strategy specialist
Keep reading


Disclaimer
This article is published for informational and entertainment purposes. It does not constitute professional financial, legal, or technical advice. Game performance, online services, patch schedules, and store listings change. Verify critical details (pricing, system requirements, regional availability) with publishers and storefronts before you buy. Affiliate links, where present, help support our editorial work and are labelled in our affiliate disclosure.
Comments
Loading comments…